45
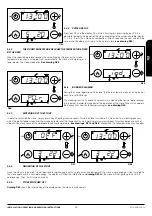
By pressing the key
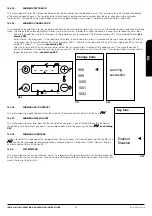
the display lights up and the main screen appears (
see drawing D64
):
San 14:26
D
Er02
Off
20º
18
º
º
M
M
L
R
Remote
Time and Date
Chrono Enable
Radio Room Temperature
Combustion Power
Heating Power
Air Flow Direction
Battery Charge
Error Code
State System
Room Radio Thermostat
Radio Configuration
D64
Mon 13:22
OFF
22º
18
º
º
D65
10.3.
USER MODE
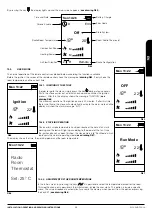
The normal operation of the remote control is explained below according the functions available.
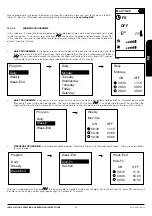
Before the ignition, the screen of the remote control shows the message of
drawing D65
. It only shows the
room temperature and the current time.
Mon 13:22
Ignition
22º
18
º
º
D66
10.3.1. IGNITION OF THE STOVE
In order to ignite the stove, simply press the key during a few seconds.
Firstly, the stove carries out an initial check-up and continues the ignition
process. After this, the display shows the message “IGNITION” (
see
drawing D66
).
The maximum duration of the ignition phase is 20 minutes. If after this time
there is not flame, the stove will automatically activate the alarm state and the
display will show the alarm message “Er12”.
Mon 13:22
Run Mode
22º
18
º
º
D67
10.3.2. STOVE IN OPERATION
Once certain smoke temperature has been reached, the hot air fan starts
working and the leds will light up according to the power of the fan. Once
the ignition phase has been finished, the stove enters into “Run Mode” which
represents the normal operating mode (
see drawing D67
).
The display shows the time, the working power and the room temperature.
Mon 13:22
Radio
Room
Thermostat
Set: 25º C
D68
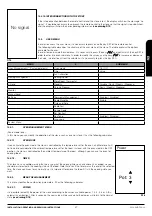
10.3.3. ADJUSTMENT OF THE ROOM TEMPERATURE
In the initial screen, by pressing the keys
it is possible to select the temperature desired for the room.
This modification is only possible in the initial screen, inside the user menu. This option is inside a specific
menu. The value introduced is automatically saved in the memory when you exit from this option or pressing
the key SET (
see drawing D68
).
EN
INSTALLATION, OPERATING AND SERVICING INSTRUCTIONS
ELSA AND PAULA
Summary of Contents for ELSA Y PAULA
Page 28: ...27 ES INSTRUCCIONES DE INSTALACIÓN USO Y MANTENIMIENTO ELSA Y PAULA ...
Page 54: ...53 EN INSTALLATION OPERATING AND SERVICING INSTRUCTIONS ELSA AND PAULA ...
Page 82: ...81 FR INSTRUCTIONS D INSTALLATION D UTILISATION ET D ENTRETIEN ELSA ET PAULA ...
Page 108: ...107 PT INSTRUÇÕES DE INSTALAÇÃO USO E MANUTENÇÃO ELSA E PAULA ...
Page 109: ...108 PT INSTRUÇÕES DE INSTALAÇÃO USO E MANUTENÇÃO ELSA E PAULA ...
Page 135: ...134 IT ISTRUZIONI DI INSTALLAZIONE USO E MANUTENZIONE ELSA E PAULA ...
Page 143: ...142 13 2 PAULA 1507 519 196 269 203 197 9 4 553 519 197 283 40 8 0 1507 203 197 9 4 519 FT ...
Page 152: ...NOTAS NOTES NOTES ANOTAÇÕES ANNOTAZIONI ...


