background image


GAT Handheld Coder GAT Pro+ User Manual 

©2016 Bimmer Retrofit Inc. 


Should 

ENET or ICOM remote connection

 be required the device will need to be connected 

to internet via local LAN (part of the OBD cable) or WiFi dongle. GAT Coder supports 
connection over internet via port 6801, 6802 and 50160 to remotely connected vehicles. 
At the vehicle side appropriate port should be opened and forwarded to the vehicle’s IP. 

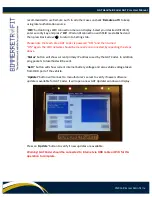
Choose desired connection (ICOM or ENET), type in IP address of the remote internet 
host with vehicle’s port forwarded and type in port (default 6801). Press “

Connect

” 

button once all information is entered. Device will attempt to connect remotely to the 
vehicle. Once connection is established, vehicle information will appear in the Primary 
Information Display. 

If for any reason connection cannot be established the “

Connect

” button will become 

RED and error information will be shown in Primary Information Display. 

When connection is successfully established, the “

Connect

” button will change to 

Disconnect

” and will become GREEN. 

If “

Disconnect

” button is pressed, the current connection will be cancelled. 


Menu Navigation 

On-screen menu has a tab structure. Each tab has a name associated with it. When a 
particular tab is selected, the new tab page will be opened on display. 

Summary of Contents for GAT Handheld Coder Pro+

Page 1: ...BMW AND VAG VEHICLES DO NOT OPERATE HANDHELD UNDER THE RAIN BECAUSE THIS DEVICE IS NOT WATER RESISTANT AND CAN BE DAMAGED BY WATER DO NOT USE ANY SHARP OBJECTS TO OPERATE A TOUCHSCREEN USE FINGER OR PLASTIC SIDE OF A PEN TO TOUCH THE ONSCREEN BUTTONS DO NOT PUSH HARD ON THE TOUCHSCREEN AS IT MAY DAMAGE THE SURFACE HANDHELD CAN ONLY BE CONNECTED TO THE VEHICLE USING SPECIAL OBDII CABLE OR TO THE PC...

Page 2: ...ice connection and start up 6 Vehicle SWT tasks FSC Certificates eFSC 9 SWID tab 9 FSC tab 10 Cert tab 11 eFSC tab 12 FDL Coding 13 FDL tab 13 ASAP 15 ASAP tab 15 Tools 16 Tools tab 16 DTC 17 DTC tab 17 Settings 18 Settings tab 18 Additional wiring set 20 Online scripts editor 21 Technical Specifications 24 Contact Us 24 ...

Page 3: ...be used in future firmware versions 2 SIM card Slot not included Not used in this version This version of GAT is equipped with WiFi USB Modem 3 Micro SD Card slot not used can be used as an additional disk drive or for other purposes In this version of the GAT this slot can be used in future firmware versions 1 Power Button 2 OBD II ENET Port 3 Service Button 4 5 LCD display with capacitive touchs...

Page 4: ...ide of GAT WiFi dongle plugged into the Primary USB port at the left side of the unit is primary used for all communication with GAT server It also can be used as a secondary network card for remote work via ENET or ICOM types of connections Power Button Service Button OBD ENET port Secondary Micro USB Micro SD Card Slot SIM card ...

Page 5: ...ght is ON when battery is charging 2 Power ON green Green light is ON whenever the device is turned on 3 LED1 red and LED2 green are service indicators which may show specific status of device 4 LAN network activity lights show the primary LAN network status red and green 7 8 9 4 Warning Do not use other than manufacturer recommended USB WiFi dongles as this may cause incorrect device functionalit...

Page 6: ...for charging GAT Coder requires 12V 13 8V and at least 2A for charging of the internal battery Should simultaneous operation and charging of the GAT coder be required the power supply with at least 3 5A current and 12V 13 8V will be needed Whenever GAT Coder is connected to vehicle s OBD port it can be both charged and operated simultaneously Device connection and start up To turn ON the GAT Coder...

Page 7: ...is connected via the OBD cable to a vehicle This connection is always selected by default Simply connect OBD cable to vehicle and to GAT Coder make sure that vehicle ignition is ON and press CONNECT button on LCD of GAT Coder Device will start connection procedure with the vehicle Progress bar at the bottom right will show the percentage of completion of the process All information during connecti...

Page 8: ... in port default 6801 Press Connect button once all information is entered Device will attempt to connect remotely to the vehicle Once connection is established vehicle information will appear in the Primary Information Display If for any reason connection cannot be established the Connect button will become RED and error information will be shown in Primary Information Display When connection is ...

Page 9: ...ficate importation eFSC Easy FSC quick FSC importation FDL FDL Coding of the ECU using scripts ASAP Assistance portal for FSC and scripts downloading and management Tools Additional tools for use with vehicle s ECUs DTC Basic vehicle diagnostic and DTC code removal Settings Configuration tab Vehicle SWT tasks FSC Certificates eFSC SWID tab allows GAT Coder to read out current statuses of all FSC c...

Page 10: ...nd head unit bootloader code Additional technical information from head unit will be shown on Information Display FSC tab allows read check and write of FSC codes into head unit Each available FSC code can be selected with the radio button selector type Selected FSC code can be read and shown on the Information Display FSC code can then be saved on local storage inside of GAT by pressing Save butt...

Page 11: ...information about FSC code will appear at the top left corner FSC Date will show original FSC code creation date year month date FSC Type will show the creator Dealer or Factory and FSC VIN will show the VIN number of the FSC code Cert tab allows read check and write of the FSC codes certificates to head unit Cert tab is very similar to the FSC tab in the way it functions Each time certificate is ...

Page 12: ... appear on the display where you will be able to select an FSC code file from the internal GAT storage for importation As soon as selection is confirmed GAT Coder will automatically import and verify the FSC code Result will be shown on Information Display This procedure should be repeated for each of FSC code in new set In case when certificate for a selected FSC code should also be replaced the ...

Page 13: ...CU with the use of pre defined coding scripts Each script contains a list of commands for ECU configuration List of ECUs available for coding is shown at the left side of the screen Once the ECU from the list is selected current software version of the ECU will appear on the Information Display FDL Coding Procedure ...

Page 14: ... BMW only You should always load appropriate script for vehicle head unit which is currently connected 2 Select desired FDL script from local storage in the pop up window and press OK Script will be loaded to the GAT Coder and button Read FDL will become active By pressing this button the selected script will be parsed and current configuration of ECU will be read and temporary stored by GAT coder...

Page 15: ...ation Warning It is very important not to interrupt FDL coding process until it is completed Interruption or disconnection during FDL coding will cause damage to ECU and may require its replacement or special low level re coding re flashing ASAP ASAP tab allows user to download FDL scripts which were created in GAT Online system as well as to download FSC codes and manage local FDL scripts and FSC...

Page 16: ... GAT Get FSC button downloads FSC code for desired VIN number entered in VIN field Please note that the quantity of FSC codes you can download is limited by your particular GAT device plan Tools Tools tab contains additional service commands Direct commander sends some pre defined commands directly to ECU ECU can be selected from drop down menu Each ECU available in drop down menu is shown in hex ...

Page 17: ...tton GAT Coder will start reading all DTC trouble codes from each ECU This process can take a few minutes and depends on the quantity of DTC codes stored in the system Once DTC codes are read by GAT it is possible to view DTC error codes on the Information Display by using scroll on the right side of the Information Display Each DTC error code will include its manufacturer s standard number and ba...

Page 18: ... additional settings and GAT Coder functionality configuration Remote account enter your Username and Password that you used for registration at the GAT Online system and press Update button This information required by GAT Coder to access the GAT Online system in order to obtain FDL and FSC downloads and other tasks Remote auth checkbox should be checked in order for GAT Coder to perform authoriz...

Page 19: ... ON again the WiFi network should be manually re connected by repeating the steps above Status button will show current primary IP address used by the GAT Coder In addition ping packets to localhost will be sent Bat V button will show current internal battery voltage and also vehicle voltage taken from OBD port of the vehicle Updater button will connect to manufacturer s server to verify if newer ...

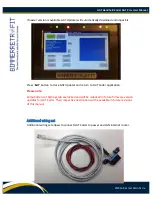
Page 20: ... to close GAT Updater and return to GAT Coder application Please note Some buttons of Settings tab are locked and will be unlocked in future firmware version updates for GAT Coder Their respective description will be available in future revisions of this manual Additional wiring set Additional wiring set allows to connect GAT Coder to power and LAN internet router ...

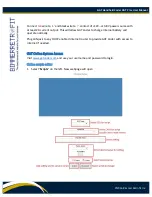
Page 21: ...rrent output This will allow GAT Coder to charge internal battery and operate normally Plug LAN jack to any DHCP enabled internet router to provide GAT Coder with access to internet if needed GAT Online System Access Visit www gatcoder com and use your username and password to login Online scripts editor 1 Select Scripts on the left New webpage will open ...

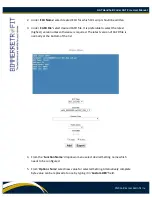
Page 22: ...referable to select the latest highest version unless otherwise is required The latest version of CAFD file is normally at the bottom of the list 4 From the Function Name dropdown menu select desired Setting name which needs to be configured 5 From Option choice select new value for selected Setting Alternatively complete byte value can be replaced at once by typing it in Custom HEX field ...

Page 23: ...etting that you want to include in the new script Do not change more than 35 settings at once i e in one script 7 Select correct vehicle series for this script E series or F series 8 Once all descried settings and their new values are added to the script press Export button Before pressing Export button make sure that vehicle series is selected correctly E series or F series ...

Page 24: ...sh 4Gb USB 1 Host high speed 1 OTG high speed Ethernet 100Mbit Wi Fi 802 11n Display TFT 5 800x480 Graphics controller Vivante GC880 Temperature 10 to 55 Celsius External power 12V 13 8V 2A minimum Power dissipation 2 9W Internal battery Li Ion 7 2V 850mA Weight 360g Dimensions 148x98x35mm Warranty 1 year from the sale date Contact Us Technical Support Sales Questions For any questions about the u...

Reviews: