background image


42

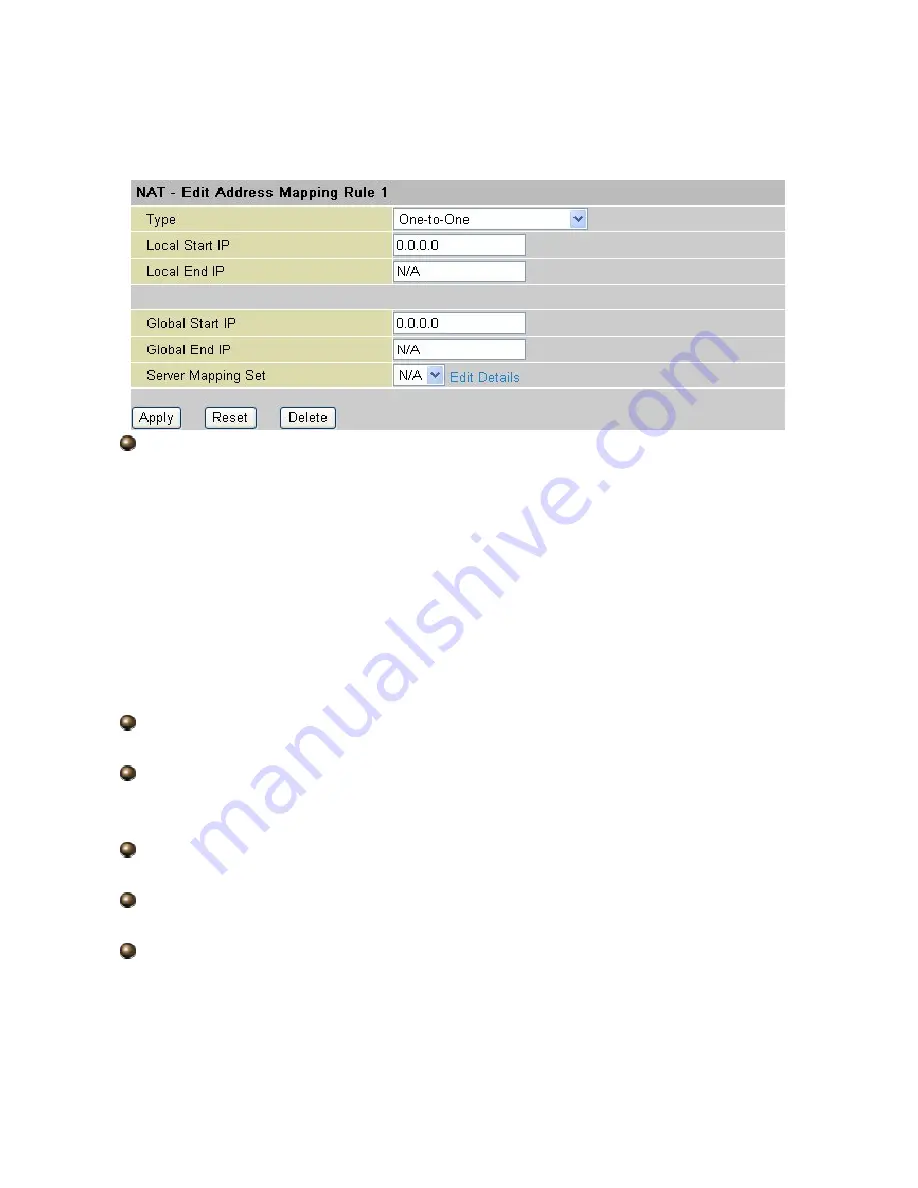
4.2.5.4 Editing an Address Mapping Rule 

To edit an address mapping rule, click the rule’s link in the NAT Address Mapping Rules 
screen to display the screen shown next. 


 Type: 

1-1: One-to-one mode maps one local IP address to one global IP address. Note that port 
numbers do not change for the One-to-one NAT mapping type. 
M-1: Many-to-One mode maps multiple local IP addresses to one global IP address. This is 
equivalent to Many to One (i.e., PAT, port address translation).


M-M Ov (Overload): Many-to-Many Overload mode maps multiple local IP addresses to 
shared global IP addresses. 
MM No (No Overload): Many-to-Many No Overload mode maps each local IP address to 
unique global IP addresses. 
Server: This type allows you to specify inside servers of different services behind the NAT to 
be accessible to the outside world.


 Local Start IP:

 This is the starting Inside Local IP Address (ILA). Local IP addresses are 

N/A


for Server


port mapping. 

 Local End IP:

 This is the end Inside Local IP Address (ILA). If your rule is for all local IP 

addresses, then enter 0.0.0.0 as the Local Start IP address and 255.255.255.255 as the 
Local End IP


address. This field is N/A


for One-to-one


and Server mapping types. 

 Global Start IP: 

This is the starting Inside Global IP Address (IGA). Enter 0.0.0.0 here if 

you have a dynamic IP address from your ISP. 

 Global End IP:

 This is the ending Inside Global IP Address (IGA). This field is N/A for 

One-to-one, Many-to-One


and Server mapping types. 

 Server Mapping Set:

 Only available when Type


is set to Server. 

Select a number from 1 to 10 from the drop-down menu to choose a server set from the NAT 
- Address Mapping Rules


screen. 

Edit Details: Click this link to go to the NAT - Edit Port Mapping rule


screen to edit a server 

set that you have selected in the Server Mapping Set field. 

Summary of Contents for BIPAC 5102 Series

Page 1: ...BIPAC 5102 Series 802 11g ADSL Modem Router User s Manual ...

Page 2: ...eb Browser 18 Chapter 4 19 4 1 Wizard Setup 20 4 1 1 Wizard Setup 20 4 1 2 PPPoE 21 4 1 3 1483 Routed IP 23 4 1 4 1483 Bridged IP 24 4 1 5 PPPoA 25 4 1 6 Wizard Setup Configuration 26 4 1 7 Wizard Setup Configuration 28 4 2 Advanced setup 29 4 2 1 Password 29 4 2 2 LAN 30 4 2 3 WAN Setup 32 4 2 4 Wireless 35 4 2 5 NAT 39 4 2 6 Security 43 4 2 7 Dynamic DNS 44 4 2 8 Time Zone 45 4 2 9 Remote Manage...

Page 3: ...ct supports PPPoA RFC 2364 PPP Point to Point Protocol over ATM Adaptation Layer 5 RFC 1483 encapsulation over ATM bridged or routed PPP over Ethernet RFC 2516 and IPoA RFC1577 to establish a connection with ISP The product also supports VC based and LLC based multiplexing It is the perfect solution to connect a small group of PCs to a high speed broadband Internet connection Multi users can have ...

Page 4: ...ers Virtual Service function allows the product to provide limited visibility to local machines with specific services for outside users An ISP Internet Service Providers provided IP address can be set to the product and then specific services can be rerouted to specific computers on the local network For instance a dedicated web server can be connected to the Internet via the product and then inc...

Page 5: ...Supports PPPoA RFC 2364 PPP over ATM Adaptation Layer 5 RFC 1483 encapsulation over ATM bridged or routed PPP over Ethernet RFC 2516 and IPoA RFC1577 to establish a connection with the ISP The product also supports VC based and LLC based multiplexing Quick Installation Wizard Supports a WEB GUI page to install this device quickly With this wizard end users can enter the information easily which th...

Page 6: ...tware is required for local computer The Automatic Reconnect and Disconnect Timeout Idle Timer functions are provided too Virtual Server User can specify some services to be visible from outside users The router can detect incoming service request and forward it to the specific local computer to handle it For example user can assign a PC in LAN acting as WEB server inside and expose it to the outs...

Page 7: ...d GUI for configuration and management It is user friendly and comes with on line help It also supports remote management capability for remote users to configure and manage this product Firmware Upgradeable Device can be upgraded to the latest firmware through the WEB based GUI Rich management interfaces Supports flexible management interfaces with local console port LAN port and WAN port Users c...

Page 8: ...6 1 3 Applications for the BIPAC 5102 Series ...

Page 9: ...102S Place the BIPAC 5102 Series on a stable surface Only use the power adapter that comes with the package Using a different voltage rating power adaptor may damage the router Attention Do not use the BIPAC 5102 Series in high humidity or high temperatures Do not use the same power source for the BIPAC 5102 Series as other equipment Do not open or repair the case yourself If the BIPAC 5102 Series...

Page 10: ... steady when there is a PPPoA PPPoE connection 2 ADSL Lit when successfully connected to an ADSL DSLAM linesync 3 LAN Port 1 4 Lit when connected to an Ethernet device Green for 100Mbps Orange for 10Mbps Blinking when data is Transmitted Received 4 SYS Lit when the system is ready 5 PWR Lit when power is ON ...

Page 11: ...device 6 seconds above restore to factory default settings this is used when you can not login to the router e g forgot the password 3 LAN Connect a UTP Ethernet cable Cat 5 or Cat 5e to one of the four LAN ports when connecting to a PC or an office home network of 10Mbps or 100Mbps 4 ADSL Connect the supplied RJ 11 telephone cable to this port when connecting to the ADSL telephone network 5 Power...

Page 12: ... devices connected to the same telephone line as your Billion router e g telephones fax machines analogue modems have a line filter connected between them and the wall socket unless you are using a Central Splitter or Central Filter installed by a qualified and licensed electrician and ensure that all line filters are correctly installed and the right way around Missing line filters or line filter...

Page 13: ...ve an IP address in the range of 192 168 1 1 to 192 168 1 253 The best and easiest way is to configure the PC to get an IP address automatically from the router using DHCP If you encounter any problems accessing the router s web interface it may also be advisable to uninstall any kind of software firewall on your PCs as they can cause problems accessing the 192 168 1 254 IP address of the router U...

Page 14: ...ork Connections 2 Double click Local Area Connection 3 In the Local Area Connection Status window click Properties 4 Select Internet Protocol TCP IP and click Properties 5 Select the Obtain an IP address automatically and the Obtain DNS server address automatically radio buttons 6 Click OK to finish the configuration ...

Page 15: ...Dial up Connections 2 Double click Local Area Connection 3 In the Local Area Connection Status window click Properties 4 Select Internet Protocol TCP IP and click Properties 5 Select the Obtain an IP address automatically and the Obtain DNS server address automatically radio buttons 6 Click OK to finish the configuration ...

Page 16: ...etwork and choose the Configuration tab 2 Select TCP IP NE2000 Compatible or the name of your Network Interface Card NIC in your PC 3 Select the Obtain an IP address automatically radio button 4 Then select the DNS Configuration tab 5 Select the Disable DNS radio button and click OK to finish the configuration ...

Page 17: ... 1 Go to Start Settings Control Panel In the Control Panel double click on Network and choose the Protocols tab 2 Select TCP IP Protocol and click Properties 3 Select the Obtain an IP address from a DHCP server radio button and click OK ...

Page 18: ... 1 254 Subnet Mask 255 255 255 0 ISP setting in WAN site PPPoE DHCP server DHCP server is enabled Start IP Address 192 168 1 100 IP pool counts 100 3 2 1 Username and Password The default username and password are admin and admin respectively Attention If you ever forget the password to log in you may press the RESET button up to 6 seconds to restore the factory default settings Attention ...

Page 19: ...Service Provider what kind of service is provided such as PPPoE PPPoA RFC1483 or IPoA Gather the information as illustrated in the following table and keep it for reference PPPoE VPI VCI VC based LLC based multiplexing Username Password Service Name and Domain Name System DNS IP address it can be automatically assigned by your ISP when you connect or be set manually PPPoA VPI VCI VC based LLC base...

Page 20: ...er the IP address of your router which by default is 192 168 1 254 and click Go a user name and password window prompt will appear The default username and password are admin and admin Congratulation You are now successfully logon to the BIPAC 5102 Series ADSL Router ...

Page 21: ...page including Wizard Setup wizard setup Advanced Setup Password LAN WAN Wireless NAT Security Dynamic DNS Time Zone Remote Management Control UPnP Static Route Current Route Maintenance System Status DHCP Table Diagnostic Firmware Logout Please see the relevant sections of this manual for detailed instructions on how to configure your Billion router ...

Page 22: ...ct the encapsulation type your ISP uses from the Encapsulation drop down list box Choices vary depending on what you select in the Mode field If you select Bridge in the Mode field select 1483 Bridged IP If you select Routing in the Mode field select PPPoA 1483 Bridged IP 1483 Router IP or PPPoE Multiplex Select the multiplexing method used by your ISP from the Multiplex drop down list box either ...

Page 23: ...rst wizard screen to display the screen as shown Service Name Type the name of your PPPoE service here User Name Enter the user name exactly as your ISP assigned Password Enter the password associated with the user name above IP Address Type your ISP assigned IP address in the IP Address text box below Connection Select Connect on Demand when you don t want the connection up all the ...

Page 24: ... and specify an idle time out in seconds in the Max Idle Timeout field Network Address Translation Select None Many to One or Many to Many from the drop sown list box Refer to the NAT chapter for more details ...

Page 25: ...ist box in the first wizard screen to display the screen as shown IP Address Type your ISP assigned IP address in the IP Address text box below Network Address Translation Select None Many to One or Many to Many from the drop sown list box Refer to the NAT chapter for more details ...

Page 26: ...the IP Address text box below Subnet Mask Enter a subnet mask in dotted decimal notation Gateway You must specify a gateway IP address supplied by your ISP when you use 1483 Bridged IP in the Encapsulation field in the previous screen Network Address Translation Select None Many to One or Many to Many from the drop sown list box Refer to the NAT chapter for more details ...

Page 27: ... Name Enter the user name exactly as your ISP assigned Password Enter the password associated with the user name above IP Address Type your ISP assigned IP address in the IP Address text box below Connection Select Connect on Demand when you don t want the connection up all the time and specify an idle time out in seconds in the Max Idle Timeout field Network Address Translation Select None Many t...

Page 28: ...e settings in the screen shown next To change the LAN information on the BIPAC 5102 Series click Change LAN Configurations If you want to change your BIPAC 5102 Series LAN settings click Change LAN Configuration to display the screen as shown next ...

Page 29: ... Off to disable DHCP server When DHCP server is used set the following items Client IP Pool Starting Address This field specifies the first of the contiguous addresses in the IP address pool Size of Client IP Pool This field specifies the size or count of the IP address pool Primary DNS Server Enter the IP addresses of the DNS servers The DNS servers are passed to the DHCP clients along with the I...

Page 30: ...gured in the Wizard Setup are correct 4 1 7 Wizard Setup Configuration The BIPAC 5102 Series automatically tests the connection to the computer s connected to the LAN ports To test the connection from the ADSL Router to the ISP click Start Diagnose Otherwise click Return to Main Menu to go back to the Site Map screen ...

Page 31: ...hat someone cannot adjust your settings without your permission Every time you change your password please record the password and keep it at a safe place Old Password Type the default password or the existing password you use to access the system in this field New Password Type the new password in this field Retype to confirm Type the new password again in this field ...

Page 32: ...n the Remote DHCP Server field in this case When DHCP is used the following items need to be set Client IP Pool Starting Address This field specifies the first of the contiguous addresses in the IP address pool Size of Client IP Pool This field specifies the size or count of the IP address pool Primary DNS Server Enter the IP addresses of the DNS servers The DNS servers are passed to the DHCP clie...

Page 33: ...55 0 Type the subnet mask assigned to you by your ISP if given RIP Direction Select the RIP direction from None Both In Only and Out Only RIP Version Select the RIP version from RIP 1 RIP 2B and RIP 2M Multicast IGMP Internet Group Multicast Protocol is a network layer protocol used to establish membership in a Multicast group it is not used to carry user data The BIPAC 5102 Series supports both I...

Page 34: ...up A WAN Wide Area Network is an outside connection to another network or the Internet And allows the user to set the configuration for the WAN ADSL ports To change BIPAC 5102 Series WAN remote node settings click WAN ...

Page 35: ...PoE Multiplex Select the method of multiplexing used by your ISP Choices are VC or LLC Virtual Circuit ID VPI and VCI define a virtual circuit VPI The valid range for the VPI is 0 to 255 VCI The valid range for the VCI is 32 to 65535 ATM QoS Type Select CBR to specify fixed always on bandwidth for voice or data traffic Select UBR for applications that are non time sensitive such as e mail Select V...

Page 36: ...tion only Service Name Type the name of your PPPoE service here User Name Enter the user name exactly as your ISP assigned Password Enter the password provide by your ISP Connection The schedule rule s have priority over your Connection settings Nailed Up Connection Select Nailed Up Connection when you want your connection up all the time Connect on Demand Select Connect on Demand when you don t w...

Page 37: ...ss LANs can be as simple as two computers with wireless LAN cards communicating in a peer to peer network or as complex as a number of computers with wireless LAN cards communicating through access points which bridge network traffic to the wired LAN 802 11g is only supported for the BIPAC 5102G ...

Page 38: ...ox RTS CTS Threshold Enter a value between 0 and 2432 Fragmentation Threshold Enter a value between 256 and 2432 WEP Encryption To prevent unauthorized wireless stations from accessing data transmitted over the network the router offers highly secure data encryption known as WEP If you require high security for transmissions there are two alternatives to select from 64 bit WEP and 128 bit WEP WEP ...

Page 39: ...exadecimal characters 0 9 A F You must configure all four keys but only one key can be activated at any one time The default key is key 1 4 2 4 2 MAC Filter The MAC filter screen allows you to configure the router to give exclusive access to up to 32 devices Allow Association or exclude up to 32 devices from accessing the router Deny Association Every Ethernet device has a unique MAC address The M...

Page 40: ...eny Association to block access to the router MAC addresses not listed will be allowed to access the router Select Allow Association to permit access to the router MAC addresses not listed will be denied access to the router MAC Address Enter the MAC addresses in XX XX XX XX XX XX format of the wireless station that are allowed or denied access to the router in these address fields ...

Page 41: ...ession configuration between multiple LAN clients and multiple WAN connections 4 2 5 1 Selecting the NAT Mode None Select this radio button to disable NAT Many to One Select this radio button if you have just one public WAN IP address for your router Edit Details Click this link to go to the NAT Edit Port Mapping rule screen Many to Many Select this radio button if you have multiple public WAN IP ...

Page 42: ... Enter a port number in this field IP Address Enter your server IP address in this field 4 2 5 3 Configuring Address Mapping To change your BIPAC 5102 Series address mapping settings click NAT Select Many to Many and click Edit Details to open the following screen ...

Page 43: ...lobal End IP This is the ending Inside Global IP Address IGA This field is N A for One to one Many to One and Server mapping types Type 1 1 One to one mode maps one local IP address to one global IP address Note that port numbers do not change for the One to one NAT mapping type M 1 Many to One mode maps multiple local IP addresses to one global IP address This is equivalent to Many to One i e PAT...

Page 44: ...to the outside world Local Start IP This is the starting Inside Local IP Address ILA Local IP addresses are N A for Server port mapping Local End IP This is the end Inside Local IP Address ILA If your rule is for all local IP addresses then enter 0 0 0 0 as the Local Start IP address and 255 255 255 255 as the Local End IP address This field is N A for One to one and Server mapping types Global St...

Page 45: ...f Packet Filter rules to prevent unauthorized computers or applications accessing your local network from the Internet You can choose all filter rules by yourself and the security is offer to some sections Telnet FTP TFTP Web SNMP and Ping ...

Page 46: ...is dynamic IP address is the WAN IP address of the router which is assigned to you by your ISP You will first need to register and establish an account with the Dynamic DNS provider using their website for example http www dyndns org Active Select this check box to use dynamic DNS Service Provider Select the name of your Dynamic DNS service provider Host Name Type the domain name assigned to your ...

Page 47: ...nter its IP address as shown above Your ISP may provide an SNTP server for you to use Time Server Use Time Server when Bootup Select the time service protocol that your time server sends when you turn on the Router Not all time servers support all protocols so you may have to check with your ISP network administrator or use trial and error to find a protocol that works The main difference between ...

Page 48: ...ter use the time server that you configured above to set its internal system clock Please wait for up to 60 seconds while the BIPAC 5102 Series locates the time server If the BIPAC 5102 Series cannot find the time server please check the time server protocol and its IP address If the IP address was entered correctly try pinging it for example to test the connection Date Current Date This field dis...

Page 49: ...on and file management Server Type Each of these labels denotes a service that you may use to remotely manage the BIPAC 5102 Series Access Status Select the access interface Choices are All LAN Only WAN Only and Disable Port This field shows the port number for the remote management service You may change the port number for a service in this field but you must use the same port umber to use that ...

Page 50: ...nable the Universal Plug and Play UPnP Service Select this checkbox to activate UPnP Be aware that anyone could use a UPnP application to open the web configurator s login screen without entering the BIPAC 5102 Series s IP address Allow users to make configuration changes through UPnP Select this check box to allow UPnP enabled applications to automatically configure the BIPAC 5102 Series so that ...

Page 51: ...the Add Remove Programs Properties window and click Next Step 5 Restart the computer when prompted Follow the steps below to install the UPnP in Windows XP Step 1 Click Start and Control Panel Step 2 Double click Network Connections Step 3 In the Network Connections window click Advanced in the main menu and select Optional Networking Components ...

Page 52: ... Step 4 Select Networking Service in the Components selection box and click Details Step 5 In the Networking Services window select the Universal Plug and Play check box Step 6 Click OK to go back to the Windows Optional Networking Component Wizard window and click Next ...

Page 53: ...ections An icon displays under Internet Gateway Step 2 Right click the icon and select Properties Step 3 In the Internet Connection Properties window click Settings to see the port mappings there were automatically created Step 4 You may edit or delete the port mappings or click Add to manually add port mappings ...

Page 54: ... Easy Access With UPnP you can access the web based configurator on the BIPAC 5102 Series without finding out the IP address of the BIPAC 5102 Series first This comes helpful if you do not know the IP address of the BIPAC 5102 Series Follow the steps below to access the web configurator Step 1 Click Start and then Control Panel Step 2 Double click Network Connections Step 3 Select My Network Place...

Page 55: ...l Network Step 5 Right click on the icon for your BIPAC 5102 Series and select Invoke The web configurator login screen displays Step 6 Right click on the icon for your BIPAC 5102 Series and select Properties A properties window displays with basic information about the BIPAC 5102 Series ...

Page 56: ...Mask It is the destination IP addresses based on above destination subnet IP Gateway IP This is the gateway IP address to which packets are to be forwarded Metric It represents the cost of transmission for routing purposes The number need not be precise but it must be between 1 and 15 Private This parameter determines if the Prestige will include the route to the remote node in its RIP broadcasts ...

Page 57: ...our BIPAC 5102 Series 4 4 1 System Status System Status System Name This is the name of the router It is for identification purposes RAS F W Version This is the firmware version and the date created DSL FW Version This is the DSL firmware version associated with your router Standard This is the standard that the router is using ...

Page 58: ...fier that you entered in the first Wizard screen LAN Information MAC Address This is the MAC Media Access Control or Ethernet address IP Address This is the LAN port IP address IP Subnet Mask This is the LAN port IP subnet mask DHCP Server This is the WAN port DHCP role Server Relay or None DHCP Start IP This is the first of the contiguous addresses in the IP address pool DHCP Pool Size This is th...

Page 59: ...PU utilization WAN Port Statistics This is the WAN port Link Status This is the status of your WAN link Transfer Rate This is the transfer rate in kbps Upstream Speed This is the upstream speed of the router Downstream Speed This is the downstream speed of the router Node Link This field displays the remote node index number and link type Link types are PPPoA ENET RFC 1483 and PPPoE LAN Port Stati...

Page 60: ...s received on this port Errors This field displays the number of error packets on this port Tx B s This field displays the number of bytes transmitted in the last second Rx B s This field displays the number of bytes received in the last second Up Time This field displays the elapsed time this port has been up Collisions This is the number of collisions on this port Poll Interval s Type the time i...

Page 61: ...lients to obtain TCP IP configuration at start up from a server Host Name This is the name of the host computer IP Address This field displays the IP address relative to the Host Name field MAC Address This field displays the MAC Media Access Control address of the computer with the displayed host name ...

Page 62: ...is is the index number of an associated wireless client MAC Address This field displays the MAC Media Access Control address of the computer with the displayed host name Association Time This field displays how long a wireless station has been associated to the router 4 4 4 2 Channel Usage Table This screen displays the state of the channels within the router s transmission range Click Wireless LA...

Page 63: ...61 Channel This is the index number of the channel Activity This field displays Yes if another AP or Ad hoc network is using the channel within the router s transmission range ...

Page 64: ...h the BIPAC 5102 Series 4 4 5 1 Diagnostic General TCP IP Address Type the IP address of a computer that you want to ping in order to test a connection Ping Click this button to ping the IP address that you entered Reset System Click this button to reboot the BIPAC 5102 Series A warning dialog box ...

Page 65: ...ation ATM Status Click this button to view ATM status ATM Loopback Test Click this button to start the ATM loopback test Make sure you have configured at least one PVC with proper VPIs VCIs before you begin this test The ATM loopback test is useful for troubleshooting problems with the DSLAM and ATM network Upstream Noise Margin Click this button to display the upstream noise margin Downstream Noi...

Page 66: ...ted BIPAC 5102 Series will reset automatically to make the new firmware work File Path Type in the location of the file you want to upload in this field or click Browse to find it Browse Click Browse to find the ras file you want to upload Remember that you must decompress compressed zip files before you can upload them Upload Click Upload to begin the upload process This process may take up to tw...

Page 67: ...65 DO NOT power down the router or interrupt the firmware upgrading while it is still in process Improper operation could damage the router Warning ...

Page 68: ...using the factory default settings for example after a firmware upgrade or if you have saved an incorrect configuration select Factory Default Settings to reset to factory default settings You may also reset your router to factory settings by holding the small Reset pinhole button on the back of your router in for 10 12 seconds whilst the router is turned on ...

Page 69: ...aware that the router is restricted to only one PC accessing the configuration web pages at a time Once a PC has logged into the web interface other PCs cannot get access until the current PC has logged out of the web interface If the previous PC forgets to logout the second PC can access the page after a user defined period by default 3 minutes ...

Page 70: ...support You have forgotten your router login and or password Try the default login and password please refers to Chapter 3 If this fails you can restore your router to its factory settings by holding the Reset button on the back of your router for 6 seconds above Problems with the WAN Interface Problem Corrective Action Initialization of the PVC connection linesync failed Ensure that the telephone...

Page 71: ... and the right way around Missing line filters or line filters installed the wrong way around can cause problems with your ADSL connection including causing frequent disconnections Problems with the LAN Interface Problem Corrective Action Can t ping any PCs on the LAN Check the Ethernet LEDs on the front panel The LED should be on for a port that has a PC connected If it is off check the cables be...

Page 72: ...eshooting section in the User s Manual If you cannot resolve the problem with the Troubleshooting chapter please contact the dealer where you purchased this product Contact Billion AUSTRALIA http www billion com au 2005 Billion Electric Co Ltd PC Range P L All Rights Reserved WORLDWIDE http www billion com ...

Reviews: