background image

IMPORTANT: If your saw fence system will be used
with a mobile base underneath the saw base and table
legs, the position of the legs will have to be changed
to fit the mobile base extension.

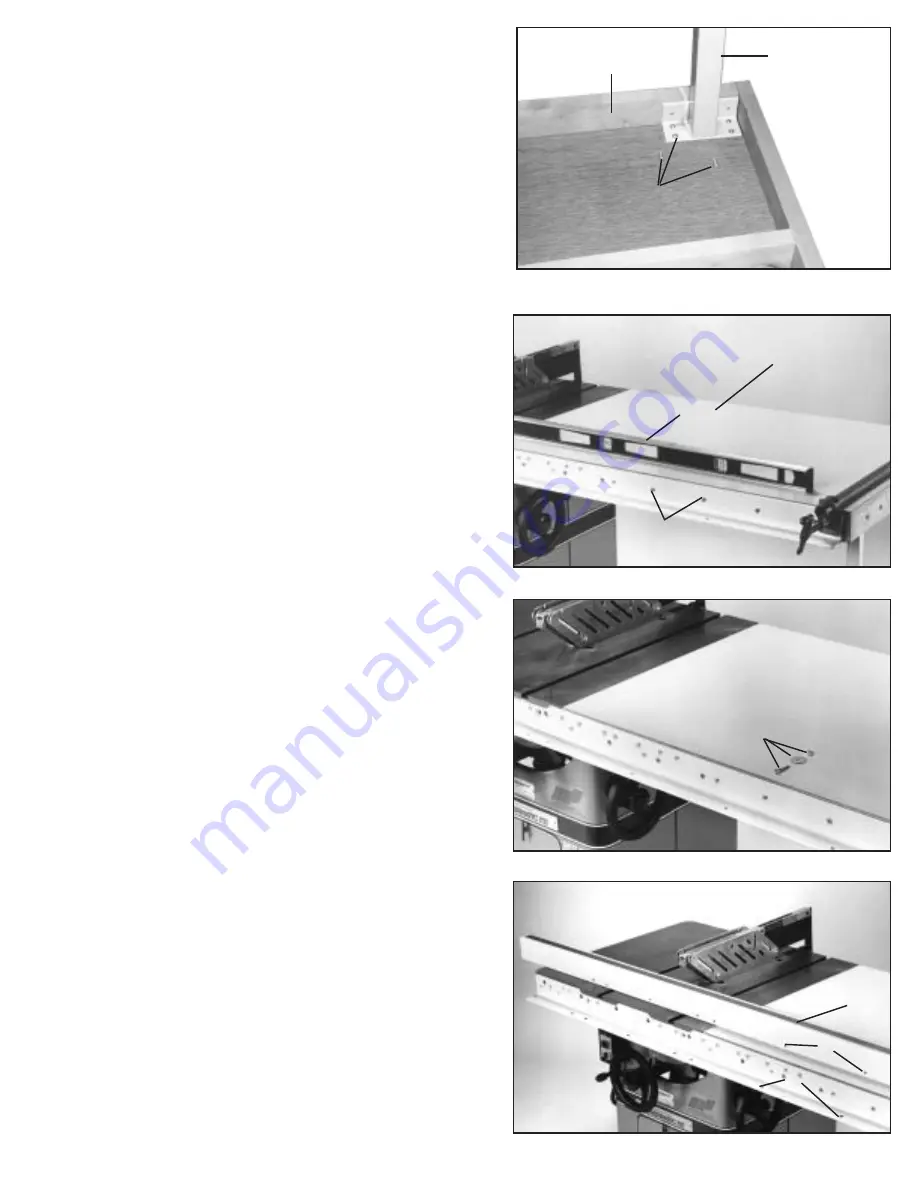
9. Lay the extension table upside down on a floor or bench.

10. Position table leg (K) to the closed in corner of the
extension table (L), as shown in Fig. 19.

11. Attach the table leg (K) to the table board (L) with six
5/8” long wood screws (M). Repeat this process for the
remaining leg.

IMPORTANT: If your saw fence system will be used
with a mobile base underneath the saw base and table
legs, the position of the legs will have to be changed
to fit the mobile base extension.

12. Place table assembly (L) in position between the front
and rear rail, as shown in Fig. 20. Make sure end of table
is flush against saw table and using a bar clamp, snug up
ends of rails to hold table in position. Using a straight edge,
(N), make certain table is in the same plane and level with
saw table. Adjust leveling screws in bottom of support legs
to accomplish this. When you are certain table is level
and in the same plane as the saw table, tighten bar clamp
to hold everything in position. Then drill 1/4” through holes
through the front and rear table frame using holes (O) in
the rail as a template. The number of holes to drill will
depend on the length of the rails.

13. After the holes have been drilled in the front and rear
table frame, fasten both front and rear rail to table Fig. 21
using the 1/4-20 x 1-1/2” long flat head screws, fender
washers and hex nuts (P) provided.

14. Lay guide tube (Q) Fig. 22, on saw table as shown,
and line up the threaded holes (R) in bottom of guide tube
with through holes (S) in the front rail. Guide tube will
extend 6” past the rail at both ends.

15. Lay guide tube on front rail and fasten the guide tube
to the front rail using the 1/4-20 x 1/2” long hex screws
and lockwashers provided. NOTE: Where there are two
holes 2-1/2” apart, use only one of the holes.

8

Fig. 19

Fig. 20

Fig.21

Fig. 22

K

L

M

L

N

O

P

Q

R

S

Summary of Contents for T-SQUARE BC30

Page 1: ...MANUFACTURING visit our web site at www biesemeyer com For Parts Service Warranty or other assistance please call 1 800 782 1831 PART NO 1352432 REVISED 03 01 07 BIESEMEYER T SQUARE Commercial Fence System Model BC30 Model BC30W Model BC50 Model BC50W ...

Page 2: ...ay be ordered seperately as well IMPORTANT The BIESEMEYER T SQUARE Commercial fence system is designed to be used only with a supporting extension table and leg kit UNPACKING Carefully unpack the BIESEMEYER T SQUARE Commercial fence system from the shipping cartons Fig 1 illustrates all the items supplied with the guide set Fig 2 illustrates all the items supplied in the fence box and the accessor...

Page 3: ... For Attaching Front Rear Rail to Non Delta Saws 21 1 4 20 x 1 1 4 Flat HD Screw 10 22 1 4 Lockwasher 10 23 1 4 Flat Washer 10 24 1 4 20 Hex Nut 10 For Attaching Guide Tube to Front Rail 25 1 4 20 X 1 2 Hex HD Screw 7 26 1 4 Lock Washer 7 27 Template For Attaching Rear Rail to Delta Hybrid Saw and Left Tilt Contractor s Saw ONLY 28 8MM x 1 Hex HD Screw 2 29 8MM Lock Washer 2 30 8MM Flatwasher 2 3 ...

Page 4: ...stened with the flat washer lock washer and hex nut IMPORTANT Do not tighten front rail mounting hardware at this time FOR DELTA CONTRACTORS HYBRID SAWS ONLY Hang the on off switch from the front rail mounting bolt on the left side of the saw as shown in Fig 6 before putting on the flat washer lock washer and hex nut 2 Using template C Figs 5 7 Check and adjust the front rail on both sides of the ...

Page 5: ... tilting Contractor s Saw Fasten rail to the saw using the two 8MM x 1 long hex head screw 8MM lock washer and 8MM flat washer supplied Fig 8 through the two holes in the rail and into the two threaded holes in the saw table 4 After fastening the rear rail to the saw table tilt the saw blade to make certain there is no interference between the guard splitter and the rear rail If there is it will b...

Page 6: ...ust leg leveling screws When you are certain table L is level and in the same plane with saw table M tighten bar clamp P to hold everything in position Then drill 1 4 holes through the front and rear of the extension table using holes Q provided in rails as a template NOTE Number of holes Q in the front and rear rails will vary depending on the length of the rails you purchased 10 After the holes ...

Page 7: ...ers and hex nuts supplied ASSEMBLE REAR RAIL 5 Clamp rear rail G Fig 17 to back of saw table using bar clamps making certain notch E in rail is aligned with saw blade A as shown using straight edge B Make sure the two cutouts in the rail are below the bottom of the miter slots in the saw table 6 Check to make certain there are no interferance such as casting ribs behind the rear edge of the saw ta...

Page 8: ...ertain table is in the same plane and level with saw table Adjust leveling screws in bottom of support legs to accomplish this When you are certain table is level and in the same plane as the saw table tighten bar clamp to hold everything in position Then drill 1 4 through holes through the front and rear table frame using holes O in the rail as a template The number of holes to drill will depend ...

Page 9: ...ERTAIN THAT THE MITER GAGE SLOTS IN THE SAW TABLE ARE PARALLEL WITH THE SAW BLADE CHECK WITH THE INSTALLATION MANUAL THAT CAME WITH YOUR SAW FOR INSTRUCTIONS 4 The fence C Fig 26 must be adjusted so it is parallel to the miter gage slot Slide the fence until the bottom edge is in line with the edge of the miter gage slot as shown and push down on locking handle B Check to see if the fence C is ali...

Page 10: ... fence assembly is completely tightened to the guide tube with the locking handle B pushed down Adjust further if necessary IMPORTANT AFTER ADJUSTING THE FENCE CLAMPING ACTION RECHECK TO SEE THAT THE FENCE IS STILL PARALLEL TO THE MITER GAGE SLOT AND ADJUST AS NECESSARY 6 When clamping the fence assembly C to the guide tube make certain the camfoot P Fig 29 is hanging down and against the locking ...

Page 11: ...ntil the witness line is aligned with the same marking on the scale as the cut piece Tighten the two screws G Repeat until the width of the cut piece matches the measurement indicated by the witness line 10 Apply grease to locking handle B and camfoot P Fig 32 monthly to prevent wear 11 Apply paste wax to the fence sides and the unpainted guide tube sliding surfaces weekly Meguiar s Professional P...

Page 12: ...rs be returned prepaid to a motor manufacturer s authorized station for inspection and repair or replacement Delta will not be responsible for any asserted defect which has resulted from normal wear misuse abuse or repair or alteration made or specifically authorized by anyone other than an authorized Delta service facility or representative Under no circumstances will Delta be liable for incident...

Reviews: