background image

- 40 -

INST

ALL

ATION

INSTALLATION

INCORRECT implementation of twin flue gas 
outlet/air suction systems

Figure 5.10

S

A

S

A

 = air suction

S

 = flue gas outlet

5.9  Flue gas outlet dimensions and 

lengths

The flue gas outlet/air suction can be set up in 
the following ways:
C

13

 C

33

 C

43

 C

53

 C

63

 C

83

 C

93

 B

23P

Consult the sheet provided with the selected kit 
which is packaged separately.
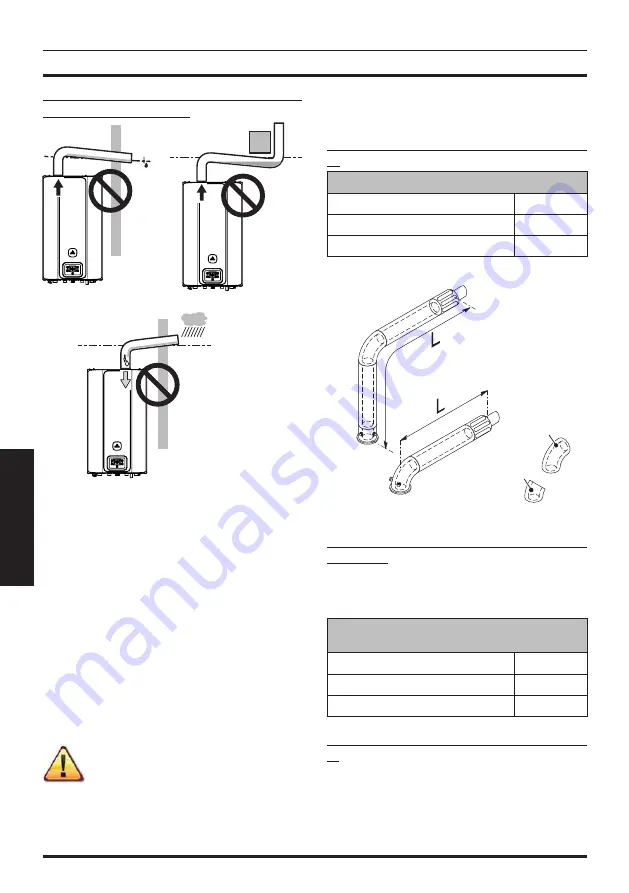
The horizontal sections of the flue gas pipes must 
have a slope of approx. 1.5 degrees (25 mm per 
metre).

The terminal must be higher than 
the boiler side opening.

Only the coaxial pipe with the terminal must 
be horizontal as the discharge pipe has already 
been implemented with the correct slope.

The following kits are available for connection to 
the boiler:

Wall-mounted flue gas outlet kit (Figure 5.11 
A)

Coaxial duct Ø 60/100 mm (A)

Nominal length

0.915 m

Minimum length

0.5 m

Maximum length

10 m

Figure 5.11

B

A

C

45°

90°

C13

Vertical flue gas outlet kit with 90° elbow (Fig-
ure 5.11 B)

This kit is used to raise the outlet axis of the boiler 
by 635 mm.
The terminal must always discharge horizontally.

Coaxial duct Ø 60/100 with 
90° elbow (B)

Nominal length

1.55 m

Minimum length

0.5 m

Maximum length

10 m

Supplementary 45° or 90° elbows (Figure 5.11 
C)

Coaxial elbows Ø 60/100 mm.
When these elbows are used in the duct, they re-
duce the maximum length of the flue gas duct 
by:

Summary of Contents for RINNOVA ADAPTIVE SV

Page 1: ...User manual and installation instructions RINNOVA ADAPTIVE SV...

Page 2: ...e tations may result It cannot be considered responsible for failure to observe the instructions con tained in this manual or the consequences of any actions that have not been specifically described...

Page 3: ...s Immediately open up the doors and windows to create an air current that cleans the room Close the gas cocks Request the intervention of professionally qualified personnel Before starting the boiler...

Page 4: ...d in this documentation at any time and without notice This documentation is provided for information purposes and cannot be considered as a contract with third parties DANGER Instructions marked with...

Page 5: ...47 5 15 Anti legionella function 49 5 16 Installing the external temperature sensor 52 5 17 Electrical connection between the boiler and the external sensor 52 5 18 Selecting the type of external sen...

Page 6: ...shut off cock for the DHW inlet The figures in this manual only show one of the possible ways of installing cocks pipes and fittings Figure 1 2 2 3 10 4 5 6 8 9 7 2 Gas supply label 3 Condensate outle...

Page 7: ...perature decrease button 13 Reset Stand by Winter Summer button 14 Heating temperature decrease button 15 Heating temperature increase button 16 LCD display The RESET that restores all param eters to...

Page 8: ...w sys tem pressure or if viewing the pressure from the INFO menu Stays on flame present Flashing drain upon ignition in progress A Stays on maintenance due pre warning Flashing maintenance required or...

Page 9: ...to proba ble chimney obstruction E25 b Flame loss for more than 6 consecutive times LCD FUNCTION E26 A Maximum deviation fault between the 2 heat ing NTC probes E40 A Incorrect mains frequen cy detec...

Page 10: ...is dis played with the flashing symbol Next maintenance due date factory setting 12 months In the event of an error this has greater priority than mainte nance due date Maintenance overdue In the even...

Page 11: ...tion set pa rameter P32 1 4 The following is displayed LP minimum DHW hP minimum output in heating mode cP maximum output in heating mode dP maximum DHW The transition occurs with buttons 15 in crease...

Page 12: ...2 2 Ignition The boiler cocks and the cocks used during installation must be open Figure 2 1 The heating circuit filling cock 8 must remain closed Figure 2 1 Open position 8 Power the boiler by turnin...

Page 13: ...d Signal on the LCD display the set value of the heating delivery hot water temperature and the symbol flash The display background lights up Figure 2 7 Figure 2 7 Adjusting the heating temperature ba...

Page 14: ...Figure 2 9 If the quantity of limestone contained in the water is particularly high it is recommended to install a small water softener To avoid any risks due to the possible forma tion of micro organ...

Page 15: ...motion Figure 2 12 Figure 2 11 11 12 13 14 15 16 Figure 2 12 If the boiler will be inactive for a long period of time Disconnect the boiler from the electric pow er supply Close the boiler cocks Figur...

Page 16: ...ing For rational and economical service have a room thermostat installed Never turn off the radiator in the room where the room thermostat is installed If a radiator or convector does not heat up chec...

Page 17: ...is not operating and a code ap pears on the LCD display that is preceded by the letter E and the message RESET see General LCD characteristics on page 8 the boiler is in lockout The background of the...

Page 18: ...the technical support centre check if there are any leaks in the heating system or the boiler itself Water leaks from the safety valve Check if the filling cock is closed tightly see Filling the heat...

Page 19: ...ansducer if foreseen J13 Ionisation current value J14 value Number of months to main tenance J15 value 3 star status ON 01 OFF 00 J16 value Modulation percentage J17 value Pump modulation percent age...

Page 20: ...t trip and therefore does not send the boiler into safety lockout the thermal fuse 17 activates as a further mea sure to protect the flue gas outlet To restore the normal operation of the boiler conta...

Page 21: ...21 INSTALLATION TECHNICAL SPECIFICATIONS 4 TECHNICAL SPECIFICATIONS 4 1 Assembly view Figure 4 1 36 24 33 22 23 18 7 27 28 26 29 25 10 32 20 34 30 21 19 17 35 31 37 38...

Page 22: ...lling cock 9 Tank coil and heating return pipe 10 Heating circuit drain cock 17 Flue gas NTC probe and thermal fuse 18 Heating NTC return probe 19 Primary condensing exchanger 20 NTC heating delivery...

Page 23: ...int 29 Heating transducer 30 Condensate discharge siphon 31 Three way valve 32 Three way valve plug 33 Fan 34 Air gas mixer 35 Burner 36 Expansion tank 37 Flue gas exhaust duct 38 Air suction duct 39...

Page 24: ...te terminal board Room thermostat 3 Pump 8 Heating transducer 13 Ignition and detection electrodes 4 NTC heating return 9 Gas valve 5 NTC heating delivery NTC maxi mum temperature 10 Thermostat Storag...

Page 25: ...exchanger If the circulation of water in the heating system decreases too much or totally stops due to the closure of thermostatic valves or circuit cocks the by pass guarantees a minimum circulation...

Page 26: ...with G31 9 5 10 5 Condensate quantity at nom Q 30 50 C l h 2 7 Condensate quantity at min Q 30 50 C l h 0 5 Condensate pH pH 4 0 Data in d h w mode CO2 at nom Q with G20 8 5 9 5 CO2 at min Q with G20...

Page 27: ...ss flow rate kg s 0 0079 Min flue gas mass flow rate kg s 0 0014 Max air mass flow rate kg s 0 0076 Min air mass flow rate kg s 0 0013 Values refer to tests with 80 mm 1 1 twin pipe discharge Methane...

Page 28: ...6 kW At 30 of rated heat output and low temperature regime 1 98 8 Auxiliary electricity consumption Other items At full load elmax 0 016 kW Standby heat loss Pstby 0 110 kW At part load elmin 0 012 kW...

Page 29: ...with G31 9 5 10 5 Condensate quantity at nom Q 30 50 C l h 4 2 Condensate quantity at min Q 30 50 C l h 0 5 Condensate pH pH 4 0 Data in d h w mode CO2 at nom Q with G20 8 5 9 5 CO2 at min Q with G20...

Page 30: ...s flow rate kg s 0 0121 Min flue gas mass flow rate kg s 0 0014 Max air mass flow rate kg s 0 0116 Min air mass flow rate kg s 0 0013 Values refer to tests with 80 mm 1 1 twin pipe discharge Methane g...

Page 31: ...9 kW At 30 of rated heat output and low temperature regime 1 98 9 Auxiliary electricity consumption Other items At full load elmax 0 034 kW Standby heat loss Pstby 0 110 kW At part load elmin 0 012 kW...

Page 32: ...with G31 9 5 10 5 Condensate quantity at nom Q 30 50 C l h 5 6 Condensate quantity at min Q 30 50 C l h 0 6 Condensate pH pH 4 0 Data in d h w mode CO2 at nom Q with G20 8 5 9 5 CO2 at min Q with G20...

Page 33: ...flow rate kg s 0 0209 Min flue gas mass flow rate kg s 0 0044 Max air mass flow rate kg s 0 0203 Min air mass flow rate kg s 0 0044 Values refer to tests with 80 mm 1 1 twin pipe discharge Methane ga...

Page 34: ...2 kW At 30 of rated heat output and low temperature regime 1 99 0 Auxiliary electricity consumption Other items At full load elmax 0 052 kW Standby heat loss Pstby 0 110 kW At part load elmin 0 011 kW...

Page 35: ...type of gas see section GAS CONVERSION on page 66 That the characteristics of the electric water and gas supply networks comply with those on the plate The combustion products may only be dis charged...

Page 36: ...the metal surfaces and neutralising the gases in the water Filling the central heating system If the boiler is installed in rooms where the ambient temperature could fall below 0 C it is recommended...

Page 37: ...g delivery H MB Tank delivery I Gas J RC Filling the heating circuit K RR Heating and tank return 5 5 Fittings The boiler uses the following fittings Cock Pipe Quick fitting MR 16 18 G 3 4 MF MB 12 14...

Page 38: ...tings Carry out a leakage test for the gas supply sys tem Connect the safety valve discharge 7 Figure 5 5 to an outlet funnel Insert the flexible condensate discharge pipe 3 Figure 5 5 inside the resi...

Page 39: ...kit for information on how to cor rectly install the flue gas duct The horizontal sections of the flue gas pipes must have a slope of approx 1 5 degrees 25 mm per metre therefore the terminal must be...

Page 40: ...erminal must be horizontal as the discharge pipe has already been implemented with the correct slope The following kits are available for connection to the boiler Wall mounted flue gas outlet kit Figu...

Page 41: ...e terminals of the air suction and flue gas exhaust pipes must not be positioned on opposite walls of the building EN 483 Figure 5 12 C13 Also 80 mm 90 and 45 elbows are available that reduce the tota...

Page 42: ...ominal length 0 96 m Maximum length 12 m Figure 5 16 45 90 125 C33 Extensions are available for reaching the maxi mum height Coaxial 80 125 mm 90 and 45 elbows are available that reduce the total max...

Page 43: ...ind or output from other gen erators cannot be conveyed through the same flue or flue gas duct Therefore ifyouinstallaductedpipeforevacuating combustion products from any type of appliance inside an e...

Page 44: ...ext to a window or door 400 B Next to an air vent or ventilation opening 600 C Side of a balcony 1000 D Under the gutter or discharge pipes 300 E Under the eaves 300 F Under balconies 300 G Under the...

Page 45: ...C I 5 12 Electrical connections Unscrew the screws L Figure 5 20 and remove the front panel M by pulling it towards you and then pushing it upwards in order to release it from the top fastenings Figur...

Page 46: ...he electric power wires The electric power supply cable or wire for the unit type H03VV F must have a minimum cross section of 0 75 mm2 be kept away from hot or sharp parts and comply with current tec...

Page 47: ...cal conductors of the zone valve micro contacts must be inserted into the A and B ter minals of the room thermostat terminal board as shown in Figure 5 26 The electric jumper between A and B must be r...

Page 48: ...9 until HiS Boiler History appears on the LCD display Figure 5 30 Figure 5 29 11 12 13 14 15 16 Figure 5 30 Scroll through the various menus by pressing the keys 12 back or 14 forward until PAr Parame...

Page 49: ...heating only 04 NTC probe tank with probe Press button 13 Figure 5 29 to confirm the val ue entered The display will show the following Figure 5 36 for 5 seconds then move up to the next level Figure...

Page 50: ...through the various menus by pressing the keys 12 back or 14 forward until PAr Parameters menu appears on the LCD display Figure 5 40 Press the 13 key for 1 second to enter the se lected menu Figure 5...

Page 51: ...e various parameters by press ing the keys 12 back or 14 forward until P29 which alternates with the parameter value ap pears on the LCD display Figure 5 44 Figure 5 44 Press the 13 key for 1 second F...

Page 52: ...be connection wires must follow the path indicated in Figure 5 25 Make the boiler cables exit using specific cable glands R Figure 5 27 5 18 Selecting the type of external sensor The boiler is set to...

Page 53: ...return to the previous level To exit the parameters menu wait 15 minutes without pressing any key switch off the electric power supply press the 12 and 14 keys simultaneously for 5 seconds Figure 5 4...

Page 54: ...set a K of 1 5 dashed line in Figure 5 54 Sequence for setting the K coefficient Enter programming mode by pressing the 12 and 14 keys simultaneously for 5 seconds Fig ure 5 55 until HiS Boiler Histo...

Page 55: ...supply press the 12 and 14 keys simultaneously for 5 seconds Figure 5 55 return to previous level At this point the system delivery temperature will follow the trend in relation to the set K co effic...

Page 56: ...using either the control panel or the remote Enter programming mode by pressing the 12 and 14 keys simultaneously for 5 seconds Fig ure 5 65 until HiS Boiler History appears on the LCD display Figure...

Page 57: ...level without changing the value return to the previous level To exit the parameters menu wait 15 minutes without pressing any key switch off the electric power supply press the 12 and 14 keys simulta...

Page 58: ...ossible to modi fy the value of parameter 10 from 1 10s to 120 1200s each unit on the display corre sponds to an increase or decrease of 10 sec onds Press button 13 Figure 5 71 to confirm the val ue e...

Page 59: ...the corresponding cir cuit and therefore the flow rate pushed by the pump in the primary circuit is by passed through the separator Therefore with a hydraulic separator it is possible to have a produc...

Page 60: ...e front panel on the body see sec tion Removing the body panels on page 69 Open the installed water cocks Open one or more hot water cocks to bleed the pipes Loosen the automatic bleed valve cap 23 in...

Page 61: ...perature primary circuit and the symbols and Figure 6 7 Figure 6 7 Open the gas cock Make sure that the ambient thermostat is in the heat request position Check the correct operation of the boiler bot...

Page 62: ...pply pressure using the tapping point 26 in Figure 7 1 and compare the val ue read with those shown in the Gas supply pressure table in section Technical data M300V 1616 SV on page 26 Technical data M...

Page 63: ...7 6 Figure 7 6 Compare the value of CO2 read on the flue gasanalyserwiththeoneinthe DatainDHW mode table and the values of CO2 at Q min section Technical data M300V 1616 SV on page 26 Technical data M...

Page 64: ...to carry out CO2 calibration at maximum boiler output Connect a flue analyser to the flue gas anal ysis outlets on the flue gas exhaust on the boiler Figure 7 2 Make sure that the room thermostat is...

Page 65: ...it 15 minutes without pressing any key switch off the electric power supply press the 12 and 14 keys simultaneously for 5 seconds Figure 7 8 return to previous level Check the precise gas calibration...

Page 66: ...8 1 11 12 13 14 15 16 Figure 8 2 Scroll through the various menus by press ing the keys 12 back or 14 forward until PAr Parameters menu appears on the LCD display Figure 8 3 Press the 13 key for 1 sec...

Page 67: ...s menus by press ing the keys 12 back or 14 forward until CAF appears on the LCD display Figure 8 8 Figure 8 8 For calibration see section Automatic calibra tion of the gas valve on page 64 To exit th...

Page 68: ...standard warranty Before performing any cleaning or mainte nance operation or before opening or remov ing the boiler panels isolate the unit from the electric power supply using the two way switch ins...

Page 69: ...display will show the fol lowing Figure 9 6 for 5 seconds then move up to the next level Figure 9 6 To exit the parameters menu wait 15 minutes without pressing any key switch off the electric power...

Page 70: ...anels on page 69 in reverse order Front panel Reinstall the front panels D working in the reverse order to that described in section Re moving the body panels on page 69 9 5 Emptying the DHW circuit C...

Page 71: ...pulling it downwards Figure 9 12 Loosen the nuts O and remove the fan burn er unit 35 Figure 9 12 Extract the burner casing by pulling it out wards The silicon gasket on the front panel of the combus...

Page 72: ...orrect the pressure 9 9 Cleaning the domestic hot water exchanger Descaling the domestic hot water exchanger will be assessed by a technician from an Au thorised Service Centre who will perform the cl...

Page 73: ...ciency 98 8 Combustion efficiency 99 0 Air index n 1 7 Composition of CO2 fumes 8 5 9 5 Composition of O2 fumes 4 8 Composition of CO fumes ppm 200 Flue gas temperature C 78 Values refer to tests with...

Page 74: ...isplay indicating the activation of the chimney sweep function at minimum power Figure 9 23 Figure 9 23 Chimney sweep function at minimum out put in heating mode Press button 14 Figure 9 20 to vary th...

Page 75: ...oard When the control board is replaced it must be configured for the exact boiler type Important In order to check boiler opera tion and any change to factory set param eters the table in Figure 9 27...

Page 76: ...P28 Anti legionella function activation frequency days P29 Reset restores factory settings P30 Chimney sweep P31 Adjusting the minimum power in DHW mode P32 PARAMETERS LCD VALUE Regulation of the mini...

Page 77: ...28 11 12 13 14 15 16 Figure 9 29 Scroll through the various menus by press ing the keys 12 back or 14 forward until PAr Parameters menu appears on the LCD display Figure 9 30 Figure 9 30 Press the 13...

Page 78: ...01 User interface P03 00 Type of domestic hot wa ter exchanger P04 01 Type of primary circuit control device P05 03 Type of DHW flow con trol device P06 04 05 04 Tank with NTC probe 05 Boiler with th...

Page 79: ...terials where possible The installer must dispose of the packaging used to transport the boiler Please observe the regulations currently in force regarding recy cling and disposing of the boiler and a...

Page 80: ...y time and without notice Product warranty pursuant to Leg Decree no 24 2002 BSG Caldaie a Gas S p a Registered office sales and administrative headquarters plant and technical support 33170 PORDENONE...

Reviews: