background image


Modena Hub/Hub+  


Installation and Operation Guide 


                                          page 5 


Option 2 - VESA Mounting Kit (

Do not install the Hub+ on the back of a monitor.

)

MOUNTING & INSTALLATION CONT.

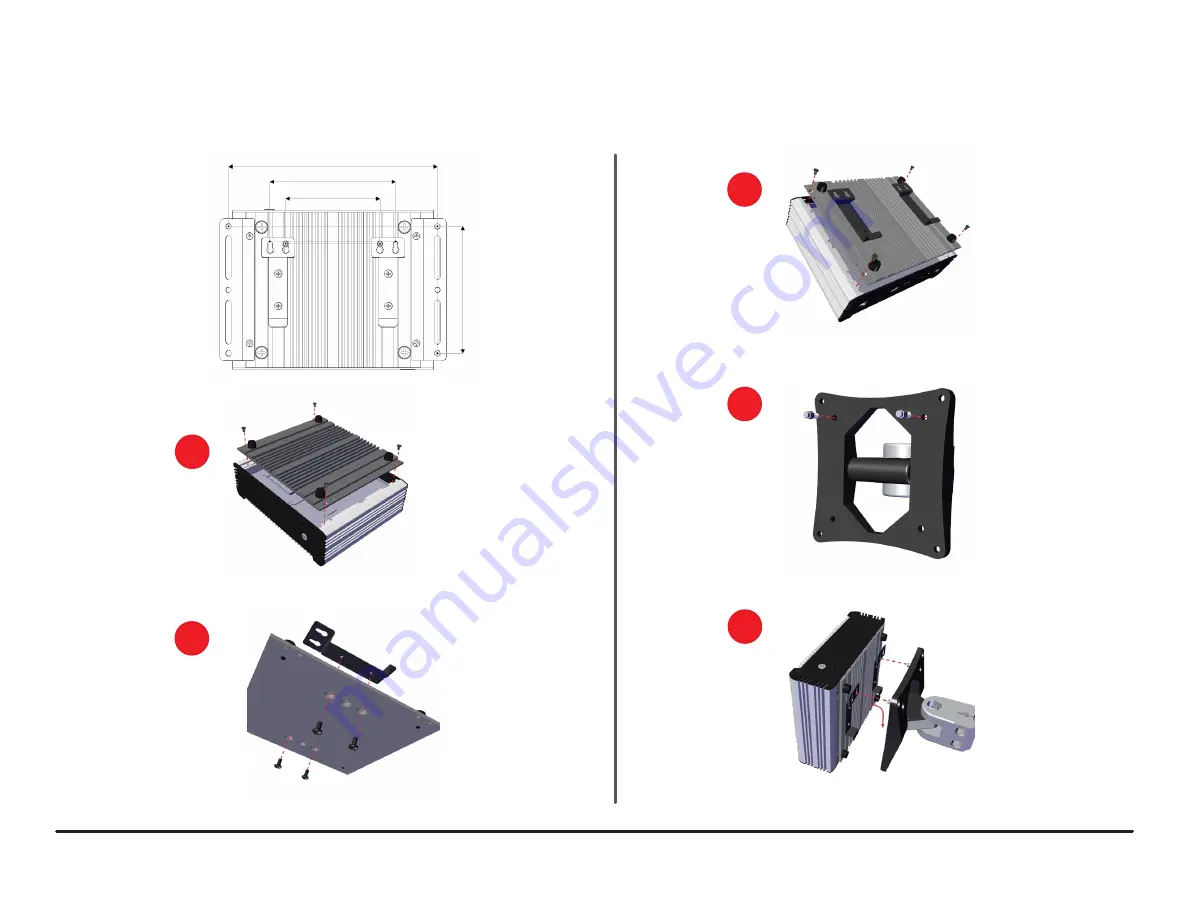
The VESA mounting kit may be used to secure the Hub to displays or other devices that follow the VESA mounting standard.

6.54" (166.2 mm)

2.95" (75 mm)

3.94" (100 mm)

3.97" (101 mm)

1

Detach the back plate of the Hub by removing the small screws at each 

corner of the device. Carefully remove the plate and flip it over.

2

Attach  the  bracket  by  installing  the  included 

screws through the plate and bracket.

3

Flip the back plate back over and reattach to the Hub with 

the keyholes facing the back side of the device.

4

Install the included bolt screws through the 

VERSA plate attached to the device.

5

Attach the Hub with the large part of the bracket 

keyhole and pull down to secure.

Summary of Contents for Modena Hub

Page 1: ...nections and device setup For device specifications see the Network Administrator s Guide SETUP AND USE User devices must be running on Windows Mac OS X iOS or Android operating systems with the Hub s...

Page 2: ...ility Connect to the LAN with Cat5e or better cables not included The Hub must be connected to the Internet to download the latest software release 4 ANTENNA Hub Only The Hub has two antenna ports for...

Page 3: ...Once the Hub is powered up a splash screen appears on the monitor Find the IP address of a Hub device An IP address is required to download the Hub apps from the device or to configure it with the we...

Page 4: ...cure the Hub to walls tables rack cabinets and more 6 54 166 2 mm 2 95 75 mm 3 94 100 mm 3 97 101 mm The Hub is designed to be placed on a flat surface like a desk table or credenza The device may als...

Page 5: ...mm 3 97 101 mm 1 Detach the back plate of the Hub by removing the small screws at each corner of the device Carefully remove the plate and flip it over 2 Attach the bracket by installing the included...

Page 6: ...lick the Proceed link 2 192 168 1 5 START OR JOIN A SESSION 6 Click the 3 dots in the upper right hand screenand choose Disconnect from the drop down 3 Enter Name 192 168 1 5 Enter room passcode if re...

Page 7: ...s to the corporate network connection while guests can access Hub via WiFi without access to the corporate network By changing the Share Mode parameter in the Network configuration page in the web adm...

Page 8: ...rd RJ45 gigabit Ethernet port Connect to Hub via user devices that are connected to the corporate LAN wirelessly or via Ethernet connection The Hub allows for guest access to the corporate LAN WIRED C...

Page 9: ...sically connected to the Hub HDMI port and the device screens of any other users that are connected to the same Hub system via WiFi The stand alone mode is a secure presentation system isolated from b...

Page 10: ...accurate at the time of printing However due to ongoing technical advances changes or modifications may have occurred that are not covered in this manual The latest version is available at www biamp...

Reviews: