background image

33


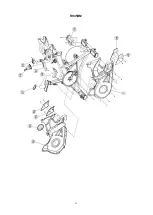
49  Right axle protect cover 

Защитная крышка правой оси

H940049 

51  Rear protect cover for foot tube 

Задняя защитная крышка подножки

H940051 

53  End cap for seat post 

Торцевая заглушка опоры седла

H940053 

56  Flywheel security washer 

Защитная шайба маховика

H925056 

58  Rubber sleeve for resistance knob 

Резиновый рукав ручки сопротивления

H945058 

59  Left axle protect cover 

Защитная крышка левой оси

H940059 

60  Belt tensor 

Натяжное устройство ремня

H925060 

63  Protect cover for handlebar post 

Защитная крышка опоры руля

H940063 

64  Idler 

Поддерживающий ролик

H925064 

65  Left outer chain guard 

Левый внешний защитный кожух цепи

H945BM065 

68  Magnetic 

Магнит

H925068 

87  Rubber sleeve for seat post 

Резиновый рукав опоры седла

H940080 

88  ABS right axle cover 

Крышка правой оси ABS

H940078 

89  Front protect cover 

Передняя защитная крышка

H940077 

92  Generator 

Генератор

0190917 

94  Left BB axle cover 

Крышка левой оси BB

H940076 

95  ABS left axle cover 

Крышка левой оси ABS

H940074 

96  Middle upper top cover 

Средняя верхняя крышка

H940073 

97  Upper top cover 

Верхняя крышка

H945097 

98  Fixed bolt 

Установочный винт

H940070 

99  Spring for release lever 

Пружина рычага

H940071 

100  Console cable 

Кабель консоли

0190880 

103  Rubber cover w/o bolt, washer 

Резиновая крышка без болта, шайбы

H925100 

106  Battery 

Аккумулятор

0190914 

107  Bracket for control board box 

Кронштейн для панели управления

H925099N 

109  Plastic box for control board 

Пластиковая коробка для панели 

управления

H925082-1 

113  Electronic set 

Комплект электронных деталей

H945BM113 

114  Monitor plate 

Пластина монитора

0190876 

G01  Seat post set 

Опора седла в сборе

H940G01 

G02  Long lever set 

Длинный рычаг в сборе

H940G02 

G03  Short lever set 

Короткий рычаг в сборе

H940G03 

G04  Brake set 

Тормозная система

H945G04 

Summary of Contents for H945BM

Page 1: ...Instrucciones de montaje y utilización Instructions for assembly and use Instructions de montage et utilisation Montage und Gebrauchsanleitung Istruzioni di montaggio e uso Инструкция по сборке и эксплуатации ...

Page 2: ...2 Fig 1 Fig 2 ...

Page 3: ...3 Fig 3A Fig 3B Fig 3C Fig 3D Fig 4 Fig 5 ...

Page 4: ...4 Fig 6 Fig 7 Fig 8 Fig 9 Fig 10 Fig 11 ...

Page 5: ...5 Fig 12 Fig 13 Fig 14 Fig 15 Fig 16 ...

Page 6: ...icleta si no funciona correctamente Precaución Antes de comenzar a utilizar la bicicleta consulte a su médico Esta advertencia es especialmente importante para personas de edades superiores a 35 años o con problemas de salud Guarde estas instrucciones INDICACIONES GENERALES 1 Esta unidad ha sido diseñada para uso profesional El peso de usuario no debe exceder de 150Kg 2 Los padres y personas respo...

Page 7: ... el interruptor I situado debajo de la horquilla se encuentre encendido antes de empezar a utilizar la máquina Fig 16 MONTAJE DEL SILLÍN Introduzca la abrazadera del sillín 1 Fig 4 en el tubo horizontal de la tija 38 como muestra la Fig 4 Coloque el sillín en posición y apriete las tuercas de la abrazadera fuertemente Seguidamente introduzca el tubo horizontal de la tija 38 por el agujero del tubo...

Page 8: ...s tija de manillar y superficie horizontal del amarre de tija manillar Fig 15 Modo de aplicación Agitar bien antes de usar Aplicar a una distancia de entre 20 y 30 cm de la superficie a tratar utilizando el tubo de extensión Esperar dos minutos hasta que estabilize el producto Extender con un paño cuidadosamente el producto dejando una capa uniforme sobre la superficie a tratar y retirar el sobran...

Page 9: ...xido Aplicar el BH indoor cycling protector con un paño limpio y seco Secar una vez aplicado 4 Los 3 pomos de apriete que dispone la unidad se deberán aflojar y rociar con el spray de engrase Wurth con el objeto de garantizar la movilidad de los mismos Anualmente 1 Limpiar con el jabón NXTde MEGUIAR S echando jabón en un cazo con agua Agitar para generar espuma Aplicar con una esponja húmeda y sec...

Page 10: ...r curious nature into account and how this can often lead to hazardous situations and behaviour resulting in accidents Under no circumstances should this appliance be used as a toy 3 The owner is responsible for ensuring that anyone who uses the machine is duly informed about the necessary precautions ASSEMBLY INSTRUCTIONS The assistance of a second person is recommended when assembling this unit ...

Page 11: ...N INSERT mark HORIZONTAL ADJUSTMENT OF THE SADDLE Loosen the knob 2 slightly by turning it anticlockwise Fig 4 move the saddle to a position comfortable for doing exercise and then tighten the knob 2 securely by turning it clockwise FITTING THE PEDALS The assembly instructions for the pedals must be followed to the letter fitting these incorrectly could damage the screw thread on either the pedal ...

Page 12: ...lf dry Note In case any part or component needs to be replaced follow the same operations described above Use only original BH spare parts PREVENTIVE MAINTENANCE OF THE MACHINE Every class 1 The user must check that the apparatus is safe and appropriate for exercise 2 A cloth or towel should be used to remove sweat after the session has ended Weekly for the first month 1 Check the tightness of the...

Page 13: ...uctions will void the warranty NOT COVERED BY THE WARRANTY Improper maintenance Incorrect assembly by the purchaser Failure to follow the assembly instructions as stated in the manual provided Damage caused by the cleats of the shoes Stretching exercises should be performed in a suitable place and never on the machine Do not hesitate to get touch with the Technical Assistance Service if you have a...

Page 14: ...s échauffements par l intermédiaire d exercices d étirement 11 Ne pas utiliser le vélo s il fonctionne incorrectement Précaution Consultez votre médecin avant d entreprendre des exercices sur cette machine Cette remarque s adresse plus particulièrement aux personnes âgées de de 35 ans et aux personnes qui ont des problèmes de santé Conservez cette notice CONSIGNES GÉNÉRALES 1 Cette machine a été c...

Page 15: ...tirées Fig 3A Vérifiez que l interrupteur I situé sous la fourche est allumé avant de commencer à utiliser la machine Fig 16 MONTAGE DE LA SELLE Introduire le collier de la selle 1 Fig 4 dans le tube horizontal de la tige 38 comme indiqué dans la Fig 4 placez la selle à la hauteur requise et vissez très fort les écrous du collier Introduire ensuite le tube horizontal de la tige 38 dans le trou du ...

Page 16: ... guidon et surface horizontale d attache de la tige du guidon Fig 15 Mode d application Bien agiter avant l emploi Appliquer à une distance de 20 à 30 cm de la surface à traiter en utilisant le tube d extension Attendre deux minutes jusqu à ce que le produit se stabilise Étaler délicatement le produit à l aide d un chiffon en laissant une couche uniforme sur la surface à traiter et retirer l excès...

Page 17: ... rouille Appliquez le BH indoor cycling protector à l aide d un chiffon propre et sec Une fois appliqué sécher 4 Les 3 boutons de serrage dont dispose l unité devront être desserrés et vaporisés avec le spray de graissage Wurth dans le but de garantir leur mobilité Annuellement 1 Nettoyer avec le savon NXT de MEGUIAR S en mélangeant dans un récipient le savon avec de l eau Agiter pour faire mousse...

Page 18: ...ät benutzen konsultieren Sie bitte Ihren Arzt Dieser Hinweis ist besonders wichtig für Personen die alter als 35 sind oder gesundheitliche Probleme haben Bevor Sie irgendein Trainingsgerät benutzen lesen Sie bitte stets die gesamten Anleitungen Bewahren Sie diese Anleitungen gut auf ALLGEMEINE HINWEISE 1 Dieses Gerät ist für den professionellen Gebrauch vorgesehen Das Gewicht des Benutzers darf 15...

Page 19: ...st Ein falscher Anschluss kann einen dauerhaften Schaden am Gerät verursachen Plazieren Sie den Monitor 62 über den Lenker 114 und schrauben Sie ihn mit den zuvor entfernten Schrauben A und B fest Fig 3A Überprüfen Sie ob der Schalter I unter der Gabel eingeschaltet ist bevor Sie die Maschine in Betrieb nehmen Fig 16 MONTAGE DES SATTELS Setzen Sie die Sattelklemme 1 Fig 4 auf die Querstange des Sa...

Page 20: ...elstange Fig 14 6 Verbindung Pleuelstange mit Mittelteil Fig 14 7 Verchromte Flächen des Lenkerrohrs und horizontale Fläche der Lenkerrohrbefestigung Fig 15 Gebrauchsanweisung Vor Gebrauch gut schütteln Anwendung aus einer Entfernung von 20 bis 30 cm Abstand von der zu behandelnden Oberfläche unter Verwendung des Verlängerungsröhrchens Zwei Minuten warten bis sich das Produkt stabilisiert hat Das ...

Page 21: ...forderlich den gesamten Heimtrainer zu wachsen jedoch sind die Teile die mit Schweiß in Berührung kommen besonders anfällig für Korrosion und sollten deshalb gut gewachst werden Den BH indoor cycling protector mit einem trockenen und sauberen Tuch auf das Gerät auftragen Nach der Anwendung trocknen 4 Die drei Feststellknöpfe des Geräts müssen gelockert und mit dem Wurth Fettspray besprüht werden u...

Page 22: ...ione Prima di cominciare ad usare la bicicletta chieda consiglo medico Questo consiglio è specialmente importante per persone con età superiore ai 35 anni o con problemi di salute Legga tutte le istruzioni prima di usare qualsiasi apparecchio per fare allenamento Conservi queste istruzioni INDICAZIONI GENERALI 1 Questo apparecchio è stato disegnato per uso professionale Il peso dell utente non dov...

Page 23: ... danneggiare l attrezzo in modo irreversibile Posizionare il monitor 62 sul supporto del manubrio 114 e avvitarlo con le viti A e B precedentemente rimosse Fig 3A Verificare che l interruttore I posto sotto la forcella sia acceso prima di iniziare ad utilizzare la macchina Fig 16 MONTAGGIO DEL SELLINO Introduca il morsetto del sellino 1 Fig 4 nel tubo orizzontale dell albero 38 come mostra la Fig ...

Page 24: ...11 e 12 4 Bordo dell ancoraggio dei cavalletti al telaio Fig 13 5 Unione del pedale alla biella Fig 14 6 Unione della biella alla struttura centrale Fig 14 7 Superfici cromate stelo del manubrio e superficie orizzontale dell ancoraggio dello stelo del manubrio Fig 15 Modalità di applicazione Agitare bene prima dell uso Applicare da una distanza di 20 30 cm dalla superficie da trattare usando il tu...

Page 25: ...cerare la bicicletta per intero ma è molto importante incerare le aree a diretto contatto con il sudore essendo quelle più vulnerabili all ossidazione Applicare il BH indoor cycling protector con un panno pulito e asciutto Asciugare dopo l applicazione 4 I 3 pomelli di serraggio dell unità dovranno essere allentati e spruzzati con lo spray lubrificante Wurth al fine di garantirne la mobilità Ogni ...

Page 26: ...екорректной работы Внимание Обязательно предварительно проконсультируйтесь с врачом Соблюдение этого правила особенно важно для лиц старше 35 лет и лиц с ранее диагностированными заболеваниями Сохраните эту инструкцию для дальнейшего использования 3 Владелец несет ответственность за то чтобы любой кто использует настоящий тренажер был в полной мере проинформирован о необходимых мерах предосторожно...

Page 27: ...ри помощи ранее снятых винтов А и В См Рис 3А Перед началом эксплуатации убедитесь что переключатель расположенный под крылом находится в положении ON См Рис 16 УСТАНОВКА СИДЕНЬЯ Установите кронштейн седла 1 См Рис 4 на горизонтальную трубу 38 как показано на Рис 4 Зафиксируйте положение седла и закрутите гайки Затем вставьте горизонтальную трубу 38 через отверстие на опоре седла 39 См Рис 4 Зафик...

Page 28: ...ом и центральной рамой См Рис 14 7 Поверхности хромированной опорной балки руля и горизонтальные поверхности на которых фиксируется опорная балка См Рис 15 Способ применения Встряхните перед использованием Распыляйте держа флакон на расстоянии 20 30 см от обрабатываемой поверхности Подождите 2 минуты чтобы средство стабилизировалось Аккуратно распределите средство тонким равномерным слоем при помо...

Page 29: ...ском весь тренажер Однако в случае областей контактирующих с потом это поможет снизить скорость износа Нанесите протектор для велотренажера BH на очищенные области После протрите поверхности сухой тряпкой 4 Для поддержания рабочего состояния необходимо регулярно ослаблять и смазывать 3 ручки натяжения Ежегодно 1 Очистите тренажер с помощью воды и мыла MEGUIAR S NXT Встряхните чтобы создать пену На...

Page 30: ...30 H945BM ...

Page 31: ...31 H945BM ...

Page 32: ...lete Задняя подножка в сборе H940011 12 Foot end cap Торцевая заглушка подножки H940012 13 PU wheel Колесо H925013 14 Front foot tube complete Передняя подножка в сборе H940014 19 Front protect cover for foot tube Передняя защитная крышка подножки H940019 20 Handlebar only Руль H945020 21 Handlebar post Опорная балка руля H940021A 22 Resistance knob complete set Ручка сопротивления в сборе H945022...

Page 33: ...0078 89 Front protect cover Передняя защитная крышка H940077 92 Generator Генератор 0190917 94 Left BB axle cover Крышка левой оси BB H940076 95 ABS left axle cover Крышка левой оси ABS H940074 96 Middle upper top cover Средняя верхняя крышка H940073 97 Upper top cover Верхняя крышка H945097 98 Fixed bolt Установочный винт H940070 99 Spring for release lever Пружина рычага H940071 100 Console cabl...

Page 34: ...in Übereinstimmung mit den grundlegenden Anforderungen und den übrigen einschlägigen Bestimmungen der Richtlinien 2011 65 EG und 2004 108 EG befindet Português Exercycle S L declara que este producto está conforme com os requisitos essenciais e outras disposições das Directivas 2011 65 CE e 2004 108 CE Italiano Con la presente Exercycle S L dichiara che questo prodotto è conforme ai requisiti esse...

Page 35: ...4 00 29 Fax 52 444 824 00 31 www bh com mx BH FITNESS ASIA BH Asia Ltd No 80 Jhongshan Rd Daya Dist Taichung City 42841 Taiwan R O C Tel 886 4 25609200 Fax 886 4 25609280 E mail info bhasia com tw ESESSTNI BH SE RESERVA EL DERECHO A MODIFICAR LAS ESPECIFICACIONES DE SUS PRODUCTOS SIN PREVIO AVISO SPECIFICATIONS MAY BE CHANGED WITHOUT PRIOR NOTICE DUE TO OUR PROGRAMME OF CONTINUOUS PRODUCT DEVELOPM...

Reviews: