32
inclinação da sua unidade desde o
nível 0 até ao nível 15 dependendo da
inclinação na qual deseja fazer o
exercício.
Importante Não varie a inclinação da
sua cinta de correr colocando objectos
por baixo dela.
IMPORTANTE:
A
INCLINAÇÃO
DEVERÁ ESTAR NO SEU NÍVEL
MAIS BAIXO ANTES DE COLOCAR
A MÁQUINA DE ANDAR NA
POSIÇÃO PARA DOBRAR.
MEDIÇÃO DA PULSAÇÃO.-
A pulsação mede-se colocando
ambas as mãos nos sensores de
pulsação (R) que estão na unidade
electrónica. A medida da pulsação
aparece depois de uns segundos. O
símbolo do coração ao lado da cifra
de pulsação piscará com o mesmo
ritmo da sua pulsação, Fig.3- 4.
IMPORTANTE.
ESTE NÃO É UM
APARELHO MÉDICO E POR ESSA
RAZÃO A INFORMAÇÃO DO RITMO
CARDÍACO SERVE APENAS DE
ORIENTAÇÃO.
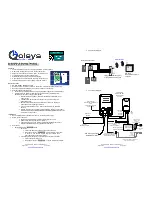
MONTAGEM DA UNIDADE
ELECTRÓNICA.-
COLOCAÇÃO DO MONITOR:
Em primeiro lugar, Fig.5 introduza o
corrimão no tubo do monitor como
indica a seta. Comprove que os
buracos do corrimão estão alinhados
e coincidem
,
tendo cuidado para não
enganchar os cabos do monitor (1).
Em segundo lugar, aproxime o
conjunto monitor que acaba de montar
no passo anterior à parte superior dos
corrimões como mostra a Fig.6 e ligue
o terminal do cabo de controle (L) que
sai do monitor ao cabo de controle
(LL) que sai do corrimão (11-1).
Depois introduza o terminal pelo
buraco (V) superior do corrimão (11-
1),Fig.6A e introduza os parafusos
(2C) tendo cuidado para não
enganchar os cabos e aparafuse-os
até deixá-los sob tensão.
Nota:
Comprove que os cabos não ficaram
engancha-dos ao dobrar a unidade.
Então, aperte os 4 parafusos (2C).
A seguir, coloque a tampas (4-7);(7-
1;4-1) Fig.7, e aperte a tampas com
os parafusos (17).
BH RESERVA O DIREITO DE
PODER
MODIFICAR
AS
ESPECIFICAÇÕES
DOS
SEUS
PRODUTOS SEM PRÉVIO AVISO.
Summary of Contents for G-639
Page 2: ...Fig 1 Fig 2 Fig 3 Fig 4 Fig 5 ...
Page 3: ...Fig 6 Fig 7 Fig 8 ...