background image

2

3

4

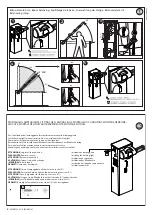
Bilanciamento Asta,  Boom balancing,  Equilibrage de la barre,  Auswuchtung der Stange,  Balance del mástil,  

Balancering stang.

+ 45 °

- 45 °

90 °

0 °

+ 45 °

1

45° OK

AB

- 45 °

5

45°

M

o

ovi 30

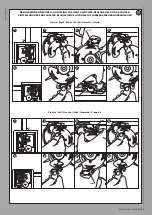
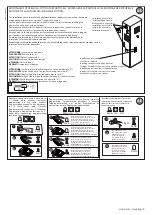
MONTAGGIO LAMPEGGIANTE, FITTING THE FLASHING LIGHT, MONTAGE DU CLIGNOTANT, MONTAGE DER BLINK-

LEUCHTE, MONTAJE DEL INDICADOR PARPADEANTE, MONTAGE FOTOCEL 

AC

25

3,9

Per l’installazione del lampeggiante fare riferimento ai manuali del lampeggiante

See the flashing light's manual for instructions on installing the flashing light

Pour monter le clignotant consultez le manuel du clignotant

Bitte nehmen Sie für die Installation der Blinkleuchte auf das Handbuch der Blinkleuchte Bezug

Para instalar el indicador parpadeante consultar el manual del mismo

Raadpleeg de handleiding van het zwaailicht voor de installatie van het zwaailicht

ATTENZIONE!  togliere il coperchietto A
PLEASE NOTE! Remove cover A
ATTENTION ! Retirez le couvercle A
ACHTUNG! Entfernen Sie die Abdeckung A
¡ATENCIÓN! Quitar la tapa A
OPGELET! Demonteer het klepje A

ATTENZIONE!  fissare il lampeggiante alla barriera con la vite (V1)
PLEASE NOTE! 

Fasten the flashing light on the barrier using the screw (V1)

ATTENTION !

 Fixez le clignotant sur la barrière avec la vis (V1)

ACHTUNG!

 Befestigen Sie die Blinkleuchte mit der Schraube (V1) an der Schranke

¡ATENCIÓN! 

Fijar el indicador parpadeante a la barrea con el tornillo (V1)

OPGELET!

 Bevestig het zwaailicht met de schroef (V1) aan de slagboom

V1

Installazione lampeggiante
Installing the flashing light
Installation du clignotant
Installation der Blinkleuchte
Instalación del indicador parpadeante 
Installatie zwaailicht

V1

A

8

 - 

MOOVI 30-60 - ALPHA BOM

D811997 00100_02

Summary of Contents for Moovi 30 Alpha Bom

Page 1: ...SME ELECTROMECANIQUE POUR BARRIERE POUR V HICULES ELEKTROMECHANISCHER ANTRIEB F R FAHRZEUGSCHRANKEN AUTOMATISMOS ELECTROMECANICOS PARA BARR RAS VEHICULAR ELEKTROMECHANISCH AUTOMATISERINGSSYSTEEM VOOR...

Page 2: ...2 MOOVI 30 60 ALPHA BOM D811997 00100_02...

Page 3: ...e sont pas fournis Nicht im lieferumfang No asignadas en el equipamiento base Niet meegeleverd Con tiranti Withanchorbolts Avec tirants Mit Ankerbolzen Con tirantes Met spankabels B1 B2 A V V 12 35 1...

Page 4: ...e m stil Montage stang Assicurarsi che la molla non sia in tensione Make sure the spring is not under tension V rifiez si le ressort n est pas en tension Sicherstellen dassdieFedernichtgespannt Asegur...

Page 5: ...Izquierda Esquerda REGOLAZIONE FINECORSA ADJUSTING THE LIMIT SWITCHES R GLAGE DE LA FIN DE COURSE EINSTELLUNG DER ENDSCHALTER REGULACI N DE LOS FINALES DE CARRERA REGELING EINDAANSLAGEN 1 2 3 4 5 6 7...

Page 6: ...rammateur de poche Steckverbinder Palmtop Programmierer Conector del programador de bolsillo Connector programmeerbare palmtop Connettore ricevente radio opzionale Optional radio receiver connector Co...

Page 7: ...il gruppo molla Remove the spring assembly D monter le groupe ressort Die Feder Baugruppe ausbauen Desmontar el grupo muelle De groep veer demonteren MONTAGGIO ASTA DESTRA ASSEMBLY OF RIGHT BOOM MONT...

Page 8: ...mo Raadpleeg de handleiding van het zwaailicht voor de installatie van het zwaailicht ATTENZIONE togliere il coperchietto A PLEASE NOTE Remove cover A ATTENTION Retirez le couvercle A ACHTUNG Entferne...

Page 9: ...a barri re avec la vis V1 ACHTUNG Befestigen Sie die Fotozelle mit der Schraube V1 an der Schranke ATENCI N Fijar la fotoc lula a la barrea con el tornillo V1 OPGELET Bevestig de fotocel met de schroe...

Page 10: ...5 m 3 8 m 3 8 m 4 m 4 5 m 4 6 m 4 9 m 5 m 5 m 5 m B MIN L 4 4 m 2 4 m 2 5 m 2 6 m 2 9 m 2 9 m 3 1 m 3 2 m 3 3 m 3 5 m 3 7 m 2 7 m 2 7 m 2 8 m 3 2 m 3 3 m 3 4 m 3 6 m 3 7 m 3 9 m MAX L 5 m 3 3 m 3 3 m...

Page 11: ...ble position and also attach a Warning sign to the structure Attach a label near the operating device in a permanent fashion with informa tion on how to operate the automated system s manual release M...

Page 12: ...d Fig AB rif 3 shows the position for determining the minimum size that the compressed spring can be allowed to reach with the boom in the open position vertical 10 MOOVI accessories boom length limit...

Page 13: ...and 3 5 To exit memorizing mode wait for the LED to go off completely IMPORTANT NOTE THE FIRST TRANSMITTER MEMORIZED MUST BE IDENTIFIED BY ATTACHING THE KEY LABEL master In the event of manual progra...

Page 14: ...to 4 step logic DIP 5 OFF CODE FIX Fixed code ON Activates built in receiver in fixed code mode OFF Activates built in receiver in rolling code mode DIP 6 OFF RADIO LEARN Transmitter program ming ON...

Page 15: ...ns power Keep the photocells optics and illuminating indicator devices clean Check that no branches or shrubs interfere with the safety devices Do not use the automated system if it is in need ofrepai...

Reviews: