


SECTION 2
INSTALLATION OF FIRE
2.1
UNPACKING THE FIRE
Carefully lift the fire out of the carton. Remove the loose item packaging, check
the contents as listed below :-
NOTE : DO NOT UNDER ANY CIRCUMSTANCES USE THIS APPLIANCE IF THE GLASS PANEL IS
BROKEN OR NOT SECURELY FIXED TO THE FIREBOX.
Packing Check List - All Models
Pack 1 of 1 - Combustion Chamber Pack
1 off
Combustion chamber & glass frame assembly
1 off
Boxed ceramic fuel-bed set (packed inside combustion chamber)
1 off
Installation / user instruction manual & guarantee card
1 off
Loose items pack – containing :- 3 off AAA battery, remote handset,
1 off fixing kit, 2 off surround brkts, 1 off handset wall brkt (inc. fixings),
1 off glass removal tool, 1 off downlight kit, 1 off restrictor baffle & fixing
screws, 3 off bags of vermiculite, 1 off Embaglow, 4 off nylon wallplugs,
4 off 30mm woodscrews, 4 off No. 12 x 40mm screws.
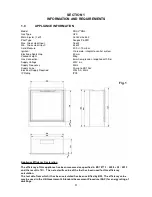
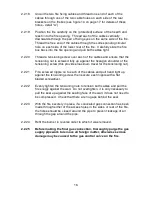
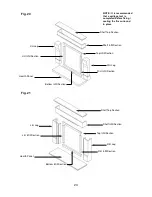
2.2
INSTALLING THE FIRE BOX
Establish which type of flue you are intending to install the fire in to :-
225 x 225mm (9 inch x 9 inch) brick built chimneys
175mm (7 inch) diameter lined brick or stone flue, or insulated pre-fabricated
metal flue box to B.S. 715.
When installing into 125mm (5 inch) diameter lined brick or stone flue, or
insulated pre-fabricated metal flue box to B.S. 715, the restrictor baffle must
not be fitted.
A spillage test must always be carried out to check satisfactory
clearance of flue products, regardless of the type of flue the
appliance is being fitted to.
It is recommended that the fire is installed and commissioned
including a spillage test before fitting the fire surround, this will
therefore allow fitment / removal of the restrictor baffle on the fire if
necessary.
9