background image

6

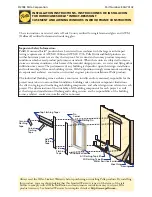
INSTALLATION OF WALL ANCHORS OR SCREWS

A.  If using supplied wall anchors, drill two 3/16” (4.76 mm) diameter holes. 

Place two wall anchors into the wall. Install two supplied screws and tighten 
until almost all the way in.

B.  If mounting to wall studs, drill two 3/32” (2.381 mm) diameter holes 

approximately 1” (25.4 mm) deep. Install two supplied screws and tighten 
until almost all the way in.

17.3” (43.94 cm)

Keyholes

NOTE:

   Washing machine and cold water faucet must  

be within 4 feet (1.21 m) of the right side of unit.

1.   Place the Laundry Pro 2.0 to the wall and mark the appropriate keyholes 

with a pencil. 

Screws (not shown)

2.  Position the keyholes of the Laundry Pro 2.0 onto the screws (not 

shown). Finish tightening screws enough to securely mount unit, but 
still allowing it to be removed from wall. Remove unit from wall.

NOTE:

   The provided hardware kit contains adhesive backed rubber spacers 

to be placed on back of unit to provide additional clearance from 
wall if needed for hose installation or the use  
of ActiveClean Port. (Page 12)

Summary of Contents for LAUNDRY PRO 2.0

Page 1: ...READ MANUAL CAREFULLY FOR PROPER USE AND OPERATION 2 0 A B E Y O N D B Y A E R U S T E C H N O L O G Y COLD WATER LAUNDRY SYSTEM...

Page 2: ...ly available without modifying existing appliances electrical systems or plumbing Laundry Pro 2 0 uses a variation of the technology originally developed for use in the International Space Station and...

Page 3: ...vision and local codes and ordinances in the USA For Electrical Codes outside the USA consult your local regulatory agency for the latest codes and ordinances It is the personal responsibility and obl...

Page 4: ...re must be greater than 20 psi 1 37 bar If your household water pressure is greater than 60 psi 4 13 bar you must install an in line pressure reducer before installing Laundry Pro 2 0 Failure to follo...

Page 5: ...ry Pro 2 0 unit was factory tested It is normal for some residual water to still remain in the unit as a result of these tests Screws 1 Remove the two 2 cover screws located on the bottom of the unit...

Page 6: ...Washing machine and cold water faucet must be within 4 feet 1 21 m of the right side of unit 1 Place the Laundry Pro 2 0 to the wall and mark the appropriate keyholes with a pencil Screws not shown 2...

Page 7: ...e from the cold water inlet on the back of your washing machine Leave hot water hose attached When connecting hoses to your Laundry Pro 2 0 start by hand tightening the hose connector s Using adjustab...

Page 8: ...rom the cold water inlet on your washing machine to the INLET connection on your Laundry Pro 2 0 5 Finally connect the new hose to the cold water inlet on your washing machine 4 Connect the new hose p...

Page 9: ...clean and dry of any standing water Failure to follow these instructions can result in death fire or electrical shock Electrical Shock Hazard Do no use an extension cord Failure to follow these instru...

Page 10: ...TION To avoid the possibility of water damage should a hose leak always have faucets accessible and turn off faucets when washer is not in use IF YOUR WASHING MACHINE IS NEW skip this section and cont...

Page 11: ...Pro 2 0 will still be using just cold water Turn off both water valves hot and cold before disconnecting hoses Failure to follow these instructions may result in water leakage and or possible injury f...

Page 12: ...please contact Customer Service at 800 989 2299 for assistance Espa a www laundrypro es Italia www laundrypro it Portugal www laundrypro pt Electrical Shock Hazard Disconnect power before attempting i...

Page 13: ...r valve is stuck or the washing machine needs to be moved back which may require re leveling a plumber may be required Aerus is not liable for improper installation or damage caused from improper inst...

Page 14: ...NG ANY IMPLIED WARRANTY OF MERCHANTABILITY OR FITNESS FOR A PARTICULAR PURPOSE UNAUTHORIZED CHANNELS MISSING SERIAL NUMBERS Our products are authorized for sale through Authorized Representatives only...

Page 15: ...15...

Page 16: ...dio communications However there is no guarantee that interference will not occur in a particular installation If this equipment does cause harmful interference to radio or television which can be det...

Page 17: ...B E Y O N D B Y A E R U S T E C H N O L O G Y ATTENTION VEUILLEZ LIRE ATTENTIVEMENT LE PR SENT MANUEL POUR OBTENIR LES INDICATIONS D UTILISATION ET DE FONCTIONNEMENT CORRECTES SYST ME DE LESSIVE EAU F...

Page 18: ...lle par tout individu d sirant une alternative conomique et cologique aux d tergents et aux produits chimiques habituellement utilis s sans modifier les appareils la plomberie ou les syst mes lectroni...

Page 19: ...des de l lectricit l ext rieur des tats Unis consultez votre agence de r glementation locale afin de connaitre les derniers codes et r glements Le propri taire de l appareil a la responsabilit personn...

Page 20: ...t sup rieure 60 psi 4 13 bars vous devez installer un r ducteur de pression en ligne avant l installation du syst me Laundry Pro 2 0 Le non respect de ces instructions peut entra ner des fuites d eau...

Page 21: ...y Pro 2 0 a t contr l l usine Il est normal qu une faible quantit d eau r siduelle se trouve l int rieur de l appareil elle est due aux contr les en question 1 Retirez les deux 2 vis du couvercle situ...

Page 22: ...net d eau froide doivent se trouver moins de 1 21 m du c t droit de l appareil 1 Positionnez le Laundry Pro 2 0 contre le mur et marquez les trous utiliser avec un crayon Vis non repr sent es 2 Positi...

Page 23: ...ide de l arriv e d eau froide situ e l arri re de votre machine laver Ne retirez pas le flexible d eau chaude Lors du raccordement des flexibles votre dispositif Laundry Pro 2 0 vissez les raccords la...

Page 24: ...e raccord l arriv e d eau froide de votre machine laver l orifice INLET entr e de votre Laundry Pro 2 0 5 Finalement raccordez le nouveau flexible l arriv e d eau froide de votre machine laver 4 Racco...

Page 25: ...doivent tre propres et secs Le non respect des pr sentes instructions peut provoquer la mort un incendie ou un choc lectrique Risque d lectrocution N utilisez pas de rallonge Le non respect des pr sen...

Page 26: ...s par l eau et provoqu par la fuite d un flexible veillez ce que les robinets soient accessibles et fermez les lorsque la machine laver n est pas utilis e SI VOTRE MACHINE LAVER EST NEUVE ignorez ce c...

Page 27: ...m me l eau froide Fermez les deux robinets d eau froide et chaude avant de d connecter les tuyaux Le non respect des pr sentes instructions peut entra ner des fuites d eau et ou d ventuelles blessure...

Page 28: ...Si cela se produit veuillez contacter le service la client le au 800 668 0763 Canada ou au 800 243 9078 tats Unis Espa a www laundrypro es Italia www laundrypro it Portugal www laundrypro pt Risque d...

Page 29: ...veau l aide d un plombier peut s av rer n cessaire Aerus d cline toute responsabilit l gard d une installation incorrecte ou des d g ts dus une installation incorrecte et recommande le recours un plom...

Page 30: ...IS TOUTE GARANTIE IMPLICITE DE QUALIT MARCHANDE OU DE CONVENANCE UN USAGE PARTICULIER NUM ROS DE S RIE MANQUANTS ET ACHATS NON CONFORMES NOS POLITIQUES La vente des produits est autoris e seulement pa...

Page 31: ...31...

Page 32: ...uisibles aux communications radio Cependant il n est pas garanti que des interf rences ne se produiront pas dans une installation en particulier Si cet quipement cause des interf rences dangereuses po...

Reviews: