background image

7

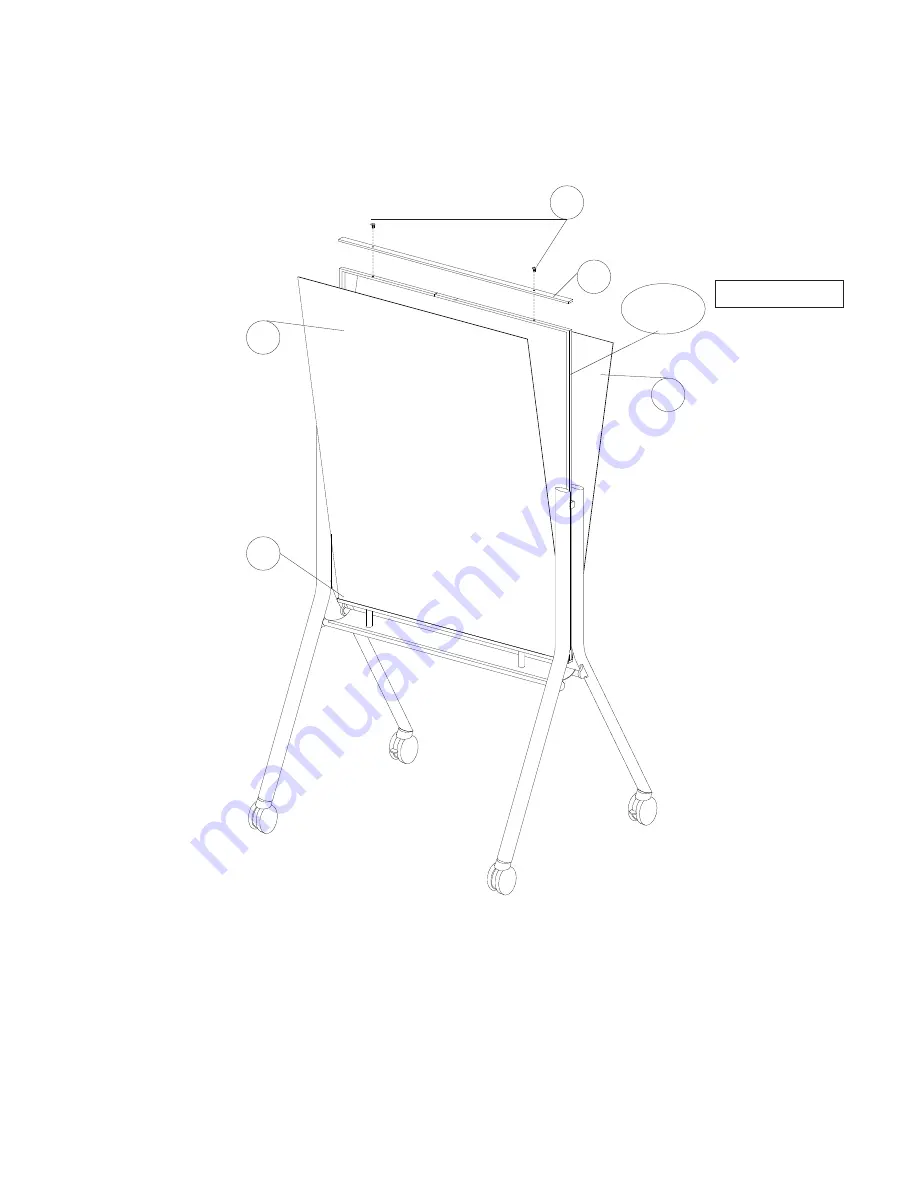
illustration #6

17.

P5

P1

B

P1

Place a Glass  Board (P1) on each side of the  C-Frame and down into the  bottom Cap

Channel (P5).  Hold both Glass Panels against the C-Frame  and place a  Cap

Channel (P5) over the top and secure in place with two Screws (B) as shown

in illustration #6.

P5

C-Frame

Summary of Contents for 74955

Page 1: ...45678901234567890123456789012123456789012 1234567890123456789012345678901212345678901234567890123456789012123456789012 1234567890123456789012345678901212345678901234567890123456789012123456789012 1234567890123456789012345678901212345678901234567890123456789012123456789012 1234567890123456789012345678901212345678901234567890123456789012123456789012 12345678901234567890123456789012123456789012345678...

Page 2: ...ray 1 EA P 7 Tray Hanger 2 EA P 8 C Frame 2 EA A CS Screw M6 10mm 8 EA P 9 C Frame Insert Tube 2 EA P 10 Threaded Block 2 EA B Screw M6 15mm 8 EA C Screw M8 65mm 2 EA D Lock Wasker 4 EA E Locking Caster 2 EA F Caster 2 EA G All Thread M6 38mm 2 EA H Caster Wrench 1 EA I Allen Wrench 4mm 1 EA J Allen Wrench 5mm 1 EA P 2B Leg 2 EA P 2A Leg 2 EA P 4 Leg Connector Inner 2 EA ...

Page 3: ... P3 to Leg P2B using two CS Screws A to secure each Make sure the threaded hole in the side of the Leg Connector Outer is positioned as shown in illustration 1 Tighten screws withAllen Wrench I 6 Place A Lock Washer D on the threaded stem of Caster F and screw it into the bottom of Leg P2A Tighten with Caster Wrench H 7 Slide the Leg Connector Inner that is on the Rear Leg up and into the Leg Conn...

Page 4: ...le in the side of the Leg Connector Inner is positioned as shown in illustration 2 Tighten screws withAllen Wrench 11 Place A Lock Washer D on the threaded stem of Locking Caster E and screw it into the bottom of the second Leg P2B Tighten with Caster Wrench H 12 Slide the Leg Connector Inner that is on the Front Leg up and into the Leg Connector Outer that is attached to the Rear Leg E H Left Fro...

Page 5: ...P8 C Frame and Leg Assembly C Frame and LegAssembly 14 Screw in an All Thread Rod G into each threaded hole in the bottom of the C Frames P8 Place a Cap Channel P5 on the All Thread rods as shown in illustration 4 Screw a Tray Hanger P7 onto eachAll Tread to secure the Cap Channel in place Place the Tray P6 on the bottom of the Tray Hangers and attach using two Screws B G P7 B P5 P6 G P7 P9 P9 ...

Page 6: ...ins from the Leg assembly from Step 12 and secure with two Screws B See illustration 5 Tray Assembly B B Leg Assembly from Step 7 16 Insert a Threaded Block P10 up and into the bottom of each Leg Connectoron the Leg assemblies while attaching the C Frame assembly using two Screws C as shown in illustration 5 UseAllen Wrench J to tighten Screws C Leg Assembly from Step 12 C C P10 P10 J ...

Page 7: ...Glass Board P1 on each side of the C Frame and down into the bottom Cap Channel P5 Hold both Glass Panels against the C Frame and place a Cap Channel P5 over the top and secure in place with two Screws B as shown in illustration 6 P5 C Frame ...

Page 8: ...8 Visionary Curve Easel 35 5 23 69 3 30 6 43 9 Visionary Curve_4 24 15 ...

Reviews: