Tongue Edge
LAP Edge
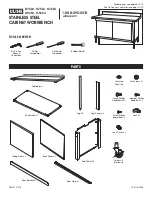
Tool List
Hammer & Phillips Screwdriver
Framing Square & Level
Hand or Circular Saw
Power Drill/Screwdriver
Measuring Tape
2 - 8' Step Ladders
Always wear safety glasses when cutting or nailing!
The siding is made in 4x8 sheets with grooves
cut into the face, the long edge is beveled so
that the siding overlays where they butt.
To identify which edge we want you to use,
we will refer to the edge as either the 'LAP'
Edge or the Tongue Edge. Nail siding with
8d galvanized box nails spaced 8" apart.
I
MPORTANT
I
NFORMATION
A
BOUT
Y
OUR
S
HED
K
IT
Thank you for purchasing our shed kit. Read the instructions before starting the assembly of the
building. If you have any questions about assembling the kit, call 800-245-1577. Business hours
(8:00-5:00 ET) Monday thru Friday. After business hours call 724-866-HELP (4357).
The foundation size should measure 12'-0" wide by 15'-9" long. Do Not make the foundation
larger than the building size. The siding should project beyond the foundation for water to expel
properly from the sidewalls.
The material that is included in our kit is listed on the back page. The optional floor package,
if purchased, will be supplied by a local lumber supplier. Our kit does not include the shingles,
the quantity needed is listed on the back page. The siding is primed. You will need to apply a
finish coat using latex acrylic paint.
Most buildings are installed on a wood floor and the siding was designed to extend over the wood
flooring. If the foundation is a concrete floor cut the siding flush with the bottom of the wall
plate to prevent the concrete from contacting the siding.
Stacking the boards, according to size, will make them easier to find when needed. Some boards
may have colored ends. Do Not discard any material until your building is complete.
Before you begin construction, be sure to study this assembly manual. Also, obtain a building
permit and check all pertinent building code regulations.