background image

6

7

click!

(4)

4-

5-

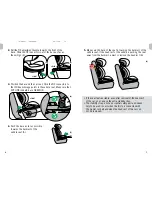
Push the base as far as possible 

towards the backrest of the 

vehicle seat (5).

Make sure the back of the seat is touching the backrest of the 

vehicle seat. If the head rest of the vehicle is pushing the seat 

away from the backrest, adjust or remove the headrest (6).

(5)

(6)

2- Pull the FIX adjustment handle towards the front of the 

base. Slide the FIX connectors out of the base as far as 

they will go (3). 

(3)

(2)

click!

click!

3- Position the base on the car seat. Click the FIX connectors to 

the ISOfix anchorage points in the vehicle seat. Make sure that 

BOTH FIX indicators are GREEN (4).

•  If the seat feels unstable, even after removal of the headrest 

of the car, you can use the extra stability strap.

•  The stability strap is not an essential safety part and needs 

only to be used in cars when the iZi Up is connected with 

the 3-point car belt and when the head rest of the car can 

not be removed.

Summary of Contents for iZi Up FIX

Page 1: ...1 2 3 15 36 kg 4 12 y FORWARD FACING ECE R44 04 GROUP WEIGHT AGE USER MANUAL...

Page 2: ...m 15 36 kg The child should ALWAYS be secured with the 3 point belt when seated in the child seat When installed with ISOfix Make sure the indicators are GREEN before you drive When the child weighs o...

Page 3: ...ISOfix car anchorages the iZi Up FIX can be installed in all passenger seats with a 3 point car belt with the FIX connectors slided in It is recommended to use the rear seats If you install iZi Up FIX...

Page 4: ...ide the FIX connectors out of the base as far as they will go 3 3 2 click click 3 Position the base on the car seat Click the FIX connectors to the ISOfix anchorage points in the vehicle seat Make sur...

Page 5: ...tween the cover and the surface of the iZi Up head rest Then guide the strap around both bars of the head rest of the car Adjust the iZi Up to the correct height by turning the height adjusting lever...

Page 6: ...e the belt is not twisted and close the guide again 15 15 3 Lock the belt in the buckle click The lap belt should be positioned over the hips 16 click 16 4 Remove slack in the belt by pulling the belt...

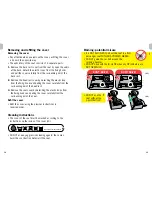
Page 7: ...ounding rim of the head rest Remove the seat cover by detaching the elastic loops from the fixing hooks and pulling the cover carefully from the surrounding rim of the seat Removing the cover Refit th...

Page 8: ...for later use with the seat DO NOT use at home on a table or worktop as long as your child is seated in the seat When installed with ISOfix Check the manufacturer s vehicle handbook When the child sea...

Page 9: ...nths of purchase due to materials or manufacturing fault except covers and harness straps please return it to the original place of purchase The guarantee is only valid when you use your seat appropri...

Reviews: