background image

Using the remote control

21

Eng
lish

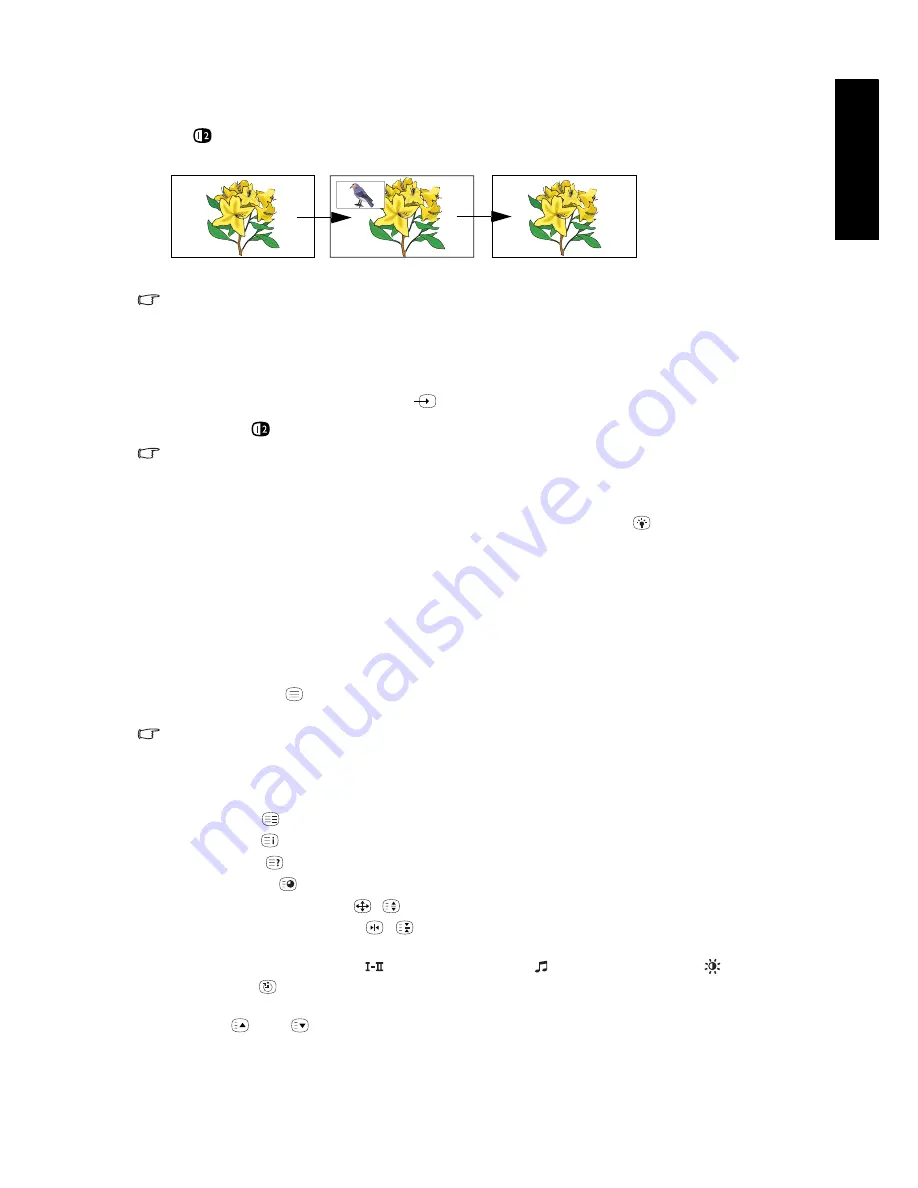
Using the PIP (Picture-In-Picture) function

If the TV is connected to a TV/CATV, Video and Graphic source simultaneously, pressing 
PIP

 on the remote control allows you to display both images on the screen at the same time 

in PIP (Picture-In-Picture) mode.

• Video image sources: TV (ATV), Composite Video (AV1, AV2, AV3 or AV4), S-Video (AV3-S or 

AV4-S).

• Graphic image source: PC.

To display images in PIP mode:
1. Make sure that both Video and Graphic image sources are connected to the TV.

2. Press INPUT on the TV, or Input 

on the remote control to select PC as the input source.

3. Press PIP

 on the remote control to switch display to PIP mode.

In PIP mode, Teletext and OSD menu will not display. Some of the remote control functions will 

also become unavailable.

Adjusting backlight

To adjust the intensity of your TV's backlight system, press Backlight 

 on the remote control 

to select between Bright, Normal, Dark or Auto.
When viewing the TV in dimly lit rooms it is recommended to set the backlight to Dark which 

will reduce the image brightness and make the dark areas of the image darker thus maintaining 

a high contrast image in a dark environment. 
If Auto is selected, the ambient light sensor on the TV will be activated and the TV’s backlight 

will be changed automatically according to the ambient lighting condition.

Using the Teletext function

Press the Teletext 

 on the remote control to display Teletext. To return to normal viewing, 

press it again.

Teletext is only available when TV, Composite Video (via the AV and SCART inputs) or S-Video 

(via the S-Video inputs) is selected as the input source, and a signal which transmits Teletext is 

currently displayed. Not all TV stations and video signals broadcast Teletext. If in doubt, please 

contact the TV station or the video source provider.

When Teletext displays on-screen, you can:
• Press Mode 

 to cycle between Teletext modes including Teletext only and mixed display.

• Press Index 

 to go to the Teletext index page.

• Press Reveal 

 to display any concealed Teletext information (if available).

• Press Subpage 

 to enter the subpage of a Teletext menu (if available).

• Press Aspect/Teletext size 

/

 to enlarge Teletext size. Press it again to resume normal size.

• Press Freeze /Teletext freeze

/

 to freeze Teletext messages. Press it again to restore 

normal update.

• Press TV sound/red button

, Audio/green button

, Preset/yellow button

 or Sleep /

blue button

 to jump to the corresponding coloured pages as displayed across the bottom 

of the Teletext screen.

• Press

 or

 to go to the previous or next Teletext page, or go to the subpage (if 

available).

Full screen

PIP mode

Full screen

Summary of Contents for V37C

Page 1: ...ts 10 Composite AV source inputs 10 Component Video source inputs 10 Other Graphic source inputs 10 Front view 11 Control panel 12 External AV devices temporary terminal panel 13 Rear view 14 Getting...

Page 2: ...g the OSD menu 29 Audio menu 30 Picture menu 31 Setting up Personal picture mode 32 Feature menu 32 Window menu 33 TV menu 34 Performing manual installation 34 Editing programs 35 Naming a program 35...

Page 3: ...Welcome English V37C VL3735 LCD TV Section 1 Quick Start Guide...

Page 4: ...k that all the following items are included The type of power cable supplied may differ from that illustrated dependant upon your region of purchase If any item is missing or damaged contact your plac...

Page 5: ...attaching the TV to the wall bracket It slides in and down onto the bracket from above Do NOT place the TV near or above sources of heat such as radiators heaters fuel stoves and other heat generatin...

Page 6: ...plug the appropriate end into the AC INLET socket on the rear of the TV as illustrated below 2 Connect the other end into an appropriate wall power outlet and switch it on if switched The TV will ente...

Page 7: ...terminals match the and marks in the battery compartment Note that these batteries are provided for your convenience so that you can operate the TV straight away You should replace them as soon as pos...

Page 8: ...arching for available channels and tune and store them for you This may take several minutes depending on the available TV channels in your local reception area Please allow the display to complete th...

Page 9: ...hould you wish to maximise your viewing experience pleasure Section 2 of this booklet contains the User s Manual which describes how to customise the TV settings to suit your preferences and viewing e...

Page 10: ...Section 1 Quick Start Guide 8 English Memo...

Page 11: ...Welcome English V37C VL3735 LCD TV Section 2 User s Manual...

Page 12: ...source inputs include 2 x Component Video Y CB PB CR PR 1 x HDMI DVI and 1 x PC VGA You should connect whichever TV Video or Graphic sources you wish to view on the TV You need not connect more than o...

Page 13: ...when the TV is in standby mode 3 Ambient light sensor If activated this sensor detects ambient lighting condition and adjusts the brightness of the TV automatically See Backlight on page 38 for more...

Page 14: ...Program buttons Sequentially selects the previous or next tuned TV program Performs the same action as the P Program buttons on the remote control In the OSD menu moves the selection highlight up or...

Page 15: ...oth are connected to an AV source at the same time S Video input takes preference over Composite Video input S Video will provide a better quality image AV3 AUDIO L R Connect to the audio output of ei...

Page 16: ...ut on page 24 and Connecting the S Video input on page 24 2 AV2 Connect each to the SCART input output of an appropriate device See Connecting the SCART input on page 23 and Connecting the SCART outpu...

Page 17: ...o output on a PC See Connecting the PC input on page 25 9 HDMI DVI Connect to the DVI digital video or HDMI digital audio video output of your digital source device See Connecting the DVI input on pag...

Page 18: ...on on page 19 When Teletext displays on screen press this button to select the corresponding colour Teletext page See Using the Teletext function on page 21 7 Preset yellow button Press this button to...

Page 19: ...page 20 When Teletext displays on screen press this button to freeze Teletext messages Press it again to restore normal update See Using the Teletext function on page 21 17 Aspect Teletext size Press...

Page 20: ...this button to toggle between the current and the previous program you were viewing See Returning to the previous viewed program on page 20 When viewing different input sources press this button to to...

Page 21: ...when the S Video input signal is connected to these inputs DVI and HDMI inputs share the same input option HDMI Adjusting volume Adjusting volume Press Volume on the TV or Volume on the remote contro...

Page 22: ...ime and any interim video is not displayed Do not leave the screen displaying a static image for an extended period of time days because you may temporarily or permanently damage the screen resulting...

Page 23: ...ensor on the TV will be activated and the TV s backlight will be changed automatically according to the ambient lighting condition Using the Teletext function Press the Teletext on the remote control...

Page 24: ...an appropriate aspect ratio for the TV to display it Press the button to cycle through the display aspect ratios The table below describes the resultant displayed images in relation to the input image...

Page 25: ...onnectors are firmly seated Connecting the SCART input Connecting the SCART output Connect the AV 1 or AV 2 terminal on the TV to the SCART terminal on your output equipment using a SCART cable not pr...

Page 26: ...ces can only output Com posite Video signals for example most VCRs analog Camcorders and game con soles 1 Connect the S Video output of your output equipment to the TV s AV3 or AV4 S VIDEO terminal us...

Page 27: ...log video signal types Component Video offers the best quality When Composite and Component signals are connected simultaneously to the AV input do not select Auto in the AV option of the Setup menu S...

Page 28: ...dio and high resolu tion audio formats See Supported Component HDMI input sig nal timing on page 43 for timing options 1 Connect the digital video output of your output equipment to the HDMI terminal...

Page 29: ...m or other audio devices If you use this output you may wish to mute the built in speakers See Speaker Out on page 30 Connect the audio input terminals of an amplifier or other audio device to the AUD...

Page 30: ...Sharpness Colour TEMP NTSC Tint NTSC Setup Contrast Brightness Colour TEMP Auto Frequency Phase H Position V Position Contrast Brightness Colour TEMP Feature Black Extension ACE Noise Reduction Aspect...

Page 31: ...ubmenu 4 Press or on the remote control or Volume or Volume on the TV to adjust settings Press OK to enter the submenu if necessary 5 Press MENU on the remote control or MENU on the TV to return to th...

Page 32: ...ations when viewing TV programs This option will become unavailable if Speaker Out is set to On Off Auto Speaker Out Enables sound output to an external sound system when set to On On Off Advanced Aud...

Page 33: ...ess for sharper image for softer image 0 to 8 Colour TEMP Adjusts the colour tint of the black and white part of the image Press or to change selection Cool Biased toward blue for PC input Normal Stan...

Page 34: ...illustration is for reference only Item Function Operation Range Black Extension Enhances the contrast among details when viewing dark images This option will not be available if the ACE function is...

Page 35: ...rce for the PIP function This option is available only if the PIP function is activated ATV AV1 AV1 RGB AV2 AV3 AV3 S AV4 AV4 S The AV3 S and AV4 S options are available only if S Video signals are co...

Page 36: ...o tuning operation and allows programs to be stored on the corresponding program numbers Press or to change selection UK France Netherlands Germany Italy Spain Austria Belgium Luxemburg Switzerland Po...

Page 37: ...his program to the TV program memory 9 Press MENU to close the menu Editing programs You can delete unwanted programs add a program name and change the program position number This option is not possi...

Page 38: ...ate broadcast programs such as adult only programs This Child Lock only affects the TV CATV input not AV inputs and prohibits the selection or display of every program which has had its PR Lock menu i...

Page 39: ...nd then press OK 3 Enter a new 4 digit password using the program selection buttons IMPORTANT Write your selected password down here in this manual so that it is available to you should you ever forge...

Page 40: ...nsity If Auto is selected the ambient light sensor will be activated and the TV s backlight will be changed automatically according to the ambient lighting condition Dark Normal Bright Auto Sleep Time...

Page 41: ...ithin 3 months or as soon as you can after initial use Important safety instructions Electrical energy can perform many useful functions but it can also cause personal injury and property damage if im...

Page 42: ...e electric shock and or short circuit internal parts For the same reason do not spill water or liquid on the TV 15 Damage requiring service If any of the following conditions occurs unplug the power c...

Page 43: ...Reference 41 English Dimensional drawings Unit mm...

Page 44: ...te Video x 2 Composite Video audio x 2 SCART Cenelec x 2 Component Video Y CB PB CR PR x 2 Component Video audio x 2 Graphic PC VGA x 1 PC audio x 1 HDMI x 1 DVI via HDMI x 1 DVI audio x 1 Signal outp...

Page 45: ...ick on Windows Desktop and select Properties from the menu that appears 2 Click the Settings tab in the window that appears 3 Drag the Resolution slider and select a compatible resolution according to...

Page 46: ...trains high voltage transmission lines neon signs or another sources of interference Try redirecting or relocating your antenna to reduce the affects of the interference If the antenna is exterior hav...

Page 47: ...ay be weak Change programs to confirm if the symptom is still present Make sure the outside antenna is not disconnected Make sure the antenna is facing the right direction If the antenna is exterior h...

Page 48: ...Reference 46 English Memo...

Reviews: