background image

28 Menus 


5. OSD POSITION: The position of the On Screen Display can be adjusted in both vertical and horizontal 

directions. 

The available adjustment range of the vertical position depends on the type of the input signal that is being 
displayed. The vertical position cannot be changed with some types of signal.

6. PATTERN: It will be displayed with the aspect ratio setting made using the ASPECT function of the 

DISPLAY menu. Use this pattern when installing the projector, even if there is no input signal. Use it to 
adjust the image size and the focus.

Only some of the items above can be adjusted, when there is no input signal.

PRO-PICTURE Menu

Except for SET USER COLOR TEMP, the settings can be stored in three separate video memories. Each can have 
different parameters for different types of video signal.

1. COLOR TEMP: Adjusts the white color. 5 options are available for COLOR TEMPERATURE: HI BRIGHT, 

STANDARD, LOW, USER1 and USER 2.

HI BRIGHT: High color temperature. Makes white bluish. It is best suited to PCs and other computers.

STANDARD: Middle color temperature (6500°K). Maintains normal colorings for white. It is best suited 
for viewing TV.

LOW: Low color temperature (5700°K). Makes white appear reddish. It is best suited for viewing movies.

USER 1 and USER 2 : Two different color temperatures can be customized and stored. See below for 
details

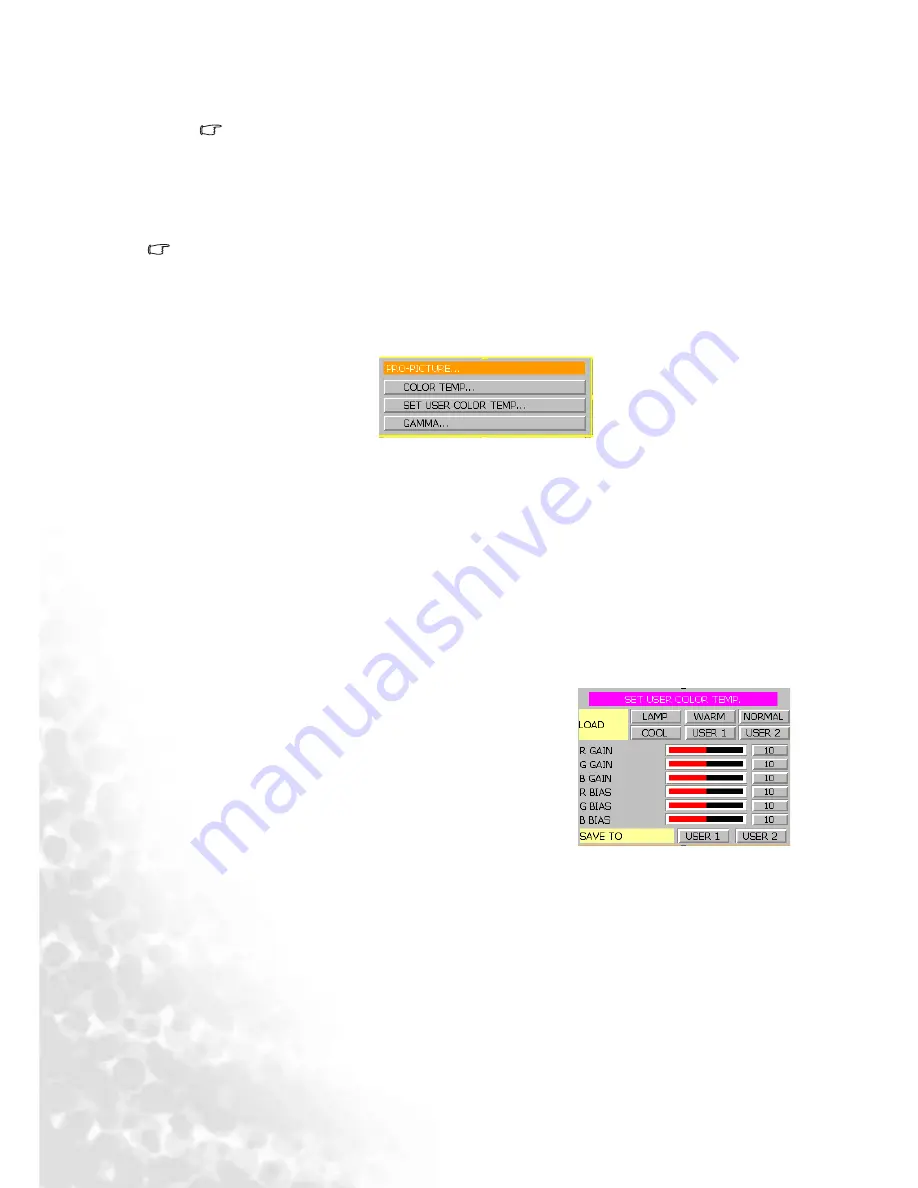
2. SET USER COLOR TEMP: Adjusts and stores users’ preferable color temperature.

To store the settings:

i.) Open the PRO-PICTURE menu and select SET USER 
COLOR TEMPERATURE, press ENTER. A menu like the one 
pictured to the right will be displayed.

ii.) Choose a basic color temperature among LAMP, WARM, 
NORMAL and COOL by pressing the 

c

 or 

d

 button and 

press ENTER.

iii.) Press 

c

 or 

d

 to select the item to be changed. And adjust 

the value with 

e

 or 

f

 button.

iv.) Store the settings as USER 1 or USER 2 by pressing the 

c


or 

d

 button.

v.) Press Enter to save the changes.

About color temperatures:
There are many different shades that are considered to be “white” for various purposes. One of the 
common methods of representing white color is known as the “color temperature”. A white color with a 
low color temperature appears to be reddish white. A white color with a high color temperature appears 
to have more blue in it. The SET USER COLOR TEMP menu allows you to alter the color temperature 
and the overall color balance of the image by adjusting the red, green and blue gains and biases.

To make the color temperature higher
Set the value of B GAIN (or B BIAS) greater, and the value of R GAIN (or R BIAS) smaller.

To make the color temperature lower

Summary of Contents for PE7800 - DLP Projector - 800 ANSI Lumens

Page 1: ...PE7800 Digital Projector Home Theater User s Manual Welcome...

Page 2: ...tions or warranties either expressed or implied with respect to the contents hereof and specifically disclaims any warranties merchantability or fitness for any particular purpose Further BENQ Corpora...

Page 3: ...anel 13 Remote Control 14 Connecting 15 Connecting Video Inputs 15 Connecting to DVD players 15 Connecting Progressive Component DTV Y PB PR 15 Connecting RGBHV DTV RGB 16 Connecting Video Equipment a...

Page 4: ...N Menu 27 PRO PICTURE Menu 28 Additional Information 30 Warning Message 30 Replacing the Lamp Contact your BenQ dealer for assistance 31 Indicators 32 Troubleshooting 33 Specifications 34 Optical Char...

Page 5: ...he distance between the equipment and receiver Connect the equipment into an outlet on a circuit different from that to which the receiver is connected Consult the dealer or an experienced radio TV te...

Page 6: ...ector Save this user s manual for future reference Do not look straight at the projector lens during operation The intense light beam may damage your eyes Refer servicing to qualified service personne...

Page 7: ...To reduce the risk of electric shock do not disassemble this appliance Take it to a qualified technician when service or repair is required Incorrect reassembly can cause malfunction of the projector...

Page 8: ...here is poorly ventilated or confined Allow at least 50 cm clearance from walls and free flow of air around the projector Locations where temperatures may become excessively high such as the inside of...

Page 9: ...n 30 dB Q Wide Variety of Inputs The projector can support a wide variety of video formats including Composite S Video Component YPbPr YCbCr and DVI I digital and analogue RGB The two component inputs...

Page 10: ...correct polarity then close the cover Notes on Batteries Q Make sure that the polarities are correct when installing the batteries Q Do not mix an old battery with a new one or mix different types of...

Page 11: ...nt Adjuster button Adjusts the height or projection angle Back IR Sensor AC Power IN Socket Main AC Power Switch Rear Adjuster Ventilation Holes exhaust Rear Adjuster Ventilation Holes exhaust Connect...

Page 12: ...signal input 3 Component RCA jacks 480i Component Y CB CR video signal input 4 RGB HDTV BNC DTV Y PB PR or DTV RGB video signal input 5 Computer DVI I RGB Computer and DVI signal input 6 RS 232C phon...

Page 13: ...g 2 ARROWS c e d f Refer to page 23 for more information Used to select the desired menu items and to make adjustments 3 EXIT Exits and saves the menu settings 4 MENU Refer to page 22 for more informa...

Page 14: ...or more information LIGHT Turns the remote control s backlight on POWER ON OFF Hold ON down for ONE second to turn the projector on Press OFF to turn the projector off Refer to pages 19 and 21 for mor...

Page 15: ...D players If the selected video image is not displayed after the projector is turned on and the correct video source has been selected please check that the video source is turned on and operating cor...

Page 16: ...her Computer using the DVI I Connector not included in the accessory kit To audio output terminals To audio input terminals DTV To DVI I terminals DVI DVI cable To DVI I terminals To audio output term...

Page 17: ...the remote control or POWER key on the projector for ONE second to turn the projector on Adjust the Height There are four adjustment screws on the bottom of the projector These adjustment screws chang...

Page 18: ...5 40 0 65 2 79 6 4 8 68 9 33 8 60 0 97 8 119 4 7 2 91 8 45 0 80 0 130 4 159 2 9 6 103 3 50 6 90 0 146 7 179 1 10 8 114 8 56 3 100 0 163 0 199 0 12 0 126 2 61 9 110 0 179 3 218 9 13 2 137 7 67 5 120 0...

Page 19: ...4 If the horizontal frequency of the input signal exceeds the range of the projector XGA a message reading Unsupported timing will be displayed on the screen This message will remain on screen until y...

Page 20: ...the image displayed at the center of the screen 5 WIDE A 4 3 aspect ratio image is enlarged NON linearly in horizontal direction to accommodate 16 9 full screen display Q Refer to page 25 for more inf...

Page 21: ...witch to the active window You can change the input signal setting in the active window Q Press or to adjust the size of the PIP window Q Adjust the position of the PIP window with the ARROW keys c e...

Page 22: ...LT LOAD LAMP TIMER RESET AUTO OFF 10 MINNUTES LOAD DEFAULT OF CURRENT SOURCE ARE YOU SURE NO YES LANGUAGE ENGLISH FRENCH SPANISH GERMAN ITALIAN TRADITIONAL CHINESE SIMPLIFIED CHINESE KOREAN MIRROR FLO...

Page 23: ...menu BRIGHTNESS CONTRAST COLOR TINT SHARPNESS FILTERS RED GREEN BLUE YELLOW 1 BRIGHTNESS Adjusts the picture brightness to values between 0 and 60 The higher the value the brighter the picture And lo...

Page 24: ...d 30 The higher the setting the greater the intensity of red color in the image 8 GREEN Adjusts green hues independently to values between 0 and 30 The higher the setting the greater the intensity of...

Page 25: ...t ration NON linearly along the horizontal axis to provide full screen display at a 16 9 aspect ratio THROUGH One to one mapping is performed without any scaling of the image The image is displayed at...

Page 26: ...P To store the settings i Adjusts the items in the Picture and Pro Picture menus to desired values ii Go to the Display menu and select SAVE press Enter The SAVE OSD will be shown as the picture above...

Page 27: ...elect this setting with the projector set on the floor and audience viewing the projected images from the front side of the screen This is the most common setting CEILING FRONT Select this setting wit...

Page 28: ...te appear reddish It is best suited for viewing movies USER 1 and USER 2 Two different color temperatures can be customized and stored See below for details 2 SET USER COLOR TEMP Adjusts and stores us...

Page 29: ...he color saturation of mid color tones within the image Can be used to displayed fine detail more clearly under some conditions CINEMA Suitable for viewing movies in a dark room PC Suitable for viewin...

Page 30: ...d its lifetime after hours will be displayed on the screen for 30 seconds each time the projector is turned on after the lamp has been in use for 1980 hours The number of hours will be updated Q The m...

Page 31: ...out the lamp module horizontally Pulling it too quickly may cause broken glass to scatter about if the bulb has broken Do not place the lamp in locations where water might splash on it children can r...

Page 32: ...e intake ventilation or the exhaust ventilation is blocked The projector may be in a poorly ventilated location The ambient temperature may be too high Solution Make sure that the ventilation holes ar...

Page 33: ...ct input signal POWER light or LAMP indicator light flashing Please contact your BenQ dealer for assistance Image is unstable The connection cables are not securely connected to the projector or the s...

Page 34: ...stics Color system NTSC3 58 NTSC 4 43 SECAM PAL M PAL N Resolution XGA SVGA VGA 480p 720p 1080i Max number of display colors 16 770 000 colors full color display Input Output Video S Video Component Y...

Page 35: ...35 Additional Information Dimensions Unit mm...

Reviews: