background image

mouse is being charged. 

2. 

If the mouse is going to remain unused for a long period of time, remove the rechargeable batteries from it to avoid unwanted battery power 

consumption. 

3. 

DO NOT charge the battery unless it is labeled as a “rechargeable” battery. 

Trouble Shooting 

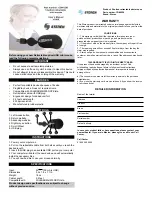
If you experience problems setting up your M310 Plus Wireless Mini Optical Mouse, please check the following: 

1. Make sure the mouse “Power ON/OFF Switch” is in the ON position. 

2. Check that the batteries are loaded correctly and have been charged. 

3. Check that the receiver is connected to the USB port correctly. 

4. Please make sure the wireless mouse & receiver are connected properly and activated as described in Step 3 of the Operating Instructions. 

5. Please try to avoid operating the optical mouse on metallic or glass surfaces as the optical sensor may not function correctly. 

6. Please ensure that the battery cover is properly secured. 


Warranty Information 

Warranty 

• 

One year parts/labor from the date of purchase. 

• 

Please refer to the Warranty Terms and Conditions for your local region for further warranty details. 

• 

For more information, please visit: www.BenQ.com 


Summary of Contents for N331

Page 1: ...le PC or Macintosh system Microsoft Windows 98SE 2000 Me XP or Mac OS X An available USB port Installation Instructions Battery Installation Step 1 Press the Battery Cover Release Button to remove the...

Page 2: ...ch 2 The mouse can be manually powered OFF by pressing both Left and Right Mouse Buttons and the Scroll Wheel Button simultaneously Press any mouse button to turn the power back ON 3 If not manually p...

Page 3: ...ries are loaded correctly and have been charged 3 Check that the receiver is connected to the USB port correctly 4 Please make sure the wireless mouse receiver are connected properly and activated as...

Page 4: ...user is encouraged to try to correct the interference by one or more of the following measures Reorient or relocate the receiving antenna Increase the separation between the equipment and receiver Co...

Page 5: ...AAA rechargeable batteries into the mouse Step 3 Slide and lock the battery cover back into place NOTE Please insert the batteries correctly as the pictures Don t insert the batteries upside down Do n...

Page 6: ...USB port on your computer and to the charge port on the mouse Step 3 The LED scroll wheel will turn RED when the mouse is charging and will turn OFF when charging is complete NOTE 1 To avoid possible...

Page 7: ...ormation Warranty One year parts labor from the date of purchase Please refer to the Warranty Terms and Conditions for your local region for further warranty details For more information please visit...

Page 8: ...user is encouraged to try to correct the interference by one or more of the following measures Reorient or relocate the receiving antenna Increase the separation between the equipment and receiver Co...

Reviews: