

Q
Q
u
u
i
i
c
c
k
k
I
I
n
n
s
s
t
t
a
a
l
l
l
l
a
a
t
t
i
i
o
o
n
n
G
G
u
u
i
i
d
d
e
e
Important Information
For Windows® XP, please visit our website at
http://www.emprex.com/
to download and install the “MouseMaestro
Input Device Driver” to access the mouse functions of tilt wheel left and tilt wheel right.
For Windows® 7 & Windows Vista®, you can use the mouse immediately after plugging the dongle receiver into your PC
USB port. If you want to enjoy the full functionality of the mouse, please go to the website at
http://www.emprex.com/
to install the "MouseMaestro Input Device Driver."
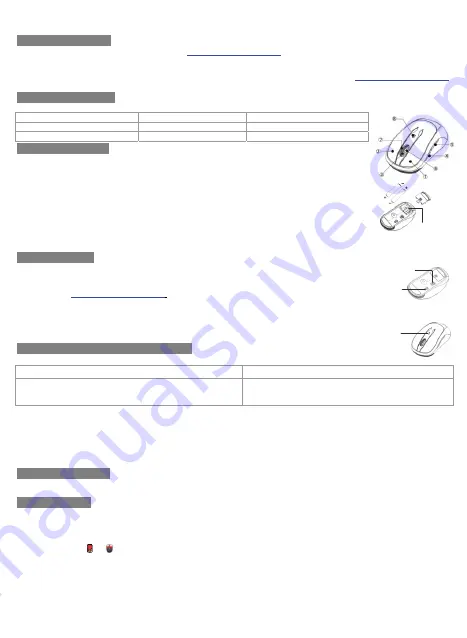
Mouse Button Function
Please refer to the mouse drawing picture :
1.
Left button
2.
Right button
3.
Scroll wheel/middle button
4.
Backward
5.
Forward 6.
Tilt wheel left
(M969TAL ONLY)
7.
Tilt wheel right
(M969TAL ONLY)
8.
LED indicator/battery low
Hardware Installation
1.
Plug the receiver into your available USB port on PC.
2.
Make sure the batteries of the mouse are installed correctly, please follow the
polarity signs in the battery compartment.
3.
Please make sure the slide switch on the back of the mouse is switched to “
on
”
before using the mouse. When not in use, you can either slide the power switch to
“
off
” for power saving or store the receiver inside the mouse to turn the power off.
4.
Please hold the mouse close to the receiver within 30 cm and press any key to pair
ID, and then you can use the wireless mouse immediately.
Receiver Storage:
You could have the receiver housed inside the receiver storage slot.
By releasing the battery cover at the bottom of the mouse, and insert the receiver into
the receiver storage slot between the batteries to store the receiver.
Pairing Procedure
Please follow the hardware installation procedure mentioned above to install the
wireless mouse, and you can use the mouse immediately.
If it can’t work, please visit
our website at
http://www.emprex.com/
to download and install the “Pairing Tool.”
Note:
1.
You don’t have to pair ID again after changing batteries. If it can’t work, please
follow the steps above to complete ID pairing.
2.
The mouse can operate freely up to 10 meter from the receiver.
3.
Mouse battery life is up to 4
months. It depends on the intensity of usage.
Mouse Sensitive (Resolution) Adjustment
The resolution can be adjusted by pressing the middle button and right button of the mouse.
1600 DPI
→
800 DPI (Default is 1600 dpi)
800 DPI
→
1600 DPI
Press and hold the middle button (scroll wheel) & right
button simultaneously about 3 seconds, and the LED
indicator will light about
1
second.
Press and hold the middle button (scroll wheel) & right
button simultaneously about 3 seconds, and the LED
indicator will light about
3
seconds.
¾
Change the cursor pointer speed
You can modify the mouse pointer speed settings in the control panel.
1.
Open the Start Menu by clicking “Start” at the lower-left corner on the screen
2.
Then click on Settings / Control Panel / Mouse
3.
In the Mouse Properties window that appears, click the Motion tab
4.
Move the slide bar toward either the faster end or the slower end
5.
Click OK to exit and make the change effective
System Requirements
Available USB port
Microsoft® Windows® 7, Windows® XP and Windows Vista® operating system
Driver Installation
For Windows® XP, please install the “MouseMaestro Input Device Driver” to access the mouse function of tilt wheel right
and tilt wheel left.
1.
After you download the driver, please find the “SetupKey.exe” in the directory and double-click this file.
2.
Then follow the on-screen instruction to install the driver.
3.
The driver icon or will show at the bottom right of the Windows system tray when the driver is loaded.
English
ID pairing button/
connect button
LED indicator
(Battery low/ ID
pairing indicator)
Power Switch
Receiver
storage slot


