Operating Instructions
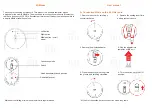
Step 1. To ensure correct operation, please make sure that the receiver is installed at least 20cm (8 inches) away from electronic devices
(such as monitors or speakers).
Step 2. Plug the receiver unit into a USB port on your system. The system will automatically detect the new hardware and install the device.
Step 3. To activate, first press the CONNECT button on the receiver, and then the CONNECT button located on the bottom of the mouse
within 10 seconds of each other.
NOTE:
•
The receiver/mouse may not function properly if placed on or near a metal surface.
•
If the mouse does not activate, please Repeat Step 3.
•
It is necessary to repeat Step 3 after any loss of power from battery replacement.
Power-Saving Modes
1. The mouse can be manually powered OFF by using the “Power ON/OFF Switch”.
2. The mouse can be manually powered OFF by pressing both Left and Right Mouse Buttons and the Scroll Wheel Button simultaneously. Press any
mouse button to turn the power back ON.
3. If not manually powered OFF, the mouse will go into automatic sleep mode when not used for 5 minutes.
Receiver Storage
1.
Insert the receiver from the rear of the mouse.
2.
To EJECT the receiver, press the receiver
release button on the top of the mouse.
Charging Instructions
When the mouse batteries are low on power, the LED scroll wheel will turn RED to indicate that they need recharging.
Step 1. Press the “Power ON/OFF Switch” to the OFF position.
Step 2. Connect the supplied USB charging cable to a USB port on your computer and to the charge port on the mouse.
Step 3. The LED scroll wheel will turn RED when the mouse is charging, and will turn OFF when charging is complete.
NOTE:
1.
To avoid possible damage during charging, please ensure the ON/OFF switch on the underside of the mouse is in the OFF position whilst the