background image

Introduction

8

Shipping contents

Shipping contents

Shipping contents

Shipping contents

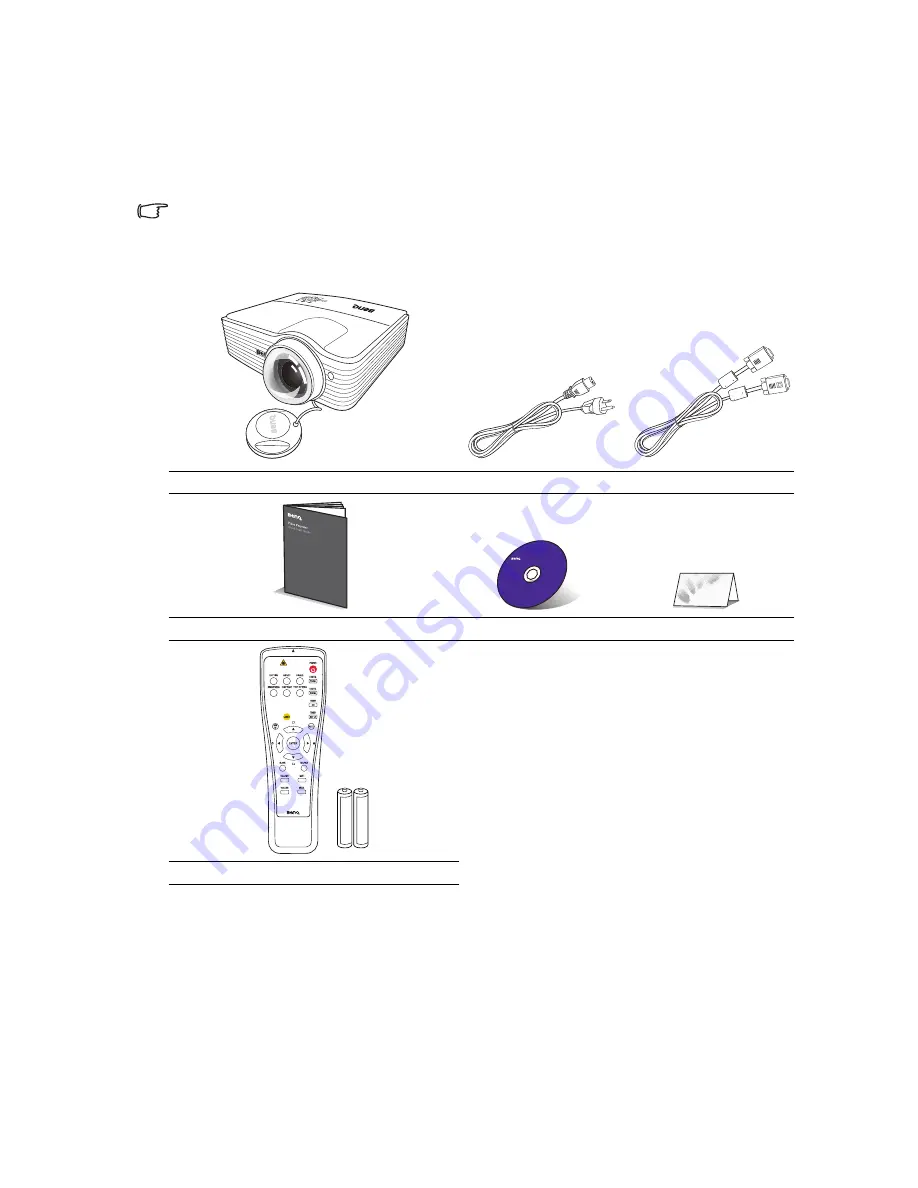
Carefully unpack and verify that you have all of the items shown below. If any of these items 
are missing, please contact your place of purchase.

Standard accessories

Standard accessories

Standard accessories

Standard accessories

The supplied accessories will be suitable for your region, and may differ from those 
illustrated.
*The warranty card is only supplied in some specific regions. Please consult your dealer for 
detailed information.

Optional accessories

Optional accessories

Optional accessories

Optional accessories

Projector

Power cord

VGA cable

Quick start guide

User manual CD

Warranty card*

Remote control with batteries

1.

Spare lamp kit

2.

Ceiling mount kit

3.

RS232 cable

4.

Carry bag

Summary of Contents for MP722ST

Page 1: ...Welcome MP772 ST MP776 ST MP772 ST MP776 ST MP772 ST MP776 ST MP772 ST MP776 ST Digital Projector Digital Projector Digital Projector Digital Projector User Manual User Manual User Manual User Manual...

Page 2: ...tching input signal 29 Magnifying and searching for details 30 Selecting the aspect ratio 30 Optimizing the image 32 Setting the presentation timer 35 Freezing the image 37 Hiding the image 37 Utilizi...

Page 3: ...er or Always open the lens shutter or remove the lens cap when the remove the lens cap when the remove the lens cap when the remove the lens cap when the projector lamp is on projector lamp is on proj...

Page 4: ...lugged 10 Do not place this product on an unstable cart stand or table The product may fall sustaining serious damage 11 Do not attempt to disassemble this projector There are dangerous high voltages...

Page 5: ...re higher than 3000 m 10000 feet 14 Do not block the ventilation holes Do not place this projector on a blanket bedding or any other soft surface Do not cover this projector with a cloth or any other...

Page 6: ...ur BenQ projector so we need to bring this safety matter to your attention to prevent possible damage to person and property If you intend to mount your projector on the ceiling we strongly recommend...

Page 7: ...arch speeding up the signal detecting process Selectable password protected function 3D color management allowing color adjustments to your liking Selectable quick cooling function making the projecto...

Page 8: ...ries Standard accessories The supplied accessories will be suitable for your region and may differ from those illustrated The warranty card is only supplied in some specific regions Please consult you...

Page 9: ...RJ45 LAN input jack 16 RS232 control port 17 RGB signal output jack 18 HDMI input port 19 RGB PC Component Video YPbPr YCbCr signal input jack 20 S Video input jack Video input jack 21 Audio L R inpu...

Page 10: ...enu items and to make adjustments Locking control keys on page 38 Using the menus on page 25 12 12 12 12 Mode Enter Mode Enter Mode Enter Mode Enter Selects an available picture setup mode Activates t...

Page 11: ...or presentation purposes Operating the LASER pointer on page 12 8 8 8 8 MENU EXIT MENU EXIT MENU EXIT MENU EXIT Turns on the On Screen Display OSD menu Goes back to previous OSD menu exits and saves m...

Page 12: ...rrows to select the desired menu items and to make adjustments Using the menus on page 25 20 20 20 20 SOURCE SOURCE SOURCE SOURCE Displays the source selection bar Switching input signal on page 29 21...

Page 13: ...batteries observing the battery polarities as indicated in the base of the battery compartment Positive goes to positive and negative goes to negative 3 Refit the cover by aligning it with the base a...

Page 14: ...your projector on the ceiling Set Front Ceiling Front Ceiling Front Ceiling Front Ceiling in the SYSTEM SETUP SYSTEM SETUP SYSTEM SETUP SYSTEM SETUP Basic Basic Basic Basic Projector Position Project...

Page 15: ...or you will need to account for both the projected image size and the vertical offset dimension which are directly proportional to the projection distance BenQ has provided a table of 4 3 aspect ratio...

Page 16: ...your measurement in the average distance from screen column labelled Distance from Screen in mm This is the projection distance 3 Using this value look across that row to the left to find the corresp...

Page 17: ...tu before you permanently install it so as to make allowance for this projector s optical characteristics This will help you determine the exact mounting position so that it best suits your installati...

Page 18: ...projector see Shipping contents on page 8 They are commercially available from electronics stores The connection illustrations below are for reference only The rear connecting jacks available on the p...

Page 19: ...See Audio Settings on page 50 for details Many notebooks do not turn on their external video ports when connected to a projector Usually a key combo like FN F3 or CRT LCD key turns the external displa...

Page 20: ...not designed for nor intended for stereo audio reproduction use as might be expected in home theater or home cinema applications Any stereo audio input if provided is mixed into a common mono audio ou...

Page 21: ...ctor to a Component Video source device To connect the projector to a Component Video source device 1 Take a Component Video to VGA D Sub adapter cable or Component Video cable and connect the end wit...

Page 22: ...able to the S VIDEO S VIDEO S VIDEO S VIDEO VIDEO VIDEO VIDEO VIDEO jack on the projector 3 If you wish to make use of the projector mixed mono speakers in your presentations take a suitable audio cab...

Page 23: ...Rotate the focus ring to adjust the image clearness To turn of the ring tone see Turning off the Power on off ring tone on page 39 for details 4 If the projector is activated for the first time select...

Page 24: ...t placed on a flat surface or the screen and the projector are not perpendicular to each other the projected image becomes trapezoidal To correct this situation see Correcting keystone on page 28 for...

Page 25: ...ou back to the main menu and the second press closes main menu and the second press closes main menu and the second press closes main menu and the second press closes the OSD menu the OSD menu the OSD...

Page 26: ...tting a password Setting a password Once a password has been set and the power on lock is activated the projector cannot be used unless the correct password is entered every time the projector is star...

Page 27: ...sword 1 Open the OSD menu and go to the SYSTEM SETUP Advanced SYSTEM SETUP Advanced SYSTEM SETUP Advanced SYSTEM SETUP Advanced Security Settings Security Settings Security Settings Security Settings...

Page 28: ...word function is disabled you need to keep the old password in hand should you ever need to re activate the password function by entering the old password Correcting keystone Correcting keystone Corre...

Page 29: ...rdingly when you switch between different input signals Data graphic PC presentations using mostly static images are generally brighter than Video using mostly moving images movies The native display...

Page 30: ...ress Mode Enter Mode Enter Mode Enter Mode Enter to switch to the panning mode and press the directional arrows on the projector or remote control to navigate the picture 5 To reduce size of the pictu...

Page 31: ...s displayed in the center of the screen with a 4 3 aspect ratio This is most suitable for 4 3 images like some computer monitors standard definition TV and 4 3 aspect DVD movies as it displays them wi...

Page 32: ...as using the projector in well lit rooms 2 Presentation Presentation Presentation Presentation mode Default mode Default mode Default mode Default Is designed for presentations The brightness is empha...

Page 33: ...Adjusting Brightness Brightness Brightness Brightness The higher the value the brighter the image And the lower the setting the darker the image Adjust this control so the black areas of the image app...

Page 34: ...D Color Management In most installation situations color management will not be necessary such as in classroom meeting room or lounge room situations where lights remain on or where building external...

Page 35: ...ents 9 Press Menu Exit Menu Exit Menu Exit Menu Exit to exit and save the settings Setting the presentation timer Setting the presentation timer Setting the presentation timer Setting the presentation...

Page 36: ...the remote control Press Timer On Timer On Timer On Timer On and press to highlight Off Off Off Off and press Mode Enter Mode Enter Mode Enter Mode Enter Using the OSD menu Using the OSD menu Using t...

Page 37: ...image The word BLANK BLANK BLANK BLANK appears in the corner of the screen while the image is hidden When this function is activated with an audio input connected the audio can still be heard You can...

Page 38: ...rol keys With the control keys on the projector locked you can prevent your projector settings from being changed accidentally by children for example When the Panel Key Lock Panel Key Lock Panel Key...

Page 39: ...ms However this is not to state that this projector can operate under any and all harsh or extreme conditions Adjusting the sound Adjusting the sound Adjusting the sound Adjusting the sound The sound...

Page 40: ...ngs Lan Control Settings Lan Control Settings Lan Control Settings allow you to manage the projector from a computer using a web browser when the computer and the projector are properly connected to t...

Page 41: ...ntrolling the projector remotely through a web browser Controlling the projector remotely through a web browser Controlling the projector remotely through a web browser Controlling the projector remot...

Page 42: ...ote network operation on this projector has been password protected iv Once set access to the tools page has been password protected After making the adjustments press the Send button and the data wil...

Page 43: ...ands during the cooling process To shorten the cooling time you can also activate the Quick cooling function See Quick Cooling on page 50 for details 3 Once the cooling process finishes a Power Off Ri...

Page 44: ...se H Size Digital Zoom 2 PICTURE Picture Mode Dynamic Presentation sRGB Cinema User 1 User 2 Reference Mode Dynamic Presentation sRGB Cinema Brightness Contrast Color Tint Sharpness Brilliant Color On...

Page 45: ...in Blank Timer Disable 5 min 10 min 15 min 20 min 25 min 30 min Panel Key Lock On Off Sleep Timer Disable 30 min 1 hr 2 hr 3 hr 4 hr 8 hr 12 hr Splash Screen Black Blue BenQ 5 SYSTEM SETUP Advanced Qu...

Page 46: ...ary between the projectors due to the continuous improvement to the products Main menu Sub menu Options 5 SYSTEM SETUP Advanced Closed Caption Closed Caption Enable On Off Caption Version CC1 CC2 CC3...

Page 47: ...tone 0 Corrects any keystoning of the image See Correcting keystone on page 28 for details Position 0 Displays the position adjustment page To move the projected image use the directional arrow keys T...

Page 48: ...usting Color on page 33 for details This function is only available when a VIDEO or S VIDEO signal is selected and the system format is NTSC or PAL Tint 0 Adjusts the red and green color tones of the...

Page 49: ...press The range is from 5 to 30 seconds in 5 second increments Menu Position Menu Position Menu Position Menu Position Center Center Center Center Sets the On Screen Display OSD menu position Auto Pow...

Page 50: ...Mode Lamp Mode Normal Normal Normal Normal See Setting Lamp Mode as Economic on page 54 for details Reset lamp timer Reset lamp timer Reset lamp timer Reset lamp timer See Resetting the lamp timer on...

Page 51: ...ed closed captioning mode To view captions select CC1 CC2 CC3 or CC4 CC1 displays captions in the primary language in your area Lan Control Settings Control By Control By Control By Control By RS232 D...

Page 52: ...cted mode in the PICTURE PICTURE PICTURE PICTURE menu Resolution Resolution Resolution Resolution Shows the native resolution of the input signal Color System Color System Color System Color System Sh...

Page 53: ...r case Cleaning the projector case Before you clean the case turn the projector off using the proper shutdown procedure as described in Shutting down the projector on page 43 and unplug the power cord...

Page 54: ...rojection lamp is a consumable item that normally can last up to 3000 4000 for the MP772 ST or 2000 3000 for the MP776 ST hours with proper usage To keep the lamp life as long as possible you can do t...

Page 55: ...0 hours Install a new lamp for optimal performance If the projector is normally run with Economic Mode selected See Lamp Mode Normal on page 50 you may continue to operate the projector until the 2950...

Page 56: ...ure optimal performance from the projector it is recommended that you purchase a qualified projector lamp for lamp replacement If lamp replacement is performed while the projector is suspended upside...

Page 57: ...your hands into the projector after the lamp is removed If you touch the optical components inside it could cause color unevenness and distortion of the projected images 7 As shown in the figure lowe...

Page 58: ...gs menu Press Mode Enter Mode Enter Mode Enter Mode Enter The Lamp Settings Lamp Settings Lamp Settings Lamp Settings page displays Highlight Reset lamp timer Reset lamp timer Reset lamp timer Reset l...

Page 59: ...e contact your dealer for assistance Lamp events Orange Flashing Off Red The projector has shutdown automatically If you try to re start the projector it will shut down again Please contact your deale...

Page 60: ...ideo source is not turned on or connected correctly Turn the video source on and check that the signal cable is connected correctly The projector is not correctly connected to the input signal device...

Page 61: ...ight 7 7 lbs 3 5 Kg Output terminals RGB output D Sub 15 pin female x 1 Speaker Stereo 5 watt x 2 Audio signal output PC audio jack x 1 Control RS 232 serial control 9 pin x 1 Lan control RJ45 x 1 IR...

Page 62: ...52 mm D Ceiling mount installation Ceiling mount installation Ceiling mount installation Ceiling mount installation 290 252 127 87 61 99 71 15 452 65 397 40 364 40 84 00 145 50 282 95 163 45 118 45 22...

Page 63: ..._85 85 061 53 674 56 250 1024 x 768 XGA_60 60 004 48 363 65 000 XGA_70 70 069 56 476 75 000 XGA_75 75 029 60 023 78 750 1280 x 800 WXGA_60 59 810 49 702 83 500 WXGA_75 74 934 62 795 106 5 1280 x 1024...

Page 64: ..._75 75 029 60 023 78 750 1280 x 800 WXGA_60 59 810 49 702 83 500 WXGA_75 74 934 62 795 106 5 WXGA_85 84 88 71 554 122 5 1280 x 1024 SXGA_60 60 020 63 981 108 000 SXGA_75 75 025 79 976 135 000 1280 x 9...

Page 65: ...4 500 1024 x 576 Netbook_timing 60 0 35 820 46 996 1024 x 600 Netbook_timing 60 0 37 5 45 000 1024 x 600 Netbook_timing 64 995 41 467 51 419 1280 x 800 WXGA_60 59 810 49 702 83 500 WXGA_75 84 880 71 5...

Page 66: ...or Video and S Video inputs MP772 ST Supported timing for Video and S Video inputs MP772 ST MP776 ST MP776 ST MP776 ST MP776 ST Signal Format Horizontal Frequency kHz Vertical Frequency Hz 480i 525i 6...

Page 67: ...he projector in a dusty environment This warranty gives you specific legal rights and you may have other rights which vary from country to country For other information please visit www BenQ com Copyr...

Page 68: ...EEC statement This machine was tested against the 89 336 EEC European Economic Community for EMC Electronic Magnetic Compatibility and fulfills these requirements WEEE directive WEEE directive WEEE d...

Page 69: ...available by using the On Screen Display OSD controls on the products BenQ s monitors and projectors include user selectable color controls such as color temperature selections Monitor 5800K 6500K and...

Reviews: