background image

  27

  Navigating the main menu
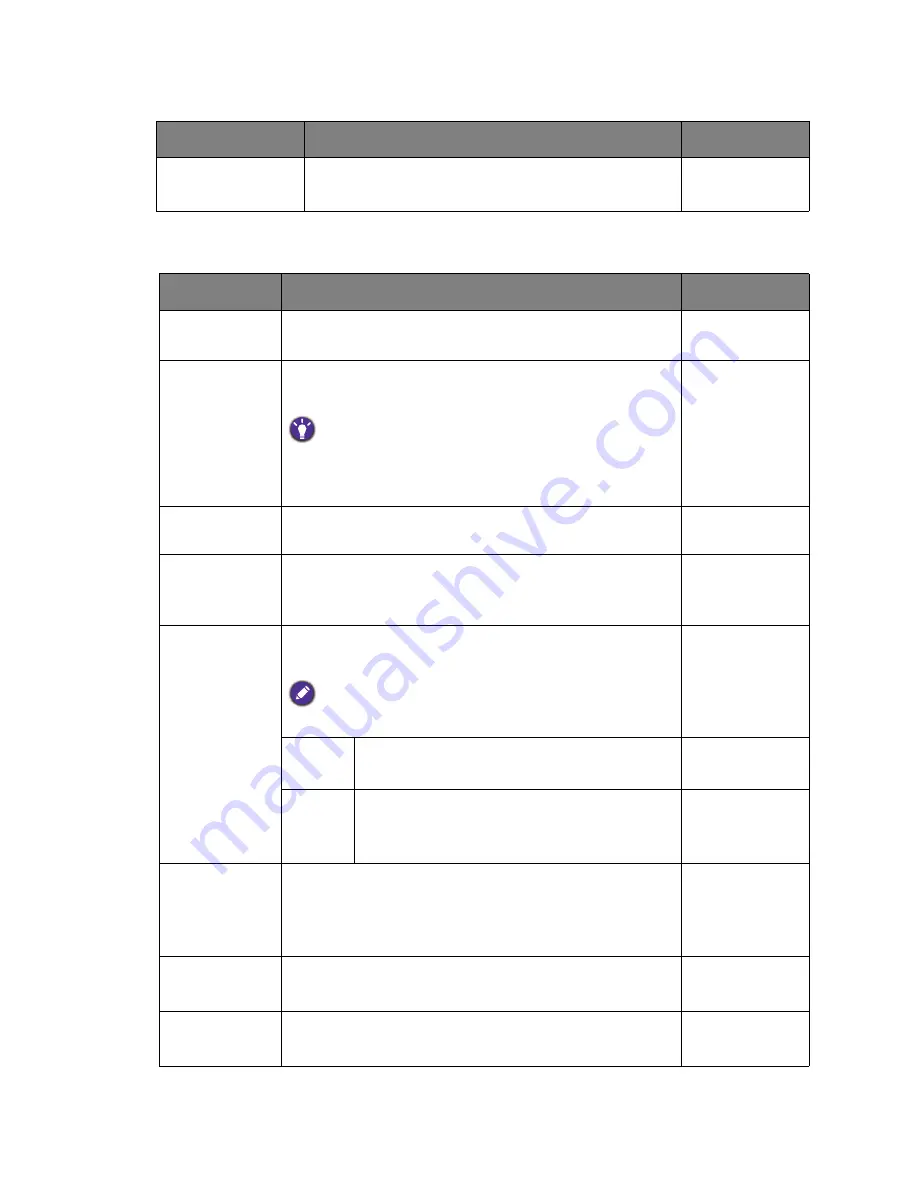
Recall menu

Miscellaneous menu

Item

Function

Range

Recall All

Resets all settings to the factory default values.

• Yes

• 

No

Item

Function

Range

Sharpness

Adjusts the clarity and visibility of the edges of the 
subjects in the image.

1 to 5

DDC CI

Allows the monitor settings to be set through the 
software on the PC.

DDC/CI, short for Display Data Channel/Command Interface, 

which was developed by Video Electronics Standards 
Association (VESA). DDC/CI capability allows monitor 
controls to be sent via the software for remote diagnostics.

• 

On

• 

Off

Display 
Information

Displays the current monitor property settings.

Adv. Contrast

The function is to automatically detect the distribution 
of an input visual signal, and then to create the optimal 
contrast.

• 

On

• Off

Display Mode

This feature is provided to allow aspect ratios other than 
16:9 to be displayed without geometric distortion.

The options under 

Display Mode

 will be different depending 

on the input signal sources.

Full

• Scales the input image to fill the screen. Ideal 

for 16:9 aspect images.

Aspect

• The input image is displayed without 

geometric distortion filling as much of the 
display as possible.

Overdrive

Slightly enlarges the input image. Use this feature to hide 
annoying edge noise if present around your image.

• Off
•   1
•   2
•   3

Opening Logo

Sets whether to show the BenQ logo when the monitor 
is turned on.

• 

On

• Off

DP Format

Sets a correct DP format for the DP input.

• 

1.1

• 1.2

Summary of Contents for GL2706PQ Series

Page 1: ...GL2706PQ Series LCD Monitor User Manual...

Page 2: ...he above mentioned external factors Applicable for flicker free models only Power Safety The AC plug isolates this equipment from the AC supply The power supply cord serves as a power disconnect devic...

Page 3: ...Life corporate vision with the ultimate goal to achieve a low carbon society Besides meeting international regulatory requirement and standards pertaining to environmental management BenQ has spared...

Page 4: ...ternet 17 How to install the monitor on a new computer 18 How to upgrade the monitor on an existing computer 19 How to install on Windows 10 system selected models only 20 How to install on Windows 8...

Page 5: ...MI Optional accessory Warranty Card Available accessories and the pictures shown here may differ from the actual contents and the product supplied for your region And the package contents may subject...

Page 6: ...6 Getting started Always keep the product and accessories out of reach of small children...

Page 7: ...nd output ports 1 Control buttons 2 Power button 3 Power LED 2 3 1 4 Input and output ports see Input and output ports on page 7 5 Cable management slot 6 Kensington lock slot 5 4 6 1 AC power input j...

Page 8: ...e on an object like a stapler or a mouse will crack the glass or damage the LCD substrate voiding your warranty Sliding or scraping the monitor around on your desk will scratch or damage the monitor s...

Page 9: ...o the computer video socket Tighten all finger screws to prevent the plugs from accidentally falling out during use To Connect the HDMI Cable Connect the plug of the HDMI cable to the HDMI port on the...

Page 10: ...s to the LINE OUT jack on the rear of the monitor 5 Connect the power cable to the monitor Plug one end of the power cord into the socket labelled on the rear of the monitor Do not connect the other e...

Page 11: ...power button on the monitor Turn on the computer too and follow the instructions in Getting the most from your BenQ monitor on page 17 to install the monitor software To extend the service life of the...

Page 12: ...e a towel on the desk for padding before laying the screen face down on a flat clean padded surface Please be careful to prevent damage to the monitor Placing the screen surface on an object like a st...

Page 13: ...g hands on the upper or lower part of the height adjustable stand or at the bottom of the monitor as ascending or descending monitor might cause personal injuries Keep children out of reach of the mon...

Page 14: ...the monitor The monitor should be vertically extended to allow to rotate from landscape to portrait mode 3 Rotate the monitor 90 degrees clockwise as illustrated To avoid the edge of the LCD display...

Page 15: ...semble your monitor hardware Viewing angle adjustment You may position the screen to the desired angle with the monitor tilt swivel and height adjustment functions Refer to the product specifications...

Page 16: ...mation Turn off the monitor and the power before disconnecting the cables from the LCD monitor 1 Remove the monitor stand Lay the screen face down on a clean and well padded surface Use a screwdriver...

Page 17: ...re and will launch its Found New Hardware wizard Follow the wizard instructions Further details and step by step instructions for either an automatic new or upgrade existing installation see How to in...

Page 18: ...8 When Windows starts it will automatically detect the new monitor and launch the Found New Hardware Wizard Follow the prompts until it displays the option to Install Hardware Device Drivers 2 Check S...

Page 19: ...you have connected and letting Windows install the corresponding driver files You need only steer it in the right direction Windows has an Upgrade Device Driver Wizard to automate the task and guide y...

Page 20: ...e Hardware tab 4 Click Generic PnP Monitor and then the Properties button 5 Click the Driver tab and the Update Driver button 6 In the Update Driver Software window select the option Browse my compute...

Page 21: ...lay Devices and Printers and right click the name of your monitor from the menu 2 Select Properties from the menu 3 Click the Hardware tab 4 Click Generic PnP Monitor and then the Properties button 5...

Page 22: ...ur monitor from the menu 2 Select Properties from the menu 3 Click the Hardware tab 4 Click Generic PnP Monitor and then the Properties button 5 Click the Driver tab and the Update Driver button 6 In...

Page 23: ...Color Mode menu You can select a picture mode that best suits the type of images shown on the screen Standard For basic PC application Game For playing video games Cinema For viewing videos Scenery F...

Page 24: ...u Enters sub menus Press for 10 seconds to enable disable OSD Lock Power Turns the power on or off Power indicator Lights blue when the monitor is turned on Lights orange when the monitor is in standb...

Page 25: ...or details Available menu options may vary depending on the input sources functions and settings Menu options that are not available will become grayed out Luminance menu Main Menu Luminance Recall Co...

Page 26: ...ing R red G green and B blue menus to change the settings Decreasing one or more of the colors will reduce their respective influence on the color tint of the image e g if you reduce the Blue level th...

Page 27: ...settings Adv Contrast The function is to automatically detect the distribution of an input visual signal and then to create the optimal contrast On Off Display Mode This feature is provided to allow...

Page 28: ...lly selects a valid input signal when the monitor is turned on DVI HDMI DP Manual Manually selects a valid input signal when the monitor is turned on Item Function Range Volume Adjusts the audio volum...

Page 29: ...the image is still not correct and the OSD also has faulty coloration this means one of the three primary colors is missing in the signal input Now check the signal cable connectors If any pin is ben...

Page 30: ...these instructions You are running the monitor at its native resolution but the image is still distorted Images from different input sources may appear distorted or stretched on the monitor running at...

Page 31: ...e monitor aspect ratio the displayed image may appear stretched or distorted To maintain the original aspect ratio image scaling options can be found in the Display Mode adjustment To find out the mon...

Page 32: ...isplay modes on page 33 1 Double click the Display icon in Control Panel 2 From the Display Properties window select the Settings tab and click the Advanced button 3 Select the Adapter tab and select...

Page 33: ...an automatic setting Incoming display mode Input timing Input signal Resolution 2560 x 1440 Aspect ratio 16 9 DVI HDMI DP 640x480 60Hz v 640x480 75Hz v 800x600 60Hz v 800x600 75Hz v 1024x768 60Hz v 1...

Page 34: ...Hz 30 89 kHz Multi frequency monitor 50 75 Hz modes within these parameters Controls 5 buttons and Power key Max power consumption Power saving mode 55 W 0 5 W Input signal Speaker DVI DL DP 1 2 HDMI...

Reviews: