background image

Using the Remote Control

25

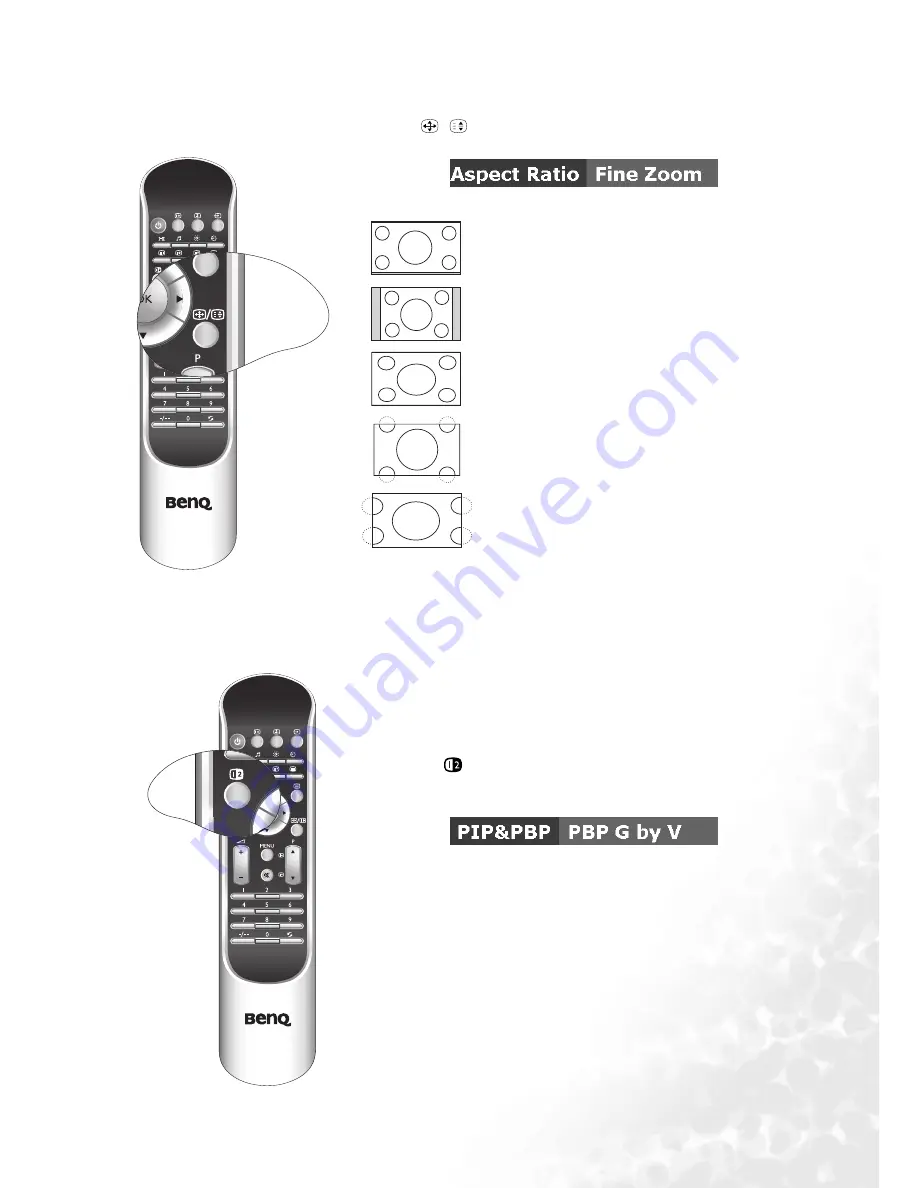
Adjusting Aspect Ratio

Using the PIP/PBP Function

Press the

/

(Screen aspect ratio) button on your remote con-

trol to select the image aspect ratio you prefer.

Press the button several times to cycle through various ratios.

• 16:9 - Displays a 16:9 aspect picture in the mid-

dle of the screen with black bars at the top and 

bottom sides.

• 4:3  -  Displays a 4:3 aspect picture in the mid-

dle of the screen with black bars at the left and 

right sides.

• Full Screen- Expands a 4:3 image horizontally 

to fill the screen.

• Fine Zoom - Stretches a letter box 4:3 aspect 

picture to fill the screen. Some of the picture 

top and bottom may be cropped depending on 

the original image aspect ratio.

• Wide - Translates a 4:3 aspect picture into a 

wide screen image.

If your television is connected to an additional Video or PC source, 
pressing the 

PIP/PBP button allows you to display both images 

on the screen at once in PIP (Picture In Picture) or PBP (Picture By 

Picture) modes:

• Full Screen: Normal display.
• PIP G on V: Enter PIP mode and display graphics in video.
• PIP V on G: Enter PIP mode and display video in graphics.
• PBP G by V: Enter PBP mode and display graphics by video.
• PBP V by G: Enter PBP mode and display video by graphics.

Summary of Contents for DV2680

Page 1: ...Welcome DV2680 DV3080 66cm 26 76cm 30 LCD TV User s Manual...

Page 2: ...echanical magnetic optical chemical manual or otherwise without the prior written permission of BenQ Corporation Disclaimer BenQ Corporation makes no representations or warranties either expressed or...

Page 3: ...11 Making Connection 11 Connecting AV Equipment 12 Connecting Composite Video Signals RCA 12 Connecting Composite Video Signals SCART 12 Connecting S Video Signals 13 Connecting Component Video Signa...

Page 4: ...e 28 Navigating the OSD Menu 29 Audio Menu 30 Picture Menu 31 Feature Menu 33 TV Menu 35 Performing Manual Installation 36 Editing Channels 37 Naming a Channel 37 Channel Sorting 37 Locking a Channel...

Page 5: ...eatures and other important information Before install ing or operating your liquid crystal display television please take the time to thoroughly read this manual particularly the sections on safety F...

Page 6: ...ly 4 Follow instructions All operating instructions must be followed 5 Water and moisture Do not use this product near water for example near a bathtub washbowl kitchen sink or laundry tub in a wet ba...

Page 7: ...other danger 14 Overloading Do not overload wall outlets extension cords or convenience receptacles on other equipment as this can result in a risk of fire or electric shock 15 Entering of objects an...

Page 8: ...ul move When relocating the product placed on a trolley it must be moved with the utmost care Sudden stops excessive force and uneven floor surfaces can cause the product to fall from the trolley 21 P...

Page 9: ...rtant operating and maintenance ser vicing instructions in the literature accom panying the product The lightning flash with arrowhead symbol within a triangle alerts the user to the pres ence of unin...

Page 10: ...Contents Please ensure that the following items are included with your DV2680 DV3080 Liquid Crystal Display TV User s manual x1 Remote control x1 Power cord x1 AAA batteries x2 Composite video cable...

Page 11: ...ontrol sensor window Receives the signal from the remote control No Name Description 1 Power Press this button to turn on the DV2680 DV3080 when it is in standby mode Press this button once more to tu...

Page 12: ...main unit function in the same way as their counterparts on the remote control Main Unit Rear View 4 Volume Press Volume to increase the volume or Volume to decrease it 5 MENU Press this button to dis...

Page 13: ...VIDEO S VIDEO input For connecting to the S Video output of your DVD player or other AV devices 5 COMPONENT COMPONENT Y Cb Pb Cr Pr For connecting to the component video output of your DVD player or...

Page 14: ...T connector Some cable television companies provide pay per view programming Since the signal for these paid channels is encoded most cable television companies provide their own tuners decoders You m...

Page 15: ...necting any component please familiarise yourself with the location and type of each input If incorrect connections are made picture or colour quality may be adversely affected Please ensure that all...

Page 16: ...Connect the Composite AUDIO VIDEO input terminals AV2 on the TV to the Composite audio video output terminals on the AV equipment using the Composite video cable Connect the AV1 SCART input terminal o...

Page 17: ...e of input is superior to that obtained with S video All High Definition Television signals must go through this input 1 Connect the S VIDEO input terminal AV2 on the TV to the S Video output terminal...

Page 18: ...to the television using a PC D SUB 15P cable 3 Certain PC models cannot be connected to the television 4 The computer in the illustration is shown only for reference your equipment may vary 5 Additio...

Page 19: ...2 Connect the AUDIO input terminal DVI on the TV to the audio output terminal on the PC using an appropriate cable The DV3080 model provides extra audio output terminals for delivering TV audio signal...

Page 20: ...he remote control or the Volume and Volume keys on the television to select your country and then press the button on the remote control or the Channel key on the television to go to the next step 5 O...

Page 21: ...nd reception During dual language broadcasts Lang 1 or Lang 2 can be selected When Teletext is displayed on the screen press this button to switch to a specific page 7 User situation mode Teletext pag...

Page 22: ...e the image on the screen the signal will continue to be broadcast Press the button again to unfreeze 17 Screen aspect ratio Press this button to adjust the screen image aspect ratio setting 18 Sequen...

Page 23: ...you wish to view When the TV is off press a button to turn it on and go to the selected channel 23 Channel return Press this button to toggle between the current and the previous channel you were view...

Page 24: ...or window on the television is in direct sunlight or strong light the remote control may not operate normally In this situation change the light source or readjust the angle of your television or oper...

Page 25: ...mix different types Do not mix old and new batteries Mixing old and new batteries will shorten battery life and or cause chemical leaks from the old batteries When batteries fail to function replace t...

Page 26: ...levision will turn on The power indicator changes to green Turning off the television Press the Power button on your remote control again and the television will go into standby mode The power indicat...

Page 27: ...epend on the TV sound system being received Using the Channel selection buttons on the Remote Control to Change Channels To select a single digit channel press the corresponding channel selection butt...

Page 28: ...the User sit uation mode button on the remote control This enables you to select from the 6 preset memory settings Vivid Standard Movie Sports Personal 1 and Personal 2 Press the Freeze button on the...

Page 29: ...to fill the screen Fine Zoom Stretches a letter box 4 3 aspect picture to fill the screen Some of the picture top and bottom may be cropped depending on the original image aspect ratio Wide Translates...

Page 30: ...n on your remote control to set the automatic sleep timer 2 Press the button again to increase the time interval Time is set in increments of 30 minutes from 0 to 180 minutes To adjust the intensity o...

Page 31: ...function press the button again When Teletext is displayed on the screen you can Press the Teletext display button to cycle Teletext display types among Teletext only mixed display TV image only Pres...

Page 32: ...The On Screen Display OSD Menu 28 The On Screen Display OSD Menu OSD Structure The Speakers option is only available with the DV3080 model...

Page 33: ...U button on your remote control or the MENU button on your television will bring up the following main menu on your screen 2 press the or buttons to select items on the main menu choose functions or c...

Page 34: ...B AV2 AV2 S PC Component or DVI is selected as the signal source Use the and buttons on the remote control or the Vol ume and Volume keys on the television to change selec tion Stereo Sound 1 Sound 2...

Page 35: ...nes 0 to 30 Sharpness Adjust the sharpness level of the image for a sharper image for softer image 14 to 25 Advanced Picture Settings Colour TEMP Adjust the colour tint of the black and white part of...

Page 36: ...of the image will be lost if the brightness is set too low Yellow Adjust yellow in the image for more yellow concentration for less yellow concentra tion 0 to 30 Save Settings Two different user pro f...

Page 37: ...television to make your selection Left Right PIP PBP Display Video and Graphic input images simulta neously in either Picture In Picture or Picture By Picture mode Use the and but tons on the remote...

Page 38: ...ding on the original image aspect ratio Wide Translates a 4 3 aspect picture into a wide screen image Auto Format Set the TV to automatically adjust screen aspect ratio SCART input only Use the and bu...

Page 39: ...rench Ger man Dutch Country Select your country where the TV is installed Use the and but tons on the remote control or the Channel and Channel keys on the television to make your selec tion Australia...

Page 40: ...TV channel position you want to set up 4 Press the button to highlight Frequency and then press the or buttons to start the tun ing system If the tuned channel is incorrect press the or button again u...

Page 41: ...to select the channel to be moved 4 Press the MENU button again to close the menu The channel will be moved on to the selected channel location Locking a Channel Preventing a channel from selection Yo...

Page 42: ...channels Refer to Locking a Channel Preventing a channel from selection on page 37 for how to lock a channel will be locked Unlock Disable Child Lock 4 Press the MENU button again to close the menu Ch...

Page 43: ...cy Use the and but tons on the remote control or the Channel and Channel keys on the television to adjust 15 to 15 Phase Adjust display clock phase Use the and but tons on the remote control or the Ch...

Page 44: ...et to suit the program source The image appears too bright and there is a loss of definition in the brightest areas of the image Reduce the contrast setting The DVD player is set for a high level outp...

Page 45: ...ion The picture is doubled or tripled Make sure the antenna is facing the right direction Picture ghosting is caused by reflections from buildings large metal structures and mountains Carefully realig...

Page 46: ...tch 0 4425 x 0 4425 mm 0 5025 x 0 5025 mm Brightness 500 cd m2 Contrast ratio 600 1 Response time 16 ms 16 6 ms Amplifier 10W speaker x 2 Signal inputs TV Analogue TV tuner x1 Video S Video Composite...

Page 47: ...obtain optimal performance Resolution Horizontal Freq KHz Vertical Freq Hz Bandwidth MHz Notes 720 400 31 47 70 08 28 32 DOS 640 480 31 47 60 00 25 18 DOS 640 480 37 50 75 00 31 50 VESA 640 480 37 86...

Page 48: ...Dimensional Drawings 44 Dimensional Drawings DV2680 86 00 Unit mm 86 40 49 40 40 00 66 00 444 00 56 14 849 99 86 00 444 00 56 14 651 00...

Page 49: ...Dimensional Drawings 45 DV3080 922 18 720 475 527 203 81 93 39 Unit mm...

Page 50: ...Dimensional Drawings 46 Memo...

Reviews: