background image

Capture mode  11

Eng

lish

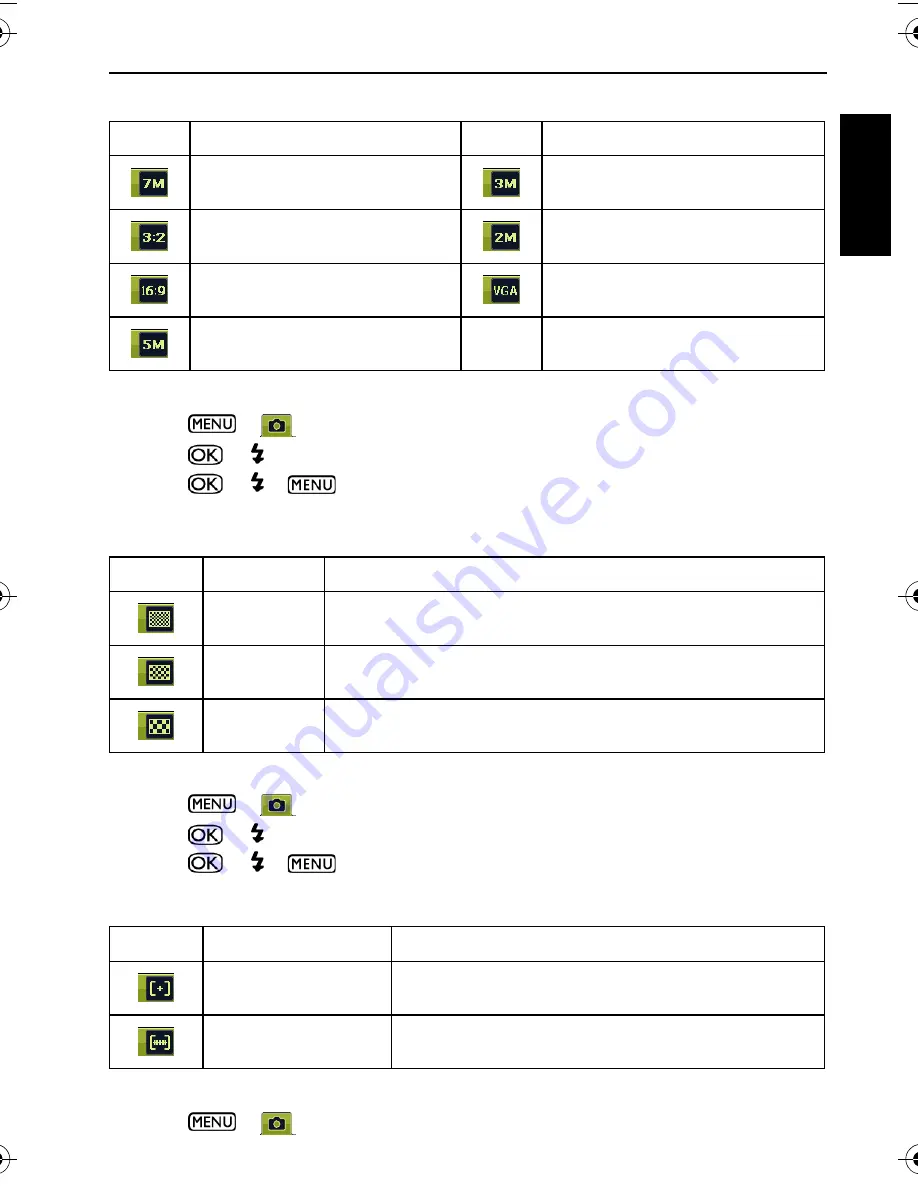
Image size

To select an image size:

1. Press  


Resolution

.

2. Press 

 or  , and then select an image size.

3. Press  

or 


>  .

Image quality

To select an image quality level:

1. Press  


Quality

.

2. Press 

 or  , and then select an image quality level.

3. Press  

or 


>  .

AF area

To select an automatic focus area:

1. Press  


AF Area

.

Icon

Description

Icon

Description

7 megapixels (3072 x 2304)

3 megapixels (2048 x 1536)

3:2 (7 megapixels; 3072 x 2048)

2 megapixels (1600 x 1200)

16:9 (7 megapixels; 3072 x 1728)

VGA (640 x 480)

5 megapixels (2592 x 1944)

--

--

Icon

Mode

Description

Fine

Best image quality with the lowest compression rate. File size is 
the largest.

Normal

Better image quality with medium compression rate. File size is 
medium.

Economy

Good image quality with the highest compression rate. File size 
is the smallest.

Icon

Mode

Description

Focusing area: Center Focuses on the center area of the objects.

Focusing area: Wide

Focuses on a wide range of multiple objects.

X725 UM.book  Page 11  Friday, March 30, 2007  2:15 PM

Summary of Contents for DC X725

Page 1: ...Welcome DC X725 Digital Camera User Manual ...

Page 2: ...he lens Do not touch the lens with your fingers To prevent electric shock do not attempt to disassemble or repair your camera by yourself Water may cause a fire or electric shock Therefore store your camera in a dry place Do not use your camera outdoors when it is raining or snowing Do not use your camera in or near water If a foreign substance or water gets in your camera please turn the power of...

Page 3: ... accordance with the instructions may cause harmful interference to radio communications However there is no guarantee that interference will not occur in a particular installation If this equipment does cause harmful interference to radio or television reception which can be determined by turning the equipment off and on the user is encouraged to try to correct the interference by one or more of ...

Page 4: ...12 AE metering 12 White balance 13 ISO sensitivity 13 Effect 14 Date Stamp 14 Setting sharpness saturation and contrast 14 Movie Record mode settings 14 Other settings 15 Playback mode 16 Options for playback and editing 17 Enlarging an image 17 Viewing multiple files at a time 17 Protecting 17 Deleting files 17 Rotating an image 18 Slideshow 18 Trimming 18 Resizing 18 Voice memo 19 Startup screen...

Page 5: ...amaged contact your dealer Save the packaging for future shipment or storage Camera components Front view and bottom view 1 User Manual 2 Digital camera 3 USB cable 4 Battery 5 Hand strap 6 Leather case 7 Software CD 8 Battery charger 9 AC power adapter 10 AV cable 1 Shutter button 2 Status LED indicator 3 Power button 4 Flash 5 Self timer LED indicator 6 Lens and lens cover 7 Microphone 8 Battery...

Page 6: ... previous menu 10 Speaker It is normal for the camera to become warm during operation because metal camera casing can conduct heat The LCD display on this camera is manufactured with sophisticated technology and more than 99 99 of the pixels on the LCD display meet standard specifications Yet it is possible that less than 0 01 of the pixels on the LCD display may have some light spots or show unus...

Page 7: ...hosen setting C To remove the battery 1 Open the battery SD card cover 2 Press and hold the battery 3 Release the battery lock lever 4 When the battery has come out a little gently pull it out the rest of the way 5 Close the battery SD card cover D To charge the battery 1 Insert the battery into the battery charger 2 Connect one end of the AC power adapter to the battery charger 3 Connect the othe...

Page 8: ...ge 2 Press or or to locate the language you want 3 Press Setting date and time When first time using the camera or the battery has been removed from the camera for a long time you need to set the date and time They are used to record when a file was captured To set date and time 1 Press 2 Press or to locate Date Time and then press or 3 Press or to select date and time Press or to move to another ...

Page 9: ... the shutter down fully to capture 6 Release the shutter 7 In the Movie Record mode press the shutter to stop video recording 8 Press to view captured images or recorded videos and then press or to move to different images videos You can also press or to zoom in out a captured images or press to view 9 images on the screen During zoom in out there is a separator in the zoom bar between and For bes...

Page 10: ...ure value EV 12 13 AE metering 12 14 White balance 13 15 ISO sensitivity 13 In the capture mode press to toggle among 4 display modes standard complete none and rule of thirds Use the rule of thirds display mode to improve your composition by placing subjects on at least one of the intersections of these 4 imaginary lines While the shutter is pressed halfway the shutter speed and the aperture are ...

Page 11: ...th a brighter look Landscape Used when taking pictures of natural scenery Sports Captures a fast moving subject Backlight Compensates for exposure in a strong backlit environment Flash is always on Night Scene Used when taking a picture in the evening night or a low light environment Beach Used under a very bright light environment such as beaches Snow Used under a very bright light environment su...

Page 12: ...colors Museum Used when taking a picture of subjects in a place where flash is usually prohibited Flash is always off Candle Light Makes a picture look warm and thus captures the mood under candle light source Flash is always off Party Captures the party atmosphere usually under indoor light source Text Takes a picture of clear text by reducing image distortion usually found on paper magazines or ...

Page 13: ...g lighting conditions Select this mode when capturing images with high contrast backlighting and deep shadows Auto anti red eye Reduces the red eye phenomenon when capturing natural looking images of people and animals in low light conditions Be sure to ask the subject to look at the camera lens or get as close to the camera as possible The flash fires automatically based on the photographic condi...

Page 14: ...re everything for example fast moving objects or subjects in the dark from near to far in an acceptable focus Infinity Used when capturing images at long distance Icon Mode Description Standard Takes one picture at a time Self timer Automatically takes a picture after 2 or 10 second delay This mode is useful when you want to be part of the picture Continuous Shoot Continuously takes pictures as lo...

Page 15: ...2304 3 megapixels 2048 x 1536 3 2 7 megapixels 3072 x 2048 2 megapixels 1600 x 1200 16 9 7 megapixels 3072 x 1728 VGA 640 x 480 5 megapixels 2592 x 1944 Icon Mode Description Fine Best image quality with the lowest compression rate File size is the largest Normal Better image quality with medium compression rate File size is medium Economy Good image quality with the highest compression rate File ...

Page 16: ...ect an AE metering option 1 Press Metering 2 Press or and then select an AE metering option 3 Press or Icon Description Battery power remains adequate Battery power is low Battery power is very low You should replace the battery ASAP Icon Mode Description Automatic Exposure metering Matrix Detects the exposure based on multiple points in the subject area Automatic Exposure metering Center Weight D...

Page 17: ... in a low light environment Yet you may see more noise in the picture as you increase the ISO value To select an ISO value 1 Press ISO 2 Press or and then select an ISO value 3 Press or Icon Mode Description Auto Adjusts white balance automatically Daylight Used in bright daylight conditions Cloudy Used in twilight or shady conditions Tungsten Used when subjects lit by tungsten incandescent lighti...

Page 18: ...ration and contrast To set sharpness saturation or contrast 1 Press and then select Sharpness Saturation or Contrast 2 Press or and then select High Normal or Low 3 Press or Movie Record mode settings Icon Mode Description Normal No effects are added Vivid Adds an effect with very clear and bright color tones Sepia Adds an effect with dark reddish brown color tones so the image or video looks as i...

Page 19: ...r Record Setup Records videos at the time and the duration you set After setup follow the procedure below to activate Timer Record Mode Description Manage Memory Copies files from the internal memory to the SD card Formats the internal memory or the SD card Instant Review Sets how long you want to review the image you just captured Digital Zoom Turns on off the digital zoom feature System Sound Tu...

Page 20: ... is in the playback mode 2 Indicates that the file is protected and cannot be deleted 17 3 Indicates this file has a voice memo or the file is an audio file 19 4 Displays the following information and controls the shooting conditions such as scene mode and image size Lets you rotate or add voice memo Shows whether it is a video file and the play button You can press to toggle among different infor...

Page 21: ...es 1 Press 2 Maximum 9 files shown in thumbnails are displayed on the screen Press or to select a file and then press or to view it in its normal viewing size Protecting Prevents selected files from accidental removal To protect files 1 Press Protect or 2 Select whether to protect this selected file other selected or all files and then press You will then see the icon indicating the file is protec...

Page 22: ...k To stop the slideshow press Trimming Crops part of an image file reduces the image size and overwrites the image file or saves it as another new file To trim an image 1 Press or to move to the image you want to trim 2 Press Trim or 3 Press or to select the target image size to which you want to reduce 4 Press or to locate the area to trim 5 Press to confirm the change and how to save the image f...

Page 23: ...amera offers the following programs on a CD To install these programs see the information supplied with the CD These bundle programs may not be Vista compatible Connecting the camera to a computer You can connect the camera to a PC or notebook to transfer view print or edit files To connect the camera to a computer 1 Connect the end of the smaller plug of the USB cable to the camera 2 Connect the ...

Page 24: ...n directly print images by connecting your camera to a PictBridge compatible printer without using a computer To print images from a PictBridge compatible printer 1 Connect the end of the smaller plug of the USB cable to the camera 2 Turn on the printer Wait for a while until it finishes starting up and is ready to print 3 Turn on the camera 4 Press PictBridge or 5 Connect the other end of the USB...

Page 25: ...orrectly The battery has no power Recharge the battery The battery power is draining quickly The external temperature is extremely low Many shots are being captured in dark places requiring a flash The battery was not fully charged or it has not been used for an extended period of time after being charged Fully charge the battery and discharge it for at least one complete cycle before use The batt...

Page 26: ...s not shoot even when pressing the shutter button The battery is running low Recharge the battery The camera is not in the capture mode Switch to the capture mode The shutter button was not pressed all the way down Press the shutter button all the way down The internal memory or memory card does not have any free space Load a new card or delete unwanted files The flash is recharging Wait until the...

Page 27: ...orce off Force on Auto anti red eye Anti red eye and Slow sync Drive mode Standard Self timer 2 or 10 second delay Continuous Shoot and Interval Shoot Exposure compensation 2 to 2 EV in 1 3 EV steps ISO Auto 80 160 320 400 800 and 1250 1600 for S S F 4000 for movie White balance Auto Daylight Cloudy Tungsten Fluorescent and Manual File format Still Image JPEG Exif 2 2 compatible and DCF compatible...

Page 28: ...Dimensions W x H x D 91 x 60 x 14 7 mm slimmest 12 5 mm Weight 120 g without battery SD card System requirements Pentium III 600 Mhz or higher compatible CPU 64 MB RAM Optical disc drive Windows Me 2000 XP Vista compatible 128 MB free hard disk space Available USB port ...

Reviews: