background image

BenQ DC 3400 User’s Manual

23

A

PPENDIX

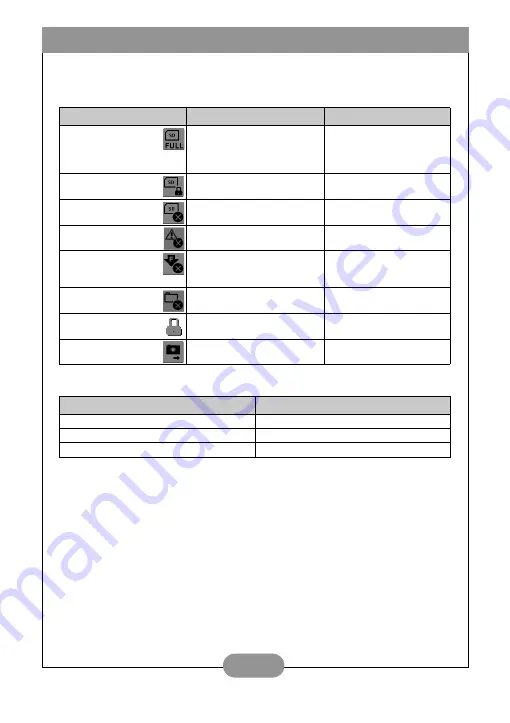
Warning/Error Messages and Codes

Note:

 If you cannot turn the digital camera off with power button, please press 

Shutter and Set button at the same time to force off.

Message

Cause

Solution

Card Full

There is insufficient card mem-
ory capacity to store an image.

Delete the stored image(s) 
in the memory card or insert 
a new memory card. See 
page 14 and page 4.

Card Lock

The SD card is locked.

Switch the card lock to the 
unlock position. 

Card Error

The SD card is corrupted.

Purchase a new SD card.

System Error 
 

There is a general system 
error.

Turn the camera off and on 
and try again.

Format Error 

Formatting has failed.

Turn the camera off and on 
and try again (006), or pur-
chase a new SD card (004).

File Error 

The file is corrupted.

Delete this image (page 14
and take the picture again.

Image Locked

The image can’t be deleted 
when it is locked. 

Unlock the protected image. 
See page 14.

Lens Cover Closed

The lens cover is closed.

Open the lens cover before 
taking pictures.

Error Code

Error Type

0000~0010

System Error

0000~0110

Storage Error

0200~0210

File Error

Summary of Contents for DC 3400

Page 1: ...User s Manual DC3400 ...

Page 2: ...of the following environmental ranges temperature 0 C to 40 C relative humidity 45 85 Do not use or store your camera in the environments listed below Direct sunlight High humidity and dusty locations Next to an air conditioner electric heater or other heat source In a closed car that is directly under the sun Avoid vibration If your camera gets wet wipe it with a dry cloth as soon as possible Sea...

Page 3: ...nding the LCD Display Icons 5 Taking Photos 7 Recording Movie Clips 12 Playback Mode 13 Setup Mode 16 Making Connections Installing the Driver Windows 98SE 19 Installing Software 19 Downloading Files to a Computer 20 Viewing Photos and Movie Clips on a Television 20 Using the DC 3400 as a PC Web Cam 21 Using QLink 21 Disconnecting the Camera 22 Appendix Warning Error Messages and Codes 23 System R...

Page 4: ...eable battery USB or power adapter charge the camera directly Unlimited movie recording duration depends on memory Up to 3 mega pixels resolution with 4x digital zoom Q link software simplifies downloading and managing files Three games for great fun anywhere anytime Unpacking Contact your dealer immediately if any of the items below are damaged or missing DC 3400 Digital Camera AC power adapter U...

Page 5: ...Lens Shutter button Direction button up down left right Mode dial LCD Set button Menu Cancel button Memory card compartment door Tripod mount connector SD card slot Hand strap eyelet DC IN connector USB connector Video OUT connector Lens cover Flash TFT LCD display Q Link button Mode dial Playback mode Snapshot mode Power switch Shutter button Video mode Indicator LED ...

Page 6: ...about two hours The indicator LED glows orange when the battery is charging When the battery is charged the indicator LED turns off Warning Use the adapter that came with your DC 3400 Do not use other adapters Note A minimum of 5 minutes charging time is required to regain minimal power of the digital camera Using an SD Flash Memory Card Inserting an SD Card 1 Turn the camera off 2 Open the memory...

Page 7: ...buttons below You will use these extensively in the following sections of the manual Understanding the LCD Display Icons When the camera is in Snapshot mode icons appear on the LCD display to indicate camera settings Depending on your camera s settings the illustration below may be different from your own camera Mode dial Snapshot mode Playback mode Video mode Menu Cancel button Direction buttons ...

Page 8: ...lf timer mode Burst mode Image resolution 2048x1536 1600x1200 1280x960 640x480 Image quality Fine Normal Photo effect Auto Portrait Scene Black and white White Balance Auto Daylight Cloudy Tungsten light Fluorescent light EV bias 2 0 to 2 0 Light metering Center average Point Frame average Date imprint On Off ...

Page 9: ...acro mode if the subject is between 0 3m and 0 4m from the camera lens Use Normal mode if the subject is more than 1 0m from the lens 3 The LCD Display button has three functions to turn the display on with all icons visible to turn the display on with only the function mode icon visible and to turn the display off Press the button until all icons appear on the dis play Note If you forget to open ...

Page 10: ...e and Normal image quality settings Note that fewer photos are stored in memory if you use the Fine setting 2048 x 1536 1 Set the Mode dial to and press the Menu but ton 2 Press and to select the image resolution menu 3 Press and to select the resolution setting 4 Press the Menu button to exit the menu or use and to move on to the next setting 1600 x 1200 1280 x 960 640 x 480 Fine 1 Set the Mode d...

Page 11: ...you want to take black and white gray scale pictures Auto The camera adjusts itself automatically It is recommended that you use this setting except under unusual lighting conditions Daylight Use this setting in bright outdoor settings or under strong lighting Cloudy Use this setting when taking photos in overcast conditions Tungsten This setting should be used in a tungsten light environment Fluo...

Page 12: ...verage The camera adjusts itself based on the average light measurement over the center region of the LCD Point The camera adjusts itself based on a point light measurement at the center of the LCD Average The camera adjusts itself based on the average light measurement over the entire region of the LCD 1 Press and to select the EV Bias menu 2 Press or the Set button 3 Press and to change the EV b...

Page 13: ...2 4 Press the Shutter button to take the shot Reviewing and Deleting a Photo After you take a photo you can view it in the LCD display and choose to delete it Auto The camera automatically fires the flash if necessary Red Eye This setting is used to reduce the red eye effect that occurs when light is reflected off of the eyes of people and animals On The flash fires regardless of lighting conditio...

Page 14: ...sed time 3 Set the Focus Range switch to either Macro or Normal mode Use Macro mode if the sub ject is between 0 3m and 0 4m from the camera lens Use Normal mode if the subject is more than 1 0m from the lens If Macro is turned on the icon appears 4 Press the Shutter button again to stop record ing Recording will stop automatically when the camera s memory capacity has been reached See page 14 for...

Page 15: ...he type of file the screen will be similar to one of the following illustrations 4 Press and to scroll through the files First Level Second Level Deleting Files Delete Current File Delete All Files Thumbnail Mode Enter and Exit Thumbnail Mode Locking Files Lock Current File Unlock Current File Lock All Files Unlock All Files Slide Show Mode Begin Slide Show DPOF Enter DPOF Mode Game Mode Enter Gam...

Page 16: ... Menu button to cancel the selection and return to the Playback menu Thumbnail Mode Thumbnail mode allows you to view up to nine small images simultaneously on the LCD display 1 Turn the Mode dial to Playback mode turn the camera power on and press the Menu button 2 Press to select the Thumbnail icon 3 Press the Set button to enter thumbnail view 4 Use and to scroll through the thumbnails 5 Press ...

Page 17: ...ra DPOF The DC 3400 s Digital Printer Order Format DPOF function lets you print photos directly to any printer that supports this protocol Refer to your printer s manual for information 1 Turn the Mode dial to Playback Mode turn the camera power on and press the Menu button 2 Press to select the DPOF icon 3 Press the Set button once to enter the DPOF menu 4 Use and to select one of the following N...

Page 18: ...sed in any of the camera modes 1 Turn the Mode dial to Playback or Snapshot mode turn the camera power on and press the Menu button 2 Press once followed by The Setup menu icon is highlighted in green 3 Press and to scroll through the Setup menu First Level Second Level First Level Second Level Format Memory Format Memory Video Format NTSC Reset File Name Numbering Yes or No PAL Set Date and time ...

Page 19: ...s the file format JPG WAV or AVI The file number is incremented automatically by the camera Reset this number to 0001 or the next available number as follows 1 Enter the setup menu and press to select the Reset Filename menu icon 2 Press the Set button and use and to select Yes or No Press the Set button to confirm your selection or press the Menu button to can cel and return to the Setup menu Set...

Page 20: ...ess to select the Video Format menu icon 2 Use and to choose between NTSC and PAL 3 Press the Menu button to confirm your selection Turning Power Saving Mode On or Off Power saving mode conserves battery life by turning the LCD display off after three minutes of inactivity and turning the camera power off after five minutes 1 Enter the setup menu as described above and press to select the Power Sa...

Page 21: ...r the software installation screen to appear If this screen does not appear automatically double click on the file named setup exe that is located on the CD ROM Follow the on screen indructions to install the driver software Installing Software The DC 3400 software installation CD ROM includes several useful commercial software applications Windows only that you can use to edit and manage the mult...

Page 22: ... DCIM 100MEDIA 6 Drag and drop the files to your hard disk or double click a file to open it with your computer s default media application The camera indicator LED flashes green and orange when files are being transferred to the computer Viewing Photos and Movie Clips on a Television The DC 3400 can be connected to a video monitor or television with the included video cable 1 Connect the mini vid...

Page 23: ... print them First install the QLink software that is located on your DC 3400 software installation CD ROM Just follow the on screen instructions The installer will create a folder within Program Files as well as a Startup item and a task bar icon You can launch the program using any of these three methods or by using the QLink button when the camera is connected to the computer with the USB cable ...

Page 24: ... and attach the selected photo s Printer print the selected photo s Edit launch your default image editor Setting change QLink default settings Exit quit the QLink program Disconnecting the Camera When you are finished right click the USB device task bar icon and click to disconnect your camera from the computer ...

Page 25: ... lock to the unlock position Card Error The SD card is corrupted Purchase a new SD card System Error There is a general system error Turn the camera off and on and try again Format Error Formatting has failed Turn the camera off and on and try again 006 or pur chase a new SD card 004 File Error The file is corrupted Delete this image page 14 and take the picture again Image Locked The image can t ...

Page 26: ...pport If you encountered problems using DC 3400 and the camera driver program please send an e mail containing detailed descriptions of the problem you encountered as well as the hardware and software environment of your system to the following addresses For free driver updates product information and news releases please visit our web site at http www BenQ com tw global USA support sc BenQ com Eu...

Reviews: