background image

Getting Started...   

11

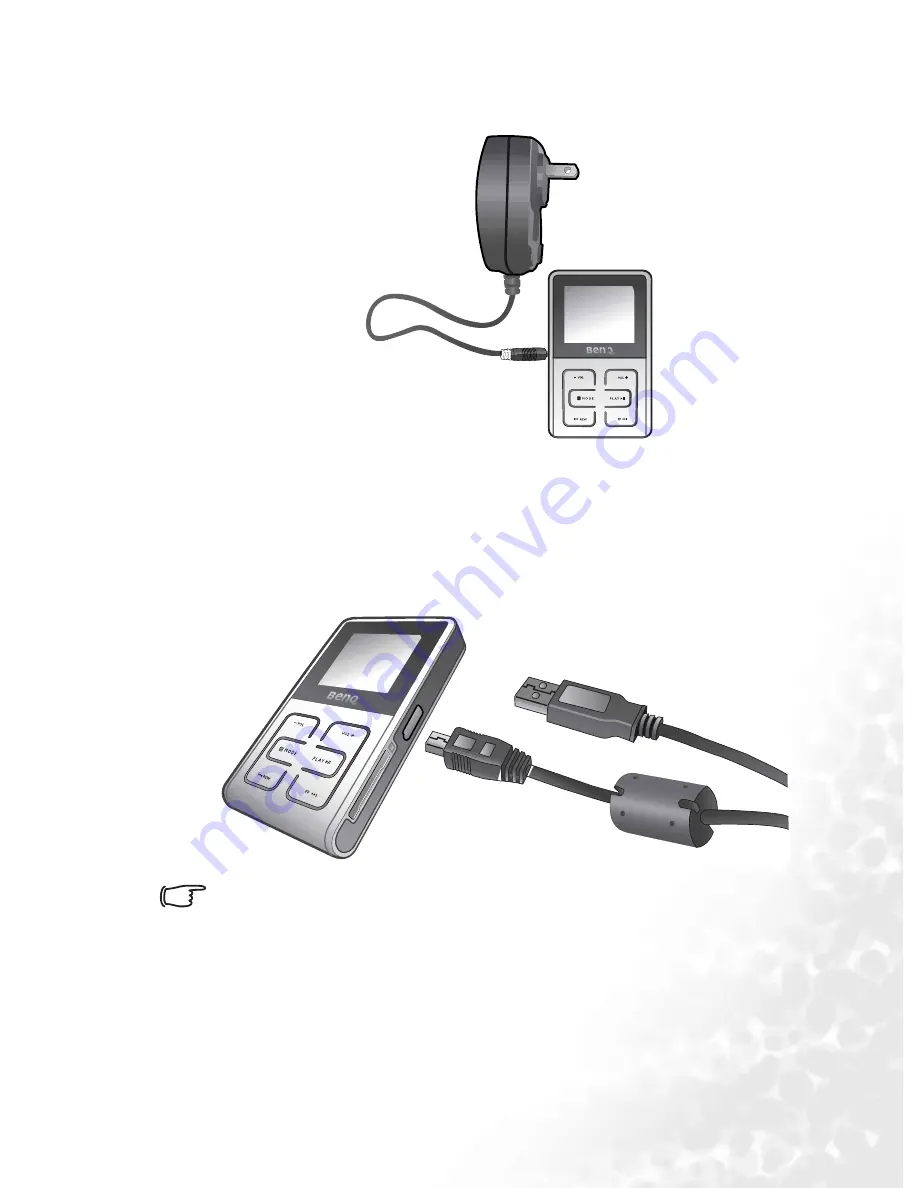
2.  Connect power adapter to a wall outlet. It takes around 4 

hours to charge the Joybee 720 completely. 

Charging with a USB Cable

Connect the Joybee 720 to a computer with the provided USB 
cable. When charging by PC through a USB cable, please have 
your PC on rather than in idle mode or off.

Exact charging time differs according to battery status.

Please check the battery bars on the Joybee 720 display.
When charging completes, battery bar


stops illuminating.

The life of battery depends on the frequency of charge, and

the more frequently the battery is recharged, the shorter

the replay time of device will be. It is a normal phenomenon

and not a manufacturing defect of battery.

Chargers might vary in different areas. 

Summary of Contents for DA720

Page 1: ...Joybee 720 DA720 Digital Audio Player User s Manual Welcome...

Page 2: ...cation Windows is the registered trademark of Microsoft Corpo ration All trademarks or product names appearing in this manual are registered property of their respective owners Important Information F...

Page 3: ...fferent from that to which the receiver is connected Consult the dealer or an experienced radio TV technician for help Any unauthorized changes or modifications to this equipment would void the user s...

Page 4: ...and accessories approved by the manufacturer War ranty voided if other adaptor or accessories are used and danger may occur Avoid high volume which may damage hearing BenQ Corporation assumes no respo...

Page 5: ...arging with DC Adapter 10 Charging with a USB Cable 11 Installing Drivers and Software 12 Operation of HDD Upgrade 13 Using SD Card 14 Using BenQ Joybee 720 as Digital Audio Player 15 Transferring Fil...

Page 6: ...Pictures with the Joybee 720 22 Operating the Joybee 720 When Viewing Pictures 22 Viewing JPEG Files 22 Showing Slides 23 Creating Slides 23 Deleting Slides 24 Editing Slides 24 Adding Background Musi...

Page 7: ...38 Adding Files from a PC to the Joybee 720 42 Updating the Joybee 720 Automatically with QMusic 45 Deleting Files Using QMusic 49 Using the Joybee 720 as USB Hard Disk 51 Connecting the Joybee 720 to...

Page 8: ...iv Table of Contents...

Page 9: ...Introduction Thank you for purchasing BenQ Joybee 720 Digital Audio Player In this manual you will find detailed descriptions and instruc tions of every function on the Joybee 720 and on QMusic as wel...

Page 10: ...720 Digital Audio Player Should any accessories be missing or damaged please contact your dealer immediately BenQ Joybee 720 Digital Audio Player Power Adapter Appearance of product shall be subject...

Page 11: ...vert music on an audio CD into MP3 files for use on the Joybee 720 or use the Joybee 720 as a hard drive disk your PC must comply with the following requirements OS Microsoft Windows 2000 ME XP QMusic...

Page 12: ...bee 720 For the detailed description and function of different parts of BenQ Joybee 720 Digital Audio Player please check the fol lowing pictures and tables USB cable port with cover SD card slot Righ...

Page 13: ...connecting USB cable between the Joybee 720 and PC When PC is on you can also charge the Joybee 720 this way SD Card Slot Insert SD card DC In Jack Allows you to use charger to recharge the Joybee 72...

Page 14: ...ions of EQ mode Intro mode and Repeat mode Play the tracks Press again to pause Press and hold to stop the playback Press to save a new channel while searching for a new one Press to finish the select...

Page 15: ...is being stopped Indicates EQ mode is off Indicates EQ mode as Pop Indicates EQ mode as Jazz Indicates EQ mode as Classical Indicates EQ mode as Rock Indicates EQ mode as My Own Indicates Intro mode i...

Page 16: ...8 Thank you for Using BenQ Joybee 720 Digital Audio Player Indicates to rotate the photo Indicates to zoom in or our the photo Indicates keys are locked Icon Description...

Page 17: ...t Photo Show JPEG File Show Slide Create Slide Delete Slide Edit Slide Erase File Music Music All Delete All Setup Auto Power Play Option Date Time Contrast Backlight Multiple Language Never 1m 3m 5m...

Page 18: ...offers about 10 hours of continuous replay time for MP3 music Of course the exact replay time is subject to the condition of battery operation frequency and the format of files being played There are...

Page 19: ...ur PC on rather than in idle mode or off Exact charging time differs according to battery status Please check the battery bars on the Joybee 720 display When charging completes battery bar stops illum...

Page 20: ...ick the icon to open the installation menu The table below shows each software and its content descrip tion on the Software CD Item Description Install BenQ QMusic QMusic is a powerful music manager I...

Page 21: ...e CD menu 4 Please follow the on screen instructions to format or upgrade the system of the Joybee 720 Please note that you will lose all the data stored on the Joy bee 720 if you format the player Th...

Page 22: ...on the SD card start being transferred to the Joy bee 720 automatically 4 After the transfer is complete press Refresh DB from Main Menu so that the new files can be sorted according to their formats...

Page 23: ...ansfer audio files and play them even when the PC you are using doesn t have QMusic on it The third way to transfer files to the Joybee 720 is using SD cards Transferring Files with QMusic Turn on you...

Page 24: ...rom a PC on page 53 to disconnect it Check if there is enough HDD space on the Joybee 720 before transferring files to it Transferring Files by SD Card Please refer to Using SD Card on page 14 for the...

Page 25: ...d to select the desired track and press to play 4 Press and hold to exit the current menu You can make other settings or viewing pictures while playing the music at the same time All audio files will...

Page 26: ...rease or decrease volume Showing the Playlist 1 Select Music from Main Menu and press 2 The playlist edited by QMusic will be displayed as QMusic other playlists created in Create Playlist will be dis...

Page 27: ...menu Repeat step 1 to 4 to select more desired tracks 6 To play the new playlist please go to Show Playlist from Music mode Use and to select the desired playlist and press to play it Using Hot Keys...

Page 28: ...any menu and play the audio files Locking Buttons Slide the power switch to the middle an icon of will appear on the screen until unlock the buttons The function is to avoid any touches that cause une...

Page 29: ...auto scan is done it will show an valid channel 8 You can always adjust the volume while listening to FM radio by pressing and 9 To exit the present menu press and hold Please note that the new avail...

Page 30: ...e and to select Photo from Main Menu and press to confirm 2 In the menu of Photo select Show JPEG File and press to confirm 3 The thumbnails of all JPEG files are displayed on OSD Use and to select th...

Page 31: ...reate Slide and press to confirm 3 Use and to move to the frame you would like to add JPEG picture and press to confrim 4 The OSD displays the thumbnails of all pictures there are six pictures per pag...

Page 32: ...ides You can replace pictures in the created slides with new ones insert new pictures into a proper position or delete pictures Of course the background music can be edited too 1 Use and to select Pho...

Page 33: ...file and press to confirm Adding Background Music into Slides You can enjoy listening to the music while viewing the slides by the following the steps 1 Please refer to the step 1 to 5 mentioned in C...

Page 34: ...1 Use and to select Erase File from Main Menu and press to enter 2 Use and to select Music All then press to enter 3 A dialog box will appear on the OSD and ask if you want to preceed the deletion Use...

Page 35: ...shut down the system after 1 3 5 or 10 mins Use and to select the desired setting and press to confirm 4 While the system if off automatically press any key to power on the Joybee 720 again Play Optio...

Page 36: ...ion to preview the playing music 1 Enter the submenu of Setup from Main Menu by pressing 2 Choose Play Option and press to confirm 3 Choose Intro On or Intro Off then press to con firm 4 Press and hol...

Page 37: ...lowing the steps 1 Enter the submenu of Setup from Main Menu by pressing 2 Choose Play Option and press to confirm 3 Use and to select Slide Show Repeat and press to confirm 4 Choose No Repeat or Repe...

Page 38: ...n off automatically after the time duration you set 1 Enter the submenu of Setup from Main Menu by pressing 2 Choose Backlight and press to confirm 3 There are choices of 10 30 60 and 120 seconds back...

Page 39: ...DD free space HDD capacity Refresh DB This function allows you to refresh your database every time after transferring files from PC The Joybee 720 cannot classify the new audio and vedio files and add...

Page 40: ...eate playlists transfer music to your the Joybee 720 burn music CDs and create your own music album The QMusic icon appears on your Desktop after it is suc cessfully installed as described in Installi...

Page 41: ...Overview of QMusic The user interface of the QMusic program is shown in the illustration below Action buttons Left panel Display Right panel Feature buttons Search window System buttons Playback butt...

Page 42: ...nder the Joybee 720 Left panel Displays all files supported by QMusic There are two default folders in your hard disk Music Library and My Joybee You can save and organize your audio files here Music...

Page 43: ...tly drag and drop your audio files saved under the Music Library to this folder or you can just right click the folder and select Add song to copy audio files saved in your hard disk to this folder Pl...

Page 44: ...eral settings dialogue box Repeat button Click to repeat playback all tracks Random button Click to random play all tracks EQ button Click to display EQ control panel Right panel Displays the files in...

Page 45: ...0 to a PC on page 51 The icon of the Joybee 720 appears in the left panel of the QMusic interface and the directories on the Joybee 720 are displayed under the icon You can now add files to your Joybe...

Page 46: ...he Joybee 720 1 Put an audio CD in the CD ROM on your PC The icon appears in the left panel of QMusic and the files on the CD appear in the right panel 2 Select the files to be added to the Joybee 720...

Page 47: ...tarts converting the selected files into MP3 files 4 After the conversion is completed a New Album is added to the left panel All the converted files are placed in this album Click the New Album to di...

Page 48: ...than one file press and hold the Ctrl key on the keyboard while selecting the files To select all files click the first file press and hold the Shift key on the keyboard and then click the last file I...

Page 49: ...6 Drag to copy the selected files from the right panel to the MP3 directory under the icon indicates as the Joybee 720 Check if there is enough HDD space on the Joybee 720 before transferring files to...

Page 50: ...42 Using QMusic Adding Files from a PC to the Joybee 720 Follow these steps to add files from a PC to your Joybee 720 1 Click the My Joybee folder in the left panel...

Page 51: ...s to open a dialogue box for selecting files Browse and select MP3 or WMA files to be add to the Joybee 720 from the PC Press Open to add the selected files to My Joy bee 3 Click the Joybee 720 icon o...

Page 52: ...elected files to the Joybee 720 QMusic shows a dialog box to ask if you want to delete the existing files in the My Joy bee folder If you want to keep them abort the transfer and back up these files b...

Page 53: ...ing the Joybee 720 Automatically with QMusic You can set up the Joybee 720 to be updated with the music from the My Joybee folder automatically when it is connected to the PC 1 Click the My Joybee fol...

Page 54: ...n a dialogue box for selecting files Browse and select MP3 or WMA files to be added to the Joybee 720 from the PC Press Open to add the selected files to My Joybee 3 Press on the right panel of QMusic...

Page 55: ...Using QMusic 47 4 In the Option dialog box shown click the Joybee tab 5 Select Automatically launch QMusic when Joybee added under Launch Settings and Automatically transfer MP3 files...

Page 56: ...he Joybee 720 with the files in My Joybee folder From now on if you want to automatically update files on the Joybee 720 you only need to save files in the My Joybee folder and connect the Joybee 720...

Page 57: ...cedure to delete files on your Joybee 720 using QMusic 1 Start QMusic 2 Turn on the Joybee 720 and connect it to the PC using the USB cable 3 Locate the files to be deleted by clicking on the MP3 subd...

Page 58: ...be deleted To select more than one file press and hold the Ctrl key on the keyboard while selecting the files To select all files click the first file press and hold the Shift key on the keyboard and...

Page 59: ...on any fixed disk When files are being transferred to the Joybee 720 do not disconnect the Joybee 720 from the PC Please check if there is enough HDD space on the Joybee 720 before transferring files...

Page 60: ...the USB cable which comes with the package For more information refer to Connecting the Joybee 720 to a PC on page 51 2 Click My Computer or Windows Explorer on the computer then locate the file you...

Page 61: ...ouble click the USB device icon on the task bar tray 2 A dialog box as shown below will appear on the screen Select USB Mass Storage Device in the dialog box and press Stop 3 Another dialog box as sho...

Page 62: ...54 Using the Joybee 720 as USB Hard Disk 4 Close the dialog box appears on the bottom of the screen and disconnect the Joybee 720 from the PC Operation procedure may differ from one OS to another...

Page 63: ...iver has been installed on your PC system Data stored in the Joybee 720 is lost When power supply is unstable while the Joybee 720 is con nected to a PC it may cause data loss Hence we strongly rec om...

Page 64: ...com hk Taiwan 0800 027 427 Support BenQ com Singapore 65 6296 2919 Thailand 66 2 6700310 1 Malaysia 603 7725 4168 Australia Australia 61 1300 130 336 Europe The Netherlands 0900 2367 669 www BenQ nl...

Page 65: ...Location and then the country You will be able to find the phone number of the local service center from the Internet For users in Europe to avoid any unnecessary inconve nience with your BenQ product...

Reviews: