background image

Connection

18

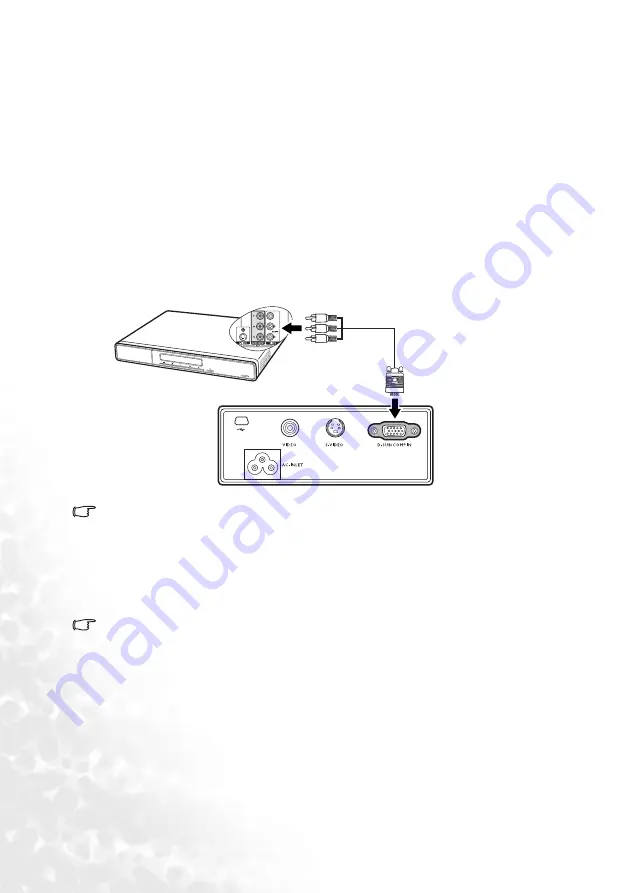
Connecting a Component Video source device

Examine your Video source device to determine if it has a set of unused Component Video 
output sockets available: 

If so, you can continue with this procedure.

If not, you will need to reassess which method you can use to connect to the device.

To connect the projector to a Component Video source device

1.

Take the (optional accessory) Component Video to VGA (D-Sub) adaptor cable and 
connect the end with 3 RCA type connectors to the Component Video output sockets 
of the Video source device. Match the color of the plugs to the color of the sockets; 
green to green, blue to blue, and red to red.

2.

Connect the other end of the Component Video to VGA (D-Sub) adaptor cable (with 
a D-Sub type connector) to the D-SUB/COMP IN socket on the projector.

The final connection path should be like that shown in the following diagram:

Component Video is the only video output that delivers native 16:9 aspect ratio picture.

If you connect the projector to a High Definition TV (HDTV) tuner, the following standards 
are supported:

If the selected video image is not displayed after the projector is turned on and the correct 

video source has been selected, check that the Video source device is turned on and 

operating correctly. Also check that the signal cables have been connected correctly.

480i

480p

576i

576p

720p (50/ 60 Hz)

1080i (50/ 60 Hz)

A/V device

Component Video to VGA 

(D-Sub) adaptor cable 

Summary of Contents for COMMUTER CP120c

Page 1: ...Welcome CP120c Digital Projector Commuter Series User s Manual...

Page 2: ...Disclaimer BenQ Corporation makes no representations or warranties either expressed or implied with respect to the contents hereof and specifically disclaims any warranties merchantability or fitness...

Page 3: ...ng a preferred projected image size 12 How to determine the position of the projector for a given screen size 13 How to determine the recommended screen size for a given distance 14 Screen size chart...

Page 4: ...Picture menu 32 3 Setting menu 33 4 Advance menu 34 5 Information Menu 36 Maintenance 37 Care of the projector 37 Cleaning the lens 37 Cleaning the projector case 37 Storing the projector 37 Transport...

Page 5: ...Table of Contents v Limited warranty 48 Regulation statements 49 FCC statement 49 EEC statement 49 ICES Statement Canada 49 VCCI Statement 49 MIC statement 49...

Page 6: ...Table of Contents vi Memo...

Page 7: ...jector Save this user s manual for future reference Do not look straight at the projector lens during operation The intense light beam may damage your eyes Refer servicing to qualified service personn...

Page 8: ...mp assembly or any electronic components unless the projector is unplugged 4 Do not place this product on an unstable cart stand or table The product may fall sustaining serious damage 5 To reduce the...

Page 9: ...tions where the altitudes are higher than 10000 feet 8 Do not block the ventilation holes Do not place this unit on a blanket bedding or any other soft surface Do not cover this unit with a cloth or a...

Page 10: ...objects to become heated or deformed or even cause a fire To temporarily turn off the lamp press BLANK button on the projector or remote control 12 Do not place liquids near or on the projector Liquid...

Page 11: ...ource Digital keystone correction The auto and manual digital keystone correction functions make it possible to correct distorted images without having to move the location of the projector Adjustable...

Page 12: ...e supplied accessories will be suitable for your region and may differ from those illustrated Optional accessories Projector Soft Carry Case Pull the tab before using the remote control Quick Start Gu...

Page 13: ...ont IR remote sensor Ventilation grill Projection lens Focus ring and zoom ring Kensington lock hole Sliding lens cover Rear IR remote sensor RGB PC Component video YPbPr YCbCr signal input socket USB...

Page 14: ...page 41 for more information Lights up or flashes when the projector is under operation 4 BLANK 5Up button Refer to Hiding the image on page 26 and Using the menus on page 29 for more information Pres...

Page 15: ...fer to Fine tuning the image size and clarity on page 24 for more information Adjusts the focus of the projected image 10 LAMP indicator light Refer to Indicators on page 41 for more information Light...

Page 16: ...lay OSD menu 6 Keystone buttons Refer to Correcting keystone on page 24 for more information Manually corrects distorted images resulting from an angled projection 7 Page Up and Down buttons You can o...

Page 17: ...er throw a battery into a fire There may be danger of an explosion If the battery is dead or if you will not be using the remote control for a long time remove the battery to prevent damage to the rem...

Page 18: ...pect width This will result in a proportionally smaller height equivalent to 75 of the projector s native aspect height Thus a 16 9 aspect image will not utilize 25 of the height of a 4 3 aspect image...

Page 19: ...and the vertical offset dimension which are directly proportional to the projection distance BenQ has provided a table of 4 3 aspect ratio screen sizes see Screen size chart on page 15 to assist you i...

Page 20: ...creen diameter listed in that row That is the projected image size of the projector at that projection distance 4 On that same row look across to the right column and make note of the vertical Offset...

Page 21: ...37 2000 1600 1200 2874 3122 3370 150 7 84 2134 1707 1280 3066 3330 3595 160 8 96 2438 1951 1463 3503 3806 4109 183 2500 2000 1500 3592 3902 4212 188 9 108 2743 2195 1646 3941 4282 4622 206 3000 2400 1...

Page 22: ...connect one end to the D Sub output socket of the computer 2 Connect the other end of the VGA cable to the D SUB COMP IN signal input socket on the projector 3 If you wish to use the remote paging fu...

Page 23: ...mposite Video Digital TV tuner and DVD players output Component Video natively so if available on your devices this should be your connection method of choice in preference to composite Video See Conn...

Page 24: ...een blue to blue and red to red 2 Connect the other end of the Component Video to VGA D Sub adaptor cable with a D Sub type connector to the D SUB COMP IN socket on the projector The final connection...

Page 25: ...on the projector The final connection path should be like that shown in the following diagram If the selected video image is not displayed after the projector is turned on and the correct video sourc...

Page 26: ...of the Video source device 2 Connect the other end of the Video cable to the VIDEO socket on the projector The final connection path should be like that shown in the following diagram If the selected...

Page 27: ...Off function See Auto Off Off on page 35 for details is activated the projector will turn off automatically if no input signal is detected from the selected source after the period of time as set by...

Page 28: ...ssing the3Left or4Right button The password will display on screen when being input IMPORTANT Write your selected password down here in this manual so that it is available to you should you ever forge...

Page 29: ...try again or press the 6Downbutton to cancel 4 Check the new password 5 You have the following options Press the AUTO button to complete the procedure Press the 5Up button to try again Press the 6Down...

Page 30: ...gle of the projector 2 Press the AUTO button 3 If the image is still distorted you will need to manually correct it following ONE of these steps Press the Keystone 3Left or Keystone 4Right buttons on...

Page 31: ...electing an application mode The projector is preset with several predefined application modes so that you can choose one to suit your operating environment and input source picture type To select a o...

Page 32: ...BLANK appears at the bottom right corner of the screen while the image is hidden You can set the blank time in the Advance Blank Time menu to let the projector return the image automatically after a...

Page 33: ...ss the Power button and a prompt message appears Press the Power button a second time to turn the projector off 2 The POWER indicator light flashes orange and the lamp shuts down the fans continue to...

Page 34: ...ure Application Mode Autokeystone Keystone Color Temp Brightness Contrast Application Mode Autokeystone Keystone Color Temp Brightness Contrast Color Tint Pro Picture Auto Resize Aspect Ratio H Positi...

Page 35: ...vance menu on page 34 for more details The following example describes the adjustment of the keystone 1 Press the MENU or MENU 6 button to turn the on screen menu on 4 Adjust Keystone values by pressi...

Page 36: ...for playing PC based games in a bright living room 4 sRGB Photo Mode Maximizes the purity of RGB colors to provide true to life images regardless of brightness setting It is most suitable for viewing...

Page 37: ...h color temperature appears to have more blue in it Brightness depends on the selected Application mode Adjusts the brightness of the image The higher the value the brighter the image And lower the va...

Page 38: ...maller than if resized to full screen You could adjust the zoom setting or move the projector away from the screen to increase the image size if necessary You may also need to refocus the projector af...

Page 39: ...word function on page 22 Once the password is set and this function is selected the projector is password protected Users who do not know the correct password can not use the projector WARNING You wil...

Page 40: ...or4Right buttons on the remote control to select your desired language Splash Screen BenQ logo Allows you to select which logo screen will display during projector start up Three modes are available D...

Page 41: ...10hours without shutdown Auto Off Off This function allows the projector to turn off automatically if no input signal is detected after a set period of time Press Left 3 Right 4on the projector or rem...

Page 42: ...use Unavailable adjustments are not shown on the screen Function Description Source Shows the current signal source Resolution Shows the native resolution of the input signal Application Mode Shows t...

Page 43: ...he power cord To remove dirt or dust wipe the case with a soft dry lint free cloth To remove stubborn dirt or stains moisten a soft cloth with water and a neutral pH detergent Then wipe the case Never...

Page 44: ...nings please refer to Indicators on page 41 The LAMP indicator light and TEMP Temperature warning light will light up if the lamp becomes too hot Turn the power off and let the projector cool for 45 m...

Page 45: ...l hazardous waste regulations to dispose of this lamp in a proper manner Step 1 Turn the power off and disconnect the projector from the wall socket Step 2 Protect the projector s surface by clearing...

Page 46: ...not over tighten the screw Step 9 Restart the projector Do not turn the power on with the lamp cover removed Step 10 Resetting the lamp counter Do not reset if the lamp is not replaced as this could c...

Page 47: ...indicator light is flashing during powering up The projector is under normal operation Lamp events It is warning you that lamp usage has exceeded 2000 3000 Economic mode hours Replace the projection l...

Page 48: ...42 The projector has shutdown automatically If you try to re start the projector it will shutdown again Please contact your dealer for assistance R O R R R R R G R R O G R R G R G G R O O R R O R G O...

Page 49: ...input source device Check the connection See Connection on page 16 for details The input signal has not been correctly selected Select the correct input signal with the SOURCE button on the projector...

Page 50: ...Cause Remedy The battery is out of power Replace the battery with a new one There is an obstacle between the remote control and the projector Remove the obstacle You are too far away from the projecto...

Page 51: ...consumption 190W Max Mechanical Dimensions 218 mm W x 61 mm H x 167 mm D Weight 2 9 lb 1 3 Kg Input terminal Computer input RGB input D sub 15 pin female x 1 Video signal input S VIDEO Mini DIN 4 pin...

Page 52: ...5 175 VGA_60 37 861 72 809 31 500 VGA_72 37 500 75 000 31 500 VGA_75 43 269 85 008 36 000 VGA_85 800 x 600 37 879 60 317 40 000 SVGA_60 48 077 72 188 50 000 SVGA_72 46 875 75 000 49 500 SVGA_75 53 674...

Page 53: ...47 59 94 576i 625i 50Hz 15 63 50 00 576p 625p 50Hz 31 25 50 00 720p 750p 60Hz 45 00 60 00 720p 750p 50Hz 37 50 50 00 1080i 1125i 60Hz 33 75 60 00 1080i 1125i 50Hz 28 13 50 00 Video mode Horizontal Fre...

Page 54: ...To obtain warranty service immediately notify the dealer from which you purchased the product of any defects Important The above warranty shall be void if the customer fails to operate the product in...

Page 55: ...etween the equipment and receiver Connect the equipment into an outlet on a circuit different from that to which the receiver is connected Consult the dealer or an experienced radio TV technician for...

Page 56: ...Regulation statements 50 Memo...

Reviews: