


9
English
en
dance with the instructions.
Carefully read the instructions in section 14.1 before
removing the oil cap.
2. Start-up
After installing the battery, press the ON/OFF switch
to start the machine.
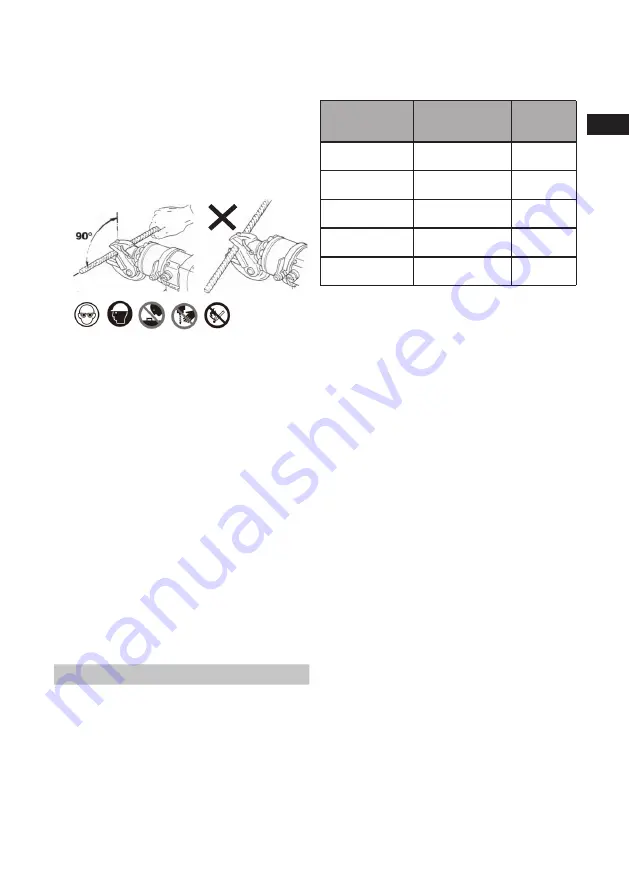
3. Cutting
Place the blades perpendicular to the axis of the
workpiece.
The blades may break if the cutting thickness is gre-
ater than the limit for the tool.
After the blade is correctly positioned on the work-
piece, press and hold down the start button until
cutting is complete.
IMPORTANT:Position the blades so that the cut-
ting edge is minimised.
Blade positions that are not perpendicular in re-
lation to the workpiece will increase the cutting
thickness.
4. Manual return valve
The manual return lever has two positions (see fi-
gure 4).
– Position 1: valve closed. The piston’s working
and return strokes are performed automati-
cally.
– Position 2: Valve open. To interrupt the work
stroke or in an emergency, move the lever
to position 2 to return the piston to its home
position.
IMPORTANT: If the machine is not working, make
sure that the manual return valve is in position 1.
14. MAINTENANCE AND INSPECTION
1. All maintenance, inspection and cleaning opera-
tions must be carried out with the power supply
disconnected and when the machine is cool (see
person responsible for the maintenance plan).
2. Maintenance work must be carried out in a suitable
location in accordance with applicable safety regu-
lations.
3. Clean the machine thoroughly before starting main-
tenance work (see Section 12).
4. Use appropriate personal protective equipment
when performing maintenance work.
AFTER THE MAINTENANCE WORK IS FINISHED,
MAKE SURE THAT ALL SAFETY DEVICES ARE
CORRECTLY REFITTED.
U=Operator; S=Service workshop.
In case of doubt about maintenance procedures, or-
dering spare parts or complicated maintenance work,
contact your authorised dealer.
1. Replacing and/or replenishing hydraulic oil
Changing the oil or refilling it must be done in such
a way that no particles/contaminants get into the oil
or the tank. Contamination in the oil can damage the
hydraulic parts irreversibly.
• MAKE SURE THAT THE OIL DOES NOT CON-
TAIN ANY CONTAMINANTS.
• DO NOT USE DIRTY TOOLS.
• DO NOT WORK IN A DIRTY ENVIRONMENT.
Changing the hydraulic oil:
USE A SUITABLE DISPENSER, PREPARE THE
CORRECT AMOUNT OF HYDRAULIC OIL (0.3 L).
LEAKING OIL CAN CAUSE SHORT-CIRCUITS,
FIRES OR EXPLOSIONS
a) Position the machine horizontally in a stable po-
sition on a work surface with the magnet cover
facing upwards. Place a container under the
machine to catch the oil.
b) Unscrew the magnetic cover (see part 6 in Se-
ction 8) and remove any residue with the piston
in its retracted position.
c) Drain the oil tank completely of hydraulic oil in a
suitable manner (use an oil suction pump) so no
oil can leak into the machine.
d) Slowly pour in the correct amount of oil (0.3
litres) with suitable equipment (such as a fun-
nel). Use only new or clean recommended oil
(as indicated on the following page). Try to avoid
introducing any air when filling the hydraulic oil.
e) Fill to the upper edge of the hole.
f) Refit the oil cover and tighten it slightly.
g) Run for a few strokes to ventilate the large air
bubbles.
Maintenance
schedule
Action
Can be
performed
by
Every 8th hour
Inspection of tool’s
status
U
Every 1600th
hour
Oil change
S
Every 8th hour
Check that screws
are tightened
U
Every 8th hour
Check status of
cutting edges
U
/
Change of cutting
edges
S