background image

34

35

MAINTENANCE & CLEANING

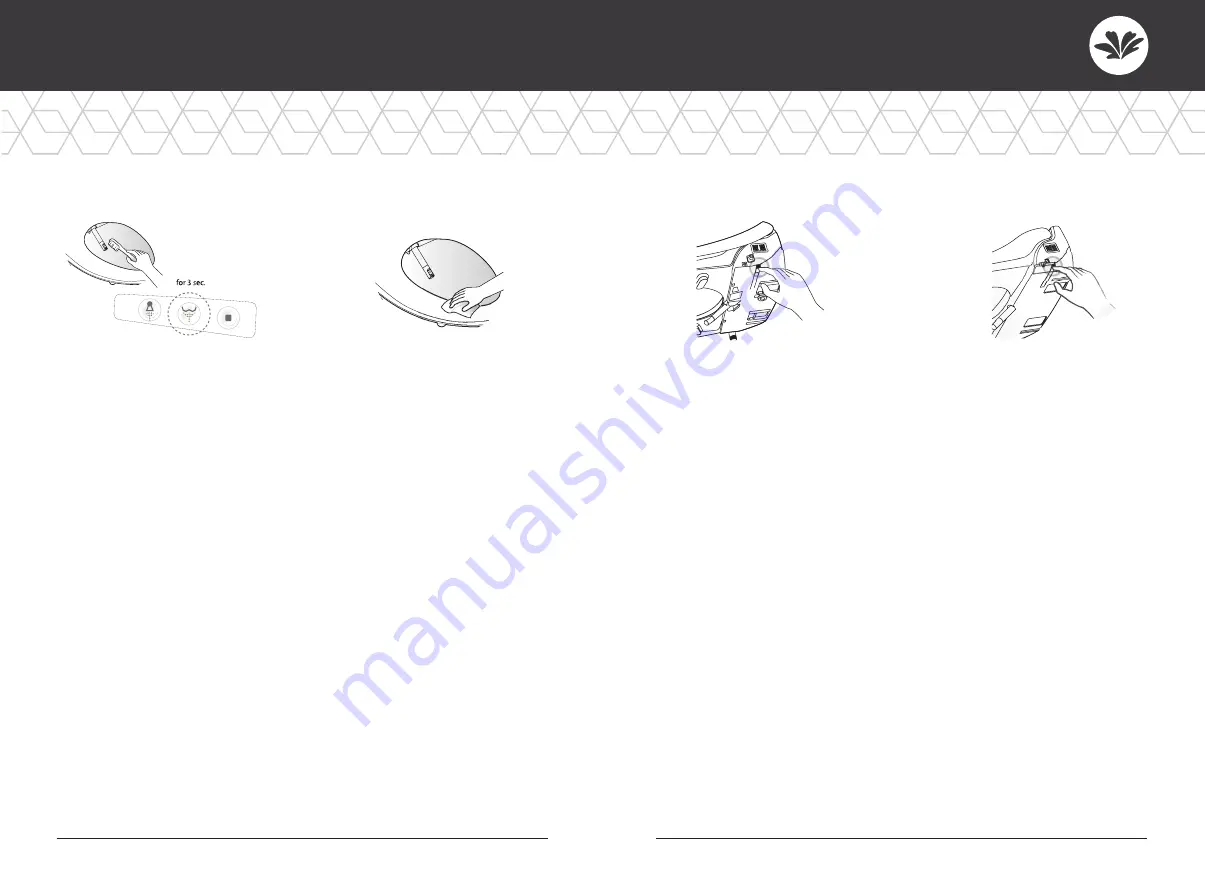
Manual Nozzle Cleaning

Cleaning of Bidet Body

Drain Remaining Water

Maintenance During Winter

1.  Press Posterior for longer 

than 3 seconds, and then 
nozzle will extract and stop 
(for 2 minutes).

2.  Clean the nozzle with an 

unused toothbrush, etc., and 
press STOP. Nozzle  
will retract.

1.  Remove the power plug  

from the outlet.

2.  Close the water feed valve by 

turning it counterclockwise.

3.  Press the button on the side 

of the main body to drain  
the water. 

1.  Insert the power plug into 

the outlet and be sure if the 
power is supplied.

2.  When the dib will not be 

used for a long time (more 
than a few days), close the 
water shut off valve and drain 
the water from the bidet.

1.  Exterior surface of bidet is 

made of plastic material, 
which may be damaged by 
scrubber, chemicals, etc.

2.  Wipe the surface with a soft 

damp cloth. Do not spray 
water directly onto surface.

3.  Clean the body after 

removing the power plug 
from the outlet. Be sure  
no water plashes onto  
the power plug or outlet.

4.  Do not touch the power 

outlet with wet hands.  
Risk of electric shock.

Summary of Contents for bioBidet DIB Special Edition

Page 1: ...1 OWNER S MANUAL DIB Special Edition ...

Page 2: ...10 Dimensions 12 Remote Control 13 PRODUCT INSTALLATION Installation 14 Remote Control Installation 16 Trial Operation 18 Product Disassembly 19 Operation 22 TROUBLESHOOTING Settings 30 Maintenance Cleaning 34 Specifications 36 Troubleshooting 37 Warranty 38 TABLE OF CONTENTS ...

Page 3: ...ELECTROCUTION Do not use while bathing Do not place or store product where it can fall or be pulled into a tub or sink Do not place in or drop into water or other liquid Do not reach for a product that has fallen into water Unplug immediately WARNING TO REDUCE THE RISK OF BURNS ELECTROCUTION FIRE OR INJURY TO PERSONS Close supervision is necessary when this product is used by on or near children o...

Page 4: ...ician or service person if the grounding instructions are not completely understood or if in doubt as to whether the product is properly grounded This product is for use on a nominal 120V circuit and has a grounding plug that looks like the plug illustrated in sketch A in Figure 1 A temporary adapter which looks like he adapter illustrated in sketches Band C may be used to connect this plug to a 2...

Page 5: ...ated Energy Saving Mode will set the heaters to a lower temperature to reduce energy consumption Touch Panel Remote Control Convenient touch screen remote control provides easy user interface Vortex Wash Soft but powerful water wash for added cleansing benefit Stainless Steel Nozzle For better hygiene a stainless steel nozzle is applied Deodorization Function Deodorizing filter eliminates odors ef...

Page 6: ...10 11 UNIT PARTS Cone packing Boltguides Mountingbolts Remotecontrol AAA4batteries Remotecontrol bracket Mounting bracket Watersupplyhose fortoilet Watersupplyhose forbidet ...

Page 7: ...12 13 REMOTE CONTROL DIMENSIONS Elongated Round ...

Page 8: ... toilet Turn shut off valve completely Flush toilet and hold down handle to completely empty tank 5 Install Mounting Bracket 6 Slide Seat onto Plate 7 Connect Bidet hose 8 Insert Deodorizing Cartridge Place adjustable mounting plate over mounting holes on toilet flat side down rubber side off mounting plate should be closet to the toilet tank Connect bidet hose making sure the hose is firmly conne...

Page 9: ...3 Batteries 4 Mount Remote Optional 5 Battery Life 6 Unplug If Unit Does Not Work When the batteries have reached the end of service life all LEDs will blink Replace the batteries with new AAA size 4pcs CAUTION Do not use old and new batteries together This could cause damage or failure of the remote control If the unit does not work after replacing the batteries unplug and wait for 3 seconds Plug...

Page 10: ...n 1 Open Water Supply 2 Check For Leaks 3 Nozzle 4 Test PRODUCT DISASSEMBLY 1 Unplug Power 2 Close Water Supply Valve 3 Drain Water 4 Release Remove Unplug the power plug from the outlet Press and release drain button on the side of bidet Completely drain the water out of the main body While pressing the button pull the main body forward and then remove it from the toilet Release the nuts and then...

Page 11: ...cover that were removed when the bidet was installed Remove the bidet hose toilet hose and T Valve Connect the water supply hose that was removed when the bidet was installed 5 Remove Bidet Hose 6 Connect Water Supply Hose 7 Open Water Supply Valve 8 Attach Toilet Seat PRODUCT DISASSEMBLY CONT ...

Page 12: ...operating the drying function Selected functions stop Press STOP on the side control panel for 3 seconds to turn off the unit Selected function can be used as described When selecting VORTEX WASH function Oscillate function cannot be used When selecting Child function VORTEX WASH function may not operate Dib s specialized water spray in VORTEX WASH function enters into rectum and then helps reliev...

Page 13: ... button during the operation of Wide Clean the nozzle position can be adjusted in 5 positions Wide Clean function will not operate during the operation of Vortex wash When pressing Massage button during operation of Posterior Feminine and Vortex wash water pressure will repeat high and low for smooth pulsating wash Adjust Water Pressure During the operation of Posterior Feminine and Vortex wash no...

Page 14: ... time of use It may take 5 7 days to let the unit memorize the usage pattern Cancel Energy Save Mode Press the Energy Saving Button until LED is off to release the energy save modes This unit adopts the instant heating technology for water heating and does not consume energy for water heating when it is in stand by mode OPERATION CONT 9 Child Function 10 Seat Temperature Control Press the Child bu...

Page 15: ...o adjustment function which turns on low temperature 320C 900F when user sits on the seat for more than 15 minutes consecutively Nozzle position water pressure dry water seat temperature can be present and stored for 2 different users How to Preset 1 Adjust nozzle position water pressure dry water seat temperature to your preference 2 Press the STOP button or wait Red activating indicator will bli...

Page 16: ...l alone for 5 seconds to set the ID ID 0 3 On Off Night Light Press button for seconds Night light can be turned on and off by pressing button on the remote Night Light is turned on Level Fan Speed Display of activating indicator Energy saving blinking Occu Unocc default High High Blinking Red 0 Off Off Blinking Off 1 Low Low Blinking Blue 2 Low High Blinking Purple 3 High High Blinking Red Level ...

Page 17: ...et will not be responsible for any resulting damages or claims related to the misuse or distribution of non Bio Bidet DIB filters Function Seat Status Switch Operation Description 1 Manual Nozzle Cleaning Press Posterior for longer than 3 second Nozzle will move forward for cleaning 2 Power Off Press STOP Nozzle will retract and clean itself 3 Factory Default Setting Press STOP for longer than 5 s...

Page 18: ... side of the main body to drain the water 1 Insert the power plug into the outlet and be sure if the power is supplied 2 When the dib will not be used for a long time more than a few days close the water shut off valve and drain the water from the bidet 1 Exterior surface of bidet is made of plastic material which may be damaged by scrubber chemicals etc 2 Wipe the surface with a soft damp cloth D...

Page 19: ...15 9 406 x 19 5 496 x 6 5 165 Product Weight Gross Weight lb kg Elongated 10 8 4 9 kg 17 4 7 9 kg Round 10 6 4 9 kg 17 2 7 8 kg TROUBLESHOOTING Problem Check List The bidet is not working Check if the power plug is not connected Check for power failure Water does not spray Check if the water supply is suspended Check if the water supply is suspended Check if the nozzle is locked by foreign materia...

Page 20: ...rmal use and service for a period of 1 year from the date of purchase This warranty is extended only to the original purchaser For full warranty details visit www biobidet com Contact Bio Bidet customer support with any questions you may have 847 458 2334 support biobidet com www biobidet com WARRANTY ...

Page 21: ...Thank You Technical Support Customer Service 7900 S Route 31 Crystal Lake IL 60014 T 847 458 2334 U S TOLL FREE 877 339 5214 support biobidet com www biobidet com ...

Reviews: