background image

17

OPERATION

Using the hotplates of your cooker

Hotplate Safety Warnings

• Do not use if the ceramic glass top is cracked or broken.
• Do not leave aluminium foil on the hot ceramic hotplates (permanent damage will occur)

NOTE: Stored heat in the hotplate can be used for the last few minutes of cooking.
Simply turn off the control.

Choose the right saucepans

The image below will help you in making sure that the correct saucepans are used on
your cooktop.
•  Always use pots and pans with flat bottoms. Uneven or thin bottoms will waste energy and 

cook slowly.

•  Always use pots and pans which are slightly larger than the hotplate. Small pans waste 

energy.

•  Always put dry pots and pans on the hotplates.
•  Do not use pots and pans which are too large. Pans which overhang the hotplate more than 

50 mm can damage the hob

•  Check the hotplates on your cooker against the diagrams below before you use your cooker 

for the first time.

Hotplate Configuration

1. Front Left Element
  a. 1800w
2. Front Right and Rear Left Element
  a. 1200W
3. Rear Right Element
  a. 2000W

1

2

2

3

Hot surface warning 

Summary of Contents for BFS54DOCG

Page 1: ...www belling com au BFS54DOCG Freestanding Double Oven with Ceramic Cooktop INSTRUCTION MANUAL PLEASE READ THE INSTRUCTION MANUAL CAREFULLY BEFORE USING THE UNIT ...

Page 2: ...ICING 7 3 OPERATION a PRODUCT DESCRIPTION 8 b FRONT CONTROL PANELS 9 c PREPARING YOUR PRODUCT FOR THE FIRST TIME 9 d OVEN SAFETY WARNINGS 10 e MAIN OVEN FUNCTIONS 11 f OVEN TEMPERATURE 13 g TOP OVEN GRILL FUNCTIONS h USING THE PROGRAMMABLE CLOCK 14 i COOKING GUIDE 16 j USING THE HOTPLATES 17 4 OPERATION AND CLEANING 18 5 HINTS AND TIPS SOLVING PROBLEMS 21 6 INSTALLATION 23 7 TECHNICAL SPECIFICATIO...

Page 3: ... purchase Place of purchase Store name Address Telephone Invoice receipt number Installation Details Electrical date of installation Electrician Installers Details Company Installers Name Licence Number Telephone Number Gas date of installation Gas installers details Company Installers Name Licence Number Telephone Number Plumbing date of installation Plumbers installers details Company Installers...

Page 4: ...re reference Installation The installation of your new appliance must be carried out by a qualified installer technician in accordance to local regulations Please ensure all packaging materials are disposed of correctly Customer Care Our Customer Care centre is available should you wish to learn more about your appliance in relation to how to use it to its best potential or tips on cleaning as wel...

Page 5: ...ns the instructions shall state that means for disconnection must be incorporated in the fixed wiring in accordance with the national wiring rules If the supply cord is damaged it must be replaced by the manufacturer its service agent or similarly qualified persons in order to avoid a hazard During use the appliance becomes hot Care should be taken to avoid touching heating elements inside the ove...

Page 6: ...b circuit in the fixed wiring that supplies this cooking range To ensure your safety all electric appliance should only be installed or service by qualified staff If the supply cord is damaged it must be replaced by the manufacture its service agent or similarly qualified staff in order to avoid a hazard Appliance must be installed according to current laws and regulations by qualified tradesmen I...

Page 7: ...using the appliance ensure that all packing materials are removed from the appliance In order to avoid any potential hazard the Installation Instructions must be followed In order to avoid accidental tipping of the appliance for example by a child climbing onto the open oven door the anti tilt plate must be installed Where the appliance is installed next to cabinets the cabinet material must be ca...

Page 8: ...tom Oven Door 9 Oven Element hidden under floor conventional models only 10 Oven Element hidden under floor conventional models only 11 Oven Element fan forced models only 12 Fan Element Cover fan forced models only 13 Door Seal 14 Drawer Panel 15 Anti Tilt Panel 16 Anti Slip Feet OPERATION Product Description ...

Page 9: ...nd the will flash To set the time of day press the or buttons 15 seconds after the last change the will disappear confirming the time has been set Note The clock has a 24 hour display 1 Function switch control knob a Sets the desired oven function 2 Top Oven Grill control knob a Sets the top oven to either grill or oven function 3 Oven temperature control knob a Sets oven temperature 4 Ceramic con...

Page 10: ...anything else on the bottom of conventional oven model as trapped heat will damage the oven Do not touch the hot surfaces or heating elements inside the oven Do not use the oven door as a shelf Do not push down on the open oven door Do not place shelves on top of upper most shelf runner as there are no stops for shelf withdrawal Fitting oven shelves Ensure shelf orientation is correct refer pictur...

Page 11: ... cook or bake your food it will only help to defrost it Conventional Oven The lower heating elements and upper heating elements will start operating This function emits heat ensuring even cooking of the lower and upper food This is ideal for making pastries cakes baked pasta and lasagne It is best to cook on one shelf at a time with this function It is recommended to pre heat the oven for approxim...

Page 12: ...to pre heat the oven for approximately 10 minutes When grilling the oven door must be closed and the oven temperature should be set to 190 200 C Fan Grill The grill heating element upper heating elements and fan will start operating This function is ideal for faster grilling of thicker foods and for covering a larger surface area The fan will ensure even cooking Use the upper shelves of the oven a...

Page 13: ...the juices in to keep them tender Grill mode can also be used for dishes that require a high temperature on the surface such as beef steaks veal ribsteak filets hamburgers etc Grill food with the oven door closed when not using fan Grill Safety Warnings Always turn off the grill immediately after you have finished cooking and pull drawer out or remove grill tray otherwise fat left in the tray in t...

Page 14: ...ock indicator will remain flashing for 15 seconds once the time is set and neither of the up key or down keys and pressed again whilst flashing OPERATION Using the Top Oven Grill of your Electric Cooker cont Convection mode When set to Convection mode the top and bottom heating elements operate together like a normal conventional oven that you have probably used before Convection mode is best suit...

Page 15: ...setting does need to exceed 59 minutes then initially the selection button should be pressed 4 times instead of 3 to bypass the hour duration selection Audible End of Cooking buzzer The buzzer will sound for up 60 seconds at the end of the cooking time duration that has been set has been reached The 00 00 display and heating indication will flash for this period unless the selection button is pres...

Page 16: ...ry Food 175 200 2 40 50 175 200 2 40 50 Chicken 200 1 or 2 45 60 Two tray Cake 160 180 1 or 4 30 40 Two tray Pastry 170 190 1 or 4 35 45 Dishes Intensive Bake Grill Thermostat C Shelf Position Cook Time min Thermostat C Shelf Position Cook Time min Layered Pastry 170 190 1 or 2 25 35 Cake 150 170 1 2 or 3 25 35 Cookie 150 170 1 2 or 3 25 35 Grilled Meatballs 200 4 10 15 Watery Food 175 200 2 40 50...

Page 17: ...ed on your cooktop Always use pots and pans with flat bottoms Uneven or thin bottoms will waste energy and cook slowly Always use pots and pans which are slightly larger than the hotplate Small pans waste energy Always put dry pots and pans on the hotplates Do not use pots and pans which are too large Pans which overhang the hotplate more than 50 mm can damage the hob Check the hotplates on your c...

Page 18: ...ax polishes If you use an oven cleaner then follow the instructions on the product carefully Cleaning the Control Panel Make sure control knobs are in off position Clean the control panel by wiping it with a soft cloth dipped in warm soapy water and squeezed dry Cleaning the Electric Cook top Remove all spilt food with the razor blade scraper supplied while the hotplate is still warm NOT HOT If al...

Page 19: ...s Oven door structures 1 remove and assemble procedure Open the door to the full extent fig 1 Open the lever A completely on the left and right hinges fig 2 Hold the door as shown in fig 3 Gently close the door fig 3 until left and right hinge levers A are hooked to part B of the door fig 4 Withdraw the hinge hooks from their location following arrow C fig 4 Rest the door on a soft surface To repl...

Page 20: ... glass fitted Do not use harsh abrasive cleaners or sharp metal scrapers to clean the oven door glass since they can scratch the surface which may result in shattering of the glass Replacing the Oven Lamp Disconnect the oven from the power supply at the fusebox by means of the switch used to connect the appliance to the electrical mains or unplug the appliance gas Remove the glass cover of the lam...

Page 21: ...Remove parts and refit carefully Port blockage in ignition area Make sure that ports and ignition area are clean and dry Oven or grill not working Digital Clock not set properly Refer to digital timer instructions Power not turned on Switch on electricity Household fuse blown Check fuses Controls incorrectly set Reset controls Circuit breaker tripped Check circuit breaker Oven light not working Po...

Page 22: ...r supply Unit smoking when first used Protective oils being removed This is normal Odour on first use of oven This is normal Allow 2 4 hours for odour to dissipate open all windows Oven shelf tight Oven shelf not inserted correctly may be upside down or back to front Remove shelf and insert as per diagram Clock display off Household fuse blown or power supply is off Check fuses power supply ...

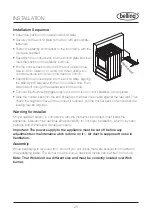
Page 23: ...ation switch for electric models and gas models without a 20A plug is to be installed in an accessible position near the cooker but not behind cooker If the supply cord or cable is damaged it must be replaced by an approved service agent or a similarly qualified person in order to avoid a hazard Note Only service centers should carry out servicing Otherwise warranty may be void Installing cooker p...

Page 24: ...he maximum power of the appliance as indicated on the data plate Go to section Installing your new cooker Unpacking and installation Instructions for Installer Unpacking Please check the product and make sure that there is no damage Read the relevant Installation Sections of this Manual Ensure understanding Confirm that product is compatible with available electrical gas supply Ensure proposed ins...

Page 25: ...tallation is completed Slide the cooker back into the anti tilt plate so that rear cover rests against the rear wall Then check the height and level of the cooker If required pull the cooker back out and adjust the leveling feet as required Warning for installer Only a qualified person in compliance with the instructions provided must install the appliance Manufacturer declines all responsibility ...

Page 26: ...hen E shall be 10mm or more or the horizontal surface shall be above the trivet Overheat clearances Measurement A The distance between the highest part of the hob of the cooking appliance should be higher than 600mm for a range hood and higher than 750mm for an overhead exhaust fan Installation of the anti tilt plate Determine position of cooker and anti tilt plate Securely fix the anti tilt plate...

Page 27: ...the cooker If there is a fault then the customer should be advised to contact the manufacturer s local service organization or the retailer Model BFS54DOCG Oven capacity L 35L 73L Voltage V 240V Frequency Hz 50HZ Circuit breaker A 16A Top oven power W 1825W Down oven power W 2570W Hobs power W 6750W Product dimension mm 538 x 600 x 900 Package size mm 578 x 704 x 942 Gross net weight kg 47 5kg 42 ...

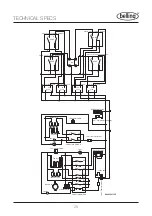
Page 28: ... ELEMENT SINGLE CIRCUIT HEATING ELEMENT SINGLE CIRCUIT HEATING ELEMENT SINGLE CIRCUIT HEATING ELEMENT P8 A8 A7 A6 A9 P7 P6 P5 P4 P3 P2 P1 1 3 2 6 5 4 8 7 Boltom Grill Back Grill Lamp Lamp Thermostat switch Light Cirewlation fan Top Grill Thermal cut out 45 120 Temperature adjuster Heat dissipation fan Electronic timer 1 2 P2 P2 4 2 S2 S2 S2 4a S2 4 2 4 2 4 2 P1 P2 P1 P2 P1 P2 P1 P1 Thermostat swit...

Page 29: ...29 NOTES ...

Page 30: ...30 NOTES ...

Page 31: ...31 NOTES ...

Page 32: ...kes only minutes You can also read important warranty information our FAQs for troubleshooting and other useful information We are here to provide service and support regarding your Belling products For queries please contact customer care on 1 800 444 357 or email customercare hapl com au To register your product for warranty please go to www belling com au warranty Glen Dimplex Australia Pty Ltd...

Reviews: