background image

35

Bellfires

English

Instructions for use and installation instructions

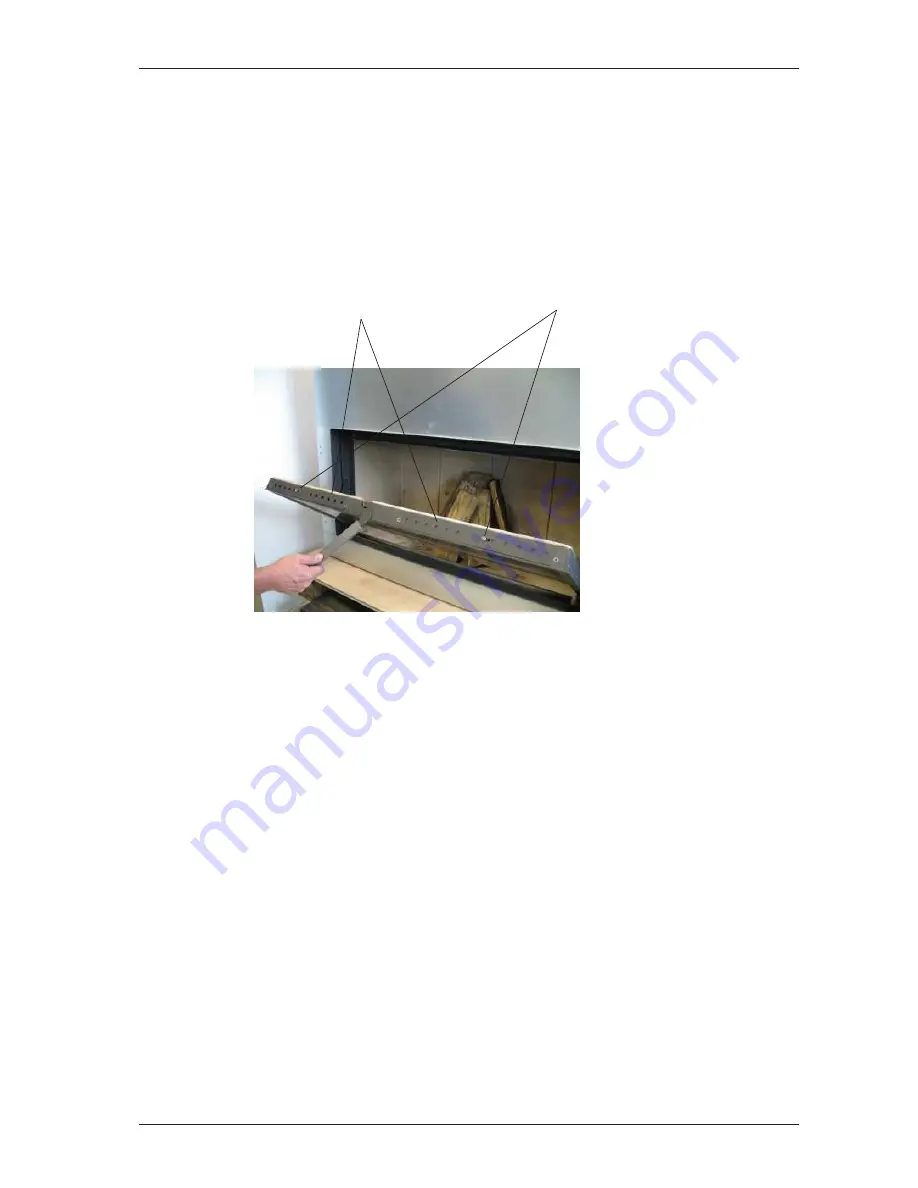
You can regulate the secondary air supply using the two sliders on the top of the door.
Fasten these sliders once the necessary secondary air supply has been determined.
The permanent position of the sliders can usually be determined after the fire has burnt
for several hours.
Start by opening the holes under the sliders halfway.
If the chimney has a good draught, the sliders can remain completely closed.

7.3. INSTRUCTIONS WHILE STOKING

After approx. 10 minutes, the fire will be burning fiercely. You can now top it up with a
few larger blocks of wood. Close the door when the new wood catches fire.

We recommend that you maintain a substantial layer of ash (2 - 3 cm). This not only
forms a protective layer for the base of the appliance but also significantly reduces
consumption of fuel and allows new wood to catch light easier.

When loading the fire with fuel, two blocks measuring 30 cm long and 30 cm in diame-
ter is sufficient. Do not add more fuel until the previous fuel has burned down to the
charcoal stage. Do not leave the door open longer than necessary.

Weather conditions
In order to reduce pollution and any other inconvenience, we advise not firing up the
fire when there is no wind, or in foggy/misty conditions.

Screw to fix the slider

       2x sliders for
secondary air supply

www.tapis.pl

Summary of Contents for SLIDE BELL

Page 1: ...re with lift door SLIDE BELL Bellfires wishes you much pleasure and ambiance with your new Bellfires fire This document is part of the delivery of your wood burning built in fire Read it carefully before installation and use of the fire and keep it in a safe place www tapis pl ...

Page 2: ...s English Instructions for use and installation instructions BELLFIRES WOOD BURNING BUILT IN FIRE WITH LIFT DOOR SLIDE BELL 70 55 SLIDE BELL 70 65 SLIDE BELL 80 65 SLIDE BELL 90 45 SLIDE BELL 105 45 www tapis pl ...

Page 3: ...4 Bellfires English Instructions for use and installation instructions www tapis pl ...

Page 4: ...on of the fireplace 6 Stoking up for the first time 7 Use 7 1 Ventilation 7 2 Getting the fire going 7 3 Instructions while stoking 7 4 Heating economically 7 5 Cleaning the window 8 General hints 8 1 Tips 8 2 Output 9 Fuel 10 Amount of fuel 11 Regular maintenance 12 Dimensions 13 Technical data 14 Frequently asked questions 7 7 9 19 21 32 33 34 34 35 36 37 38 38 40 41 42 43 48 53 Page www tapis p...

Page 5: ...6 Bellfires English Instructions for use and installation instructions www tapis pl ...

Page 6: ...en filling etc Protect yourself and others especially children from burns Do not leave children unattended when the fire is burning Watch your clothing Synthetic clothing in particular can easily catch fire and burn intensely Do not approach the appliance with flammable materials or liquids Any work with solvents adhesives etc in the space heated by the fire can be very dangerous Make sure you kno...

Page 7: ... first fire up your appliance there are a number of extra points you should take into account See chapter 6 In transit some parts of the appliance may have moved from their original place The Slide Bell is a built in fire with lift door Check that the door opens and closes the retardant plates brake plates are fitted correctly to the brackets at the top of the fire the interior panels are fixed to...

Page 8: ...Loose in appliance Glove Handle 5x collar rings Ø125 mm 4x for the convection opening on the top of the fire and 1x for the combustion air supply under rear 2 2 PREPARATION FOR POSITIONING Dismantle the metal plate on the front above the fire opening by unscrewing the screws on the sides and the top hexagonal 7 www tapis pl ...

Page 9: ...ons for use and installation instructions Remove the plastic tie wraps with which the chains are secured Ensure that the chains are properly placed on the chain wheels Check whether the lift door is functioning properly www tapis pl ...

Page 10: ...t door Ensure that the bottom of the lift door fits horizontally to the sealing strip Reassemble the metal plate to the appliance In addition check the way the door tilts forward to allow the glass to be cleaned and check the operation of the two sliding vents in the top of the door These sliders are used to regulate the secondary combustion air www tapis pl ...

Page 11: ...y to your dealer Remove enclosed documents and components from the built in fire Fit the fan set optional Important Using a hammer open at least two of the convection openings on the top of the fire In this way the discharge of the heat that accumulates in the convection casing is guaranteed Ensure that the casing fireplace has sufficient ventilation openings See Chapter 2 3 The casing fireplace w...

Page 12: ...ust be at least 4 m per kW of nominal output Built in fires may only be constructed or moved into rooms where at least 360 m3 combustion air per hour and per m2 clear fire opening can circulate If there are any other fire burning appliances in the same room at least 540 m combustion air per hour and per m clear fire opening must be in circulation Other appliances must have at least 1 6 m combustio...

Page 13: ...d be fitted with an adjustment valve the position of the valve should be visible from the outside The air supply in thus refreshes the air in the room and is also used in the combustion process As this air runs through the convection system it is also referred to as pre warmed combustion air The casing fireplace The casing may not be directly connected to the built in fire but must be constructed ...

Page 14: ...e all connection pieces convection set 1x or 2x for warm air can be connected to the convection casing If separate connection adapters are closed the manufacturer cannot guarantee the evenness of the temperature of the air and air speed Figure 1 Use of convection set and ventilation of fireplace www tapis pl ...

Page 15: ...asily be cleaned There must be no electrical cables or gas pipes in the walls surrounding the area of the fireplace In accordance with construction regulations in Germany combustion air pipes in buildings with more than two inhabited floors containing piping and cabling running through fire walls must be fitted in such a way that fire and smoke cannot escape to other floors or rooms 2 5 HEAT INSUL...

Page 16: ... de Sort Form Can be delivered as ºC kg m 99 99 99 99 Other Tailor made Different approval standard Different approval standard Mats 1 Mats 2 Bowls 1 Bowls 2 Plates 1 Plates 2 Strips Individual fibres Granular fibres Felt Fins mats Mats Plates Bowls Segments Twisted Mineral fibre Glass fibre Stone fibre Cinter fibre 10 11 12 13 01 02 10 11 20 21 01 02 03 04 05 06 07 08 09 10 20 25 30 35 40 45 50 5...

Page 17: ... tight and in good condition The diameter of the entire chimney including the chimney pot on the roof must be at least Ø200 mm for the Slide Bell 70 55 70 65 and 90 45 and Ø250 mm for the Slide Bell 80 65 and 105 45 If there is no suitable chimney immediately available we advise you to use double walled insulated stainless steel pipe sections A chimney must be compliant with the prevailing plannin...

Page 18: ...ace must be made of non flammable material The minimum dimensions of these non flammable surfaces must be as follows At the front the dimensions are determined by the height of the heating area measured from the bottom plate h plus 30 cm h 30 cm however no less than 50 cm At the sides the dimensions are determined by the height of the heating area measured from the bottom plate h plus 20 cm h 20 c...

Page 19: ...am must be factored in to calculations This may be filled in with ceramic or fibre glass sealing tape The casing fireplace must also be covered on the inside with a layer of insulation material It is not necessary to insulate the casing if the fitted fireplace is designed so that the free surfaces thereof cannot get hotter than 85 C www tapis pl ...

Page 20: ...is not immediately available a pedestal must be built from the creeping space The appliance can be placed in position using the carrying brackets supplied Positioning the Slide Bell without a fan The space between the fireplace hearth surround brick work and the fire itself should be left completely open so that there is an empty space At least 25 cm of free space should be left on both sides of t...

Page 21: ...Positioning the Slide Bell with a fan The convection fan system 2 fans is connected to both sides of the fire without making use of flexible connection hoses It is necessary to leave additional space at the sides of the fire for this as described above The connection set consists of 2 fans 2 gaskets 1 fanspeed controller with built in box 1 junction box wiring assembly material www tapis pl ...

Page 22: ...be fully assembled from inside the fire Carefully remove the base stones left and right from the fire Use a wide and flat screwdriver for this Make sure no pieces of stone are broken off Then carefully remove the side interior panels left and right on the inside of the fire The inner metal panels left and right can now be unscrewed 8 x cross headed ...

Page 23: ...lish Instructions for use and installation instructions Unscrew the outer metal panel left and right The fan can now be fitted to this using 4 nuts and bolts Note Place gaskets between fan and outer plate www tapis pl ...

Page 24: ...on must be undertaken by a qualified professional Fit place all components back in the appliance in the reverse order to above The fans are at all times accessible via the fire for service purposes By means of the hollow area and the openings at the front or on both sides of the chimney breast the fan system will extract sufficient air from the room to be heated for the convection box of the fire ...

Page 25: ... been opened Air supply connection possibility at rear of appliance open and underneath appliance closed To prepare one of the air supply connections for use the opening must first be opened by knocking out the small cover with a hammer Air supply connection possibility rear open Air supply connection possibility underneath closed www tapis pl ...

Page 26: ... and installation instructions Bend the 3 lips slightly outwards using pliers Place the collar ring Ø125 mm and turn it slightly Using a screw driver press the 3 lips against the collar ring so that it is clamped to the appliance www tapis pl ...

Page 27: ...until a few days later once the masonry has been pointed and allowed to dry If one or more channels are connected leading to other rooms these rooms must be fitted with closable grids These are available from your dealer as well as the flexible hoses and clamps required Ensure that the hose connections are gastight and that the whole flue is gastight and insulated After four weeks your fire will b...

Page 28: ...Slide Bell fire against a fireproof wall 10 cm insulation see table 1 page 17 T 85º C Fitting an Slide Bell fire against a wall with flammable material T 85º C Fire against a bearing wall or wall with flammable material 20 mm air cavity 10 cm insulation see table 1 pag 17 10 cm additional false brick wall Closable grids www tapis pl ...

Page 29: ...d around the fire insulation must be fitted which is at least 10 cm thick The material must be A1 according to DIN 4102 see table 1 At the sides the fire must be packed with insulation of at least 6 cm 4 2 BUILDING IN A FIRE IN GERMANY AND SWITZERLAND Building in the fire against a wall in a casing fireplace chimney breast False wall is mandatory A false wall is mandatory in the case of protective...

Page 30: ...C 19 Mantelpiece 7 False wall 20 Ceiling 8 Wall to be protected 21 Mantle iron or lintel 9 Layer of insulation material 10 cm T 1000ºC 22 Layer of insulation material 10 cm T 1000ºC 10 Concrete plate 23 Floor in front of the fire 11 Layer of insulation material 10 cm T 1000ºC 24 Inlet opening ambient air 12 Pedestal 25 Air admission valve 13 Expansion seam 26 Flue damper Smoke flap In the case of ...

Page 31: ...ion 9 Slider 2x on top of the door for rear side and or underneath adjusting the secondary combustion 4 Latch for tilting the door forward air supply Operated with the handle 10 Convection air supply In addition 5 Lift tilting door connection possibility for fan 2x 6 Latching bracket left and right for 11 Carrying bracket can be operating the lift door with the handle dismounted 2x 7 Handle 12 Adj...

Page 32: ...to avoid it getting scorched causing a bad smell Check again that all moving parts are in order and that loose parts such as the retardant plates brake plates interior panels bottom stones etc are in the correct position They may have moved during installation The built in fire has a heat proof finish It only hardens at high temperatures When unpacked it is therefore not fully hardened It can easi...

Page 33: ... door and regulating slider Use dry fine wood and some scrunched up paper or firelighters to start the fire Leave the lift door ajar for 10 minutes Do not fully open the door as the window will then remain cold If the door is then shut smoke will condense on the glass and form soot Open the primary air by moving the slider to the right side When the tinder material is burning well place approximat...

Page 34: ...p it up with a few larger blocks of wood Close the door when the new wood catches fire We recommend that you maintain a substantial layer of ash 2 3 cm This not only forms a protective layer for the base of the appliance but also significantly reduces consumption of fuel and allows new wood to catch light easier When loading the fire with fuel two blocks measuring 30 cm long and 30 cm in diame ter...

Page 35: ...odifications to your fire Any alteration to your fire of whatever nature will also invalidate your warranty 7 4 HEATING ECONOMICALLY The most environmentally friendly and economic way of heating with wood is to have your fire hot but calm The ash should appear to glow a soft red orange and should not glow like a blacksmith s fire Fires like that burn quickly and intensely leaving little time for c...

Page 36: ...HE WINDOW After several burning hours a light deposit may form on the inner side of the window Once the fire has cooled down this deposit can be removed using glass cleaner or ceramic hob cleaner To allow easy cleaning of the window it can be tilted forward using the handle www tapis pl ...

Page 37: ...ire is burning Doing so improves the performance of your fire 8 10 times benefiting the environment and the heat in your home less topping up see section 8 2 You will also prevent fire damage from any particles the fire spits out this is a particular problem with softwood from conifers If your floor contains flammable material an extra floor plate is required Avoid lighting a fire in misty or stil...

Page 38: ... the fire Excessive chimney draught The combustion air does not reach the fuel but leaves the appliance via the chimney The fire cools and the combustion quality decreases Using too much wood This is a problem if your built in fire is too small In that case it becomes overloaded and burns more wood than heat emitted In this case too the fuel cannot burn completely More to the point there is not en...

Page 39: ...d linden Unsuitable fuels are Painted bonded chipboard MDF etc or impregnated wood plastic and other flammable waste Stoking a fire with this is completely forbidden The combustion gases released by these materials are aggressive and will attack your fitted fireplace and the environment Paraffin containing open fire lighters are not suitable for a closed fire A closed fire generates more heat than...

Page 40: ...f wood can lead to varying outputs When used correctly one load will burn in around one hour Putting in too much wood at once can lead to the appliance being overloaded You can best vary the capacity of your appliance with the amount of fuel Example The fire has an output of 10 kW and an efficiency of 70 Wood 3 blocks each around 1 kg Briquettes 5 briquettes each around 0 5 kg The fire has an outp...

Page 41: ...s resumed Fire hearth interior panels Check annually Clean interior panels as necessary with hand brush Replace panels as necessary Sliders flue damper Check function annually Convection channels Clean annually Paint Annually if necessary touch up with Bellfires heat resistant paint do not paint when the fire is in use Parts Individual parts for replacement accessories are available from your Bell...

Page 42: ...43 Bellfires English Instructions for use and installation instructions 12 DIMENSIONS 12 1 SLIDE BELL 70 55 air supply connection www tapis pl ...

Page 43: ...44 Bellfires English Instructions for use and installation instructions 12 2 SLIDE BELL 70 65 air supply connection www tapis pl ...

Page 44: ...45 Bellfires English Instructions for use and installation instructions 12 3 SLIDE BELL 80 65 air supply connection www tapis pl ...

Page 45: ...46 Bellfires English Instructions for use and installation instructions 12 4 SLIDE BELL 90 45 air supply connection www tapis pl ...

Page 46: ...47 Bellfires English Instructions for use and installation instructions 12 5 SLIDE BELL 105 45 air supply connection www tapis pl ...

Page 47: ...tes Inner lining and floor plate Steel heat resistant and rust proof Retardant plates brake plates 2x Stainless steel sheet Outside Construction Sheet steel casing Top plate with Ø200 mm smoke connection and 4 convection holes Ø125 mm Combustion air intake connections Ø125 mm Doors Lift door Door tilted forwards to allow window to be cleaned Operation Handle for sliding the door upwards and downwa...

Page 48: ...er lining and floor plate Steel heat resistant and rust proof Retardant plates brake plates 2x Stainless steel sheet Outside Construction Sheet steel casing Top plate with Ø200 mm smoke connection and 4 convection holes Ø125 mm Combustion air intake connections Ø125 mm Doors Lift door Door tilted forwards to allow window to be cleaned Operation Handle for sliding the door upwards and downwards Han...

Page 49: ... lining and floor plate Steel heat resistant and rust proof Retardant plates brake plates 2x Stainless steel sheet Outside Construction Sheet steel casing Top plate with Ø250 mm smoke connection and 4 convection holes Ø125 mm Combustion air intake connections Ø125 mm Doors Lift door Door tilted forwards to allow window to be cleaned Operation Handle for sliding the door upwards and downwards Handl...

Page 50: ... lining and floor plate Steel heat resistant and rust proof Retardant plates brake plates 2x Stainless steel sheet Outside Construction Sheet steel casing Top plate with Ø200 mm smoke connection and 4 convection holes Ø125 mm Combustion air intake connections Ø125 mm Doors Lift door Door tilted forwards to allow window to be cleaned Operation Handle for sliding the door upwards and downwards Handl...

Page 51: ...r lining and floor plate Steel heat resistant and rust proof Retardant plates brake plates 2x Stainless steel sheet Outside Construction Sheet steel casing Top plate with Ø250 mm smoke connection and 4 convection holes Ø125 mm Combustion air intake connections Ø125 mm Doors Lift door Door tilted forwards to allow window to be cleaned Operation Handle for sliding the door upwards and downwards Hand...

Page 52: ...ng a point of using dry clean wood in the fire Wood that is too damp immediately gives off lots of ash Make sure the seals are in good working order Any air seeping out around the glass part of the door will cool the air resulting in the fire not burning cleanly How much wood will I use That depends entirely on how you heat your room what sort of appliance you have and the size of the room you are...

Page 53: ...es the combustion temperature is too low This leaves numerous dangerous compounds intact which means more deposits in your chimney and more waste into the environment What should I do if the wood does not catch fire This probably means that the wood is damp Remove the wood and replace it with dry wood If necessary make a fire with wood briquettes They are always dry they have a moisture content of...

Page 54: ... any moisture still in the wood will evaporate This drying procedure implies a significant loss of energy if wood which is too damp is burnt The right degree of moisture is achieved after 1 5 2 years of drying The moisture content is then 15 17 Decomposition At moderate high temperatures 150 C 350 C the decomposition process can be discerned This is when the chemical structure of the fuel breaks d...

Page 55: ...02 010208 323197 INTERFOCOS B V HALLENSTRAAT 17 5531 AB BLADEL NEDERLAND E mail info interfocos nl Internet www interfocos com www tapis pl ...

Reviews: