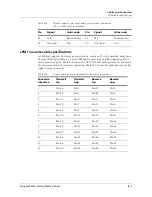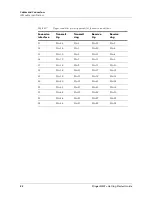
Installing and Removing Modules
Replacing a power filter
Stinger® MS+ Getting Started Guide
6-9
Figure 6-4. Replacing the cooling module
5
Align the replacement module to slide straight into the opening in the back of the
chassis.
6
Carefully slide the replacement cooling module into the chassis and press firmly
to engage the power connector in the chassis.
7
Fully tighten the locking screw on the replacement cooling module.
Replacing a power filter
The power filters are located in the front of the chassis. Before replacing a power
filter, the Stinger unit must be removed from service and there must not be any
supply voltage on the cables connected to the unit.
To replace a power filter:
1
Verify that power has been removed from the cables that connect to the power
filter.
2
Remove the protective cover and power cables from the power filter, as
illustrated in Figure 3-1 on page 3-2.
3
Using a number 2 Phillips screwdriver, fully loosen the power filter locking screw,
shown in Figure 6-5.
4
Grasp the extraction handle of the power filter and pull it straight out of the
chassis.
TM
1
2
3
4
CAUTIO
N
MOVIN
G PAR
TS
GREEN-A
CTIVE
RED-F
AILED
POR
T
25-48
POR
T
25-48
POR
T
25-48
POR
T
25-48
POR
T
49-72
POR
T
49-72
POR
T
49-72
POR
T
49-72
POR
T 1
Locking screw
Extraction
handle


