BELINEA 10 17 15 User Manual Download Page 16

14 

- Belinea 10 17 15

ENGLISH

CONFIGURATION


Monitor setup under Windows

®

 9x/ME/2000 and

XP:

If using the monitor under Windows

®

 9x/ME/2000 or XP

we strongly recommend installing the Belinea settings file.

You can get this file from your Belinea dealer or download

it from the MAXDATA FTP server at 

ftp.maxdata.com.

Here, click the “Belinea_Treiber_Driver” directory and

download the Belinea.inf and README_Berlinea.TXT

files.  Follow  the  installation  instructions  in  the

README_Belinea.TXT file.

➧➧

➧➧

 Monitor setup under Windows

®

 NT 4.0:

Under Windows

®

 NT 4.0 no separate setup file is required.

Select the vertical frequency and the number of colors

directly from within the “Settings” 

à

 “Control Panel” 

à

“Display” 

à

 “Settings” menu.

BASIC SETUP


Automatic Image Adjustment ...................................

You can adjust the image settings (such as brightness,

contrast, image position, phase etc) manually or by using

the LCD monitor’s automatic image adjustment feature.

This  will  adjust  the  image  parameters  to  their  optimal

settings for the current graphics mode. To reset the image

settings choose the 

RESET 

option from the OSD menu.


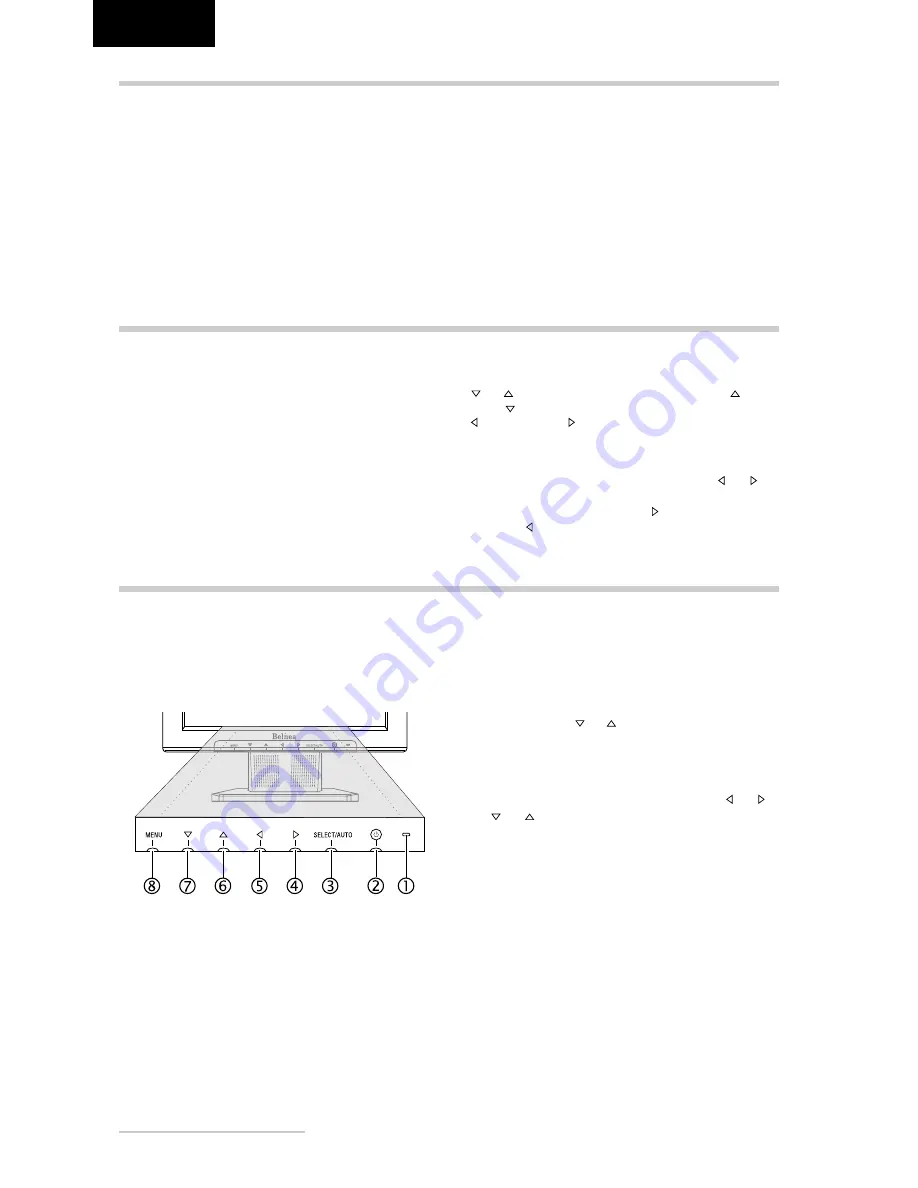
Direct contrast and brightness adjustment ...........

When the OSD menu is not displayed on screen you can

set the contrast and brightness directly by pressing the

 or   buttons (

‡

 and 

†

 in fig. 4). Press the   button

or the   button to change the brightness, then press the

 button or the   button to change the contrast.


Direct Volume Setting ..............................................

You can adjust the speaker volume of the integrated audio

system directly by pressing the OSD button  or  (

…

and 

„

 in fig. 4) while the OSD menu is not active. To

increase the volume press the   button to increase or

press the   button to decrease or the volume.

IMAGE SETTINGS USING THE OSD MENU

The OSD menu is a window on your screen that allows

you to view and change display settings. To change an

OSD setting:

1.

Press the 

MENU 

button (

ˆ

 in fig. 4) to display the

OSD menu on the screen.

2.

There  are  a  total  of  6  OSD  submenus  divided  by

categories. Select the desired submenu by pressing

the OSD button   or   (

‡

 and 

†

 in fig. 4, see section

”OSD Menu Functions”).

3.

Press  the 

SELECT 

OSD  button  (

ƒ

  in  fig.  4)  to

activate the selected function or associated submenu.

4.

Set the desired value using the OSD button  or  or

 or  .

5.

Press the 

SELECT 

button again to save the setting.

Repeat  steps  2-5  to  make  further  adjustments  as

needed.

6.

The OSD menu automatically disappears if no changes

are  made  for  more  than  10  seconds.  The  current

settings will be saved. You can close it manually by

pressing the 

MENU 

button.

Figure 4.

  Monitor features

Summary of Contents for 10 17 15

Page 1: ...1 27789 0 www maxdata com MAXDATA Benelux B V Hogehilweg 8 NL 1101 CC Amsterdam Zuid Oost Telefon 31 20 311 3232 De Vunt 17 B 3220 Holsbeek Telefon 32 16 269 720 www maxdata com MAXDATA UK Limited The...

Page 2: ...ils sur les possibilit s d change gratuit service offert dans de nombreux pays Pour votre appel tenez les num ros de s rie et d article port e de main All other countries Alle anderen L nder Les autre...

Page 3: ...Bedienungsanleitung 1 DEUTSCH DEUTSCH 2 10 ENGLISH 11 18 FRAN AIS 19 26 Belinea 10 17 15 DEUTSCH ENGLISH FRAN AIS Revision 1 2...

Page 4: ...beit schnell vorbei Die hohe Ergonomie der Belinea Monitore zeigt sich in den Spezifikationen und ist nach TCO und T V Ergonomie zertifiziert Performance Die Leistungsf higkeit des Monitors muss an di...

Page 5: ...vorbehalten Belinea ist ein international eingetragenes Warenzeichen Andere Markennamen k nnen eingetragene Warenzeichen sein und m ssen als solche behandelt werden Umweltschutz ist auch unsere Aufga...

Page 6: ...m Bereich zwischen 31 und 81 kHz sowie alle Vertikalfrequenzen im Bereich zwischen 56 und 75 Hz ab Das Digital Front Control System mit 26 Speicherpl tzen 17 voreingestellte und 9 benutzerdefinierte e...

Page 7: ...d anschlie end den Belinea Monitor mit der Netztaste R in Abb 4 ein Die Betriebsanzeige siehe Q in Abb 4 leuchtet gr n auf 2 Stellen Sie das Bild gem Ihren Anforderungen ein siehe die nachstehenden Ab...

Page 8: ...a TXT herunter Befolgen Sie die Installationsanweisungen in der Datei README_Belinea TXT KONFIGURIEREN Monitor unter Windows NT 4 0 konfigurieren Unter Windows NT 4 0 ben tigen Sie keine separate Eins...

Page 9: ...stellte Farbtemperatur 9300 K oder 6500 K Die Auswirkung der von Ihnen gew hl ten Farbtemperatur ist sofort am Bildschirm sichtbar Wie deutlich dabei die Unterschiede zu erkennen sind h ngt von mehrer...

Page 10: ...ngen abspeichern Verwenden Sie eine andere Aufl sung oder eine an gegebene Aufl sung mit anderen Frequenzen so ju stieren Sie einfach das Bild bis es optimal dargestellt wird siehe Abschnitt Bildeinst...

Page 11: ...en s unter Position Bild flimmert oder zittert M glicherweise ist nicht die richtige Einstellungsdatei f r den Monitor ausgew hlt Informationen zum Ein richten des Monitors unter Windows 9x ME 2000 XP...

Page 12: ...max 1280 x 1024 Punkte Lautsprecherleistung Verst rker 1 W bei 8 Ohm 1 15 kHz Lautsprecher 1 W Dauerbelastung 2 W Spitzenleistung Netzteil Eingangsspannung 110 240 V Wechselspannung 50 60 Hz max 1 5...

Page 13: ...or to indicate especially useful information DANGER Indicates risk of injury When not following instructions severe injury or death may result ATTENTION Indicates possible damage to devices When not...

Page 14: ...and dust can cause the monitor to fail Don t place the monitor near heaters such as radiators or the like Don t expose the monitor to mechanical vibrations or jarring Position the monitor so that no d...

Page 15: ...d packing material in case you have to ship or transport the monitor UNPACKING To connect the monitor to the power source 1 Connect the power cable in fig 3 to the monitor s power socket at the design...

Page 16: ...splayed on screen you can set the contrast and brightness directly by pressing the or buttons and in fig 4 Press the button or the button to change the brightness then press the button or the button t...

Page 17: ...AUTO ADJUST Automatically selects the optimal settings for image parameters brightness contrast image position phase etc CLOCK Controls the horizontal pixel distribution for optimizing the image disp...

Page 18: ...he factory preset graphic modes and their resolutions and frequencies For all these graphic modes all image adjustments width height position etc are already optimally configured You can save up to 9...

Page 19: ...rs or is shaky Perhaps setup file chosen for the monitor is incorrect For information on monitor setup under Windows 9x ME 2000 XP consult the Configuration section Image is blurred Check brightness a...

Page 20: ...ixels Audio system Amplifier 1W at 8 ohms 1 kHz 15 kHz Speaker 1W peak 2W rated Power adapter Input voltage 110 240 V AC 50 60 Hz max 1 5 A Output voltage 12 V DC max 4 16 A Power consumption max 50 W...

Page 21: ...e Les autres marques et noms de produits mentionn s dans ce document peuvent tre des marques commerciales ou des marques d pos es et sont consid rer comme telles Nous somme tous responsables de l env...

Page 22: ...uffage par exemple un radiateur N exposez pas le moniteur des vibrations m caniques ou des secousses Positionnez le moniteur de fa on prot ger l cran de la lumi re directe ou du soleil la lumi re dire...

Page 23: ...ur et raccordez celui ci une prise lectrique MISE EN ROUTE 1 Mettez tout d abord votre PC en marche puis allumez votre moniteur Belinea l aide du connecteur de mise sous tension la fig 4 L indicateur...

Page 24: ...ffich vous pouvez r gler directement le contraste et la luminosit l aide des boutons ou et la fig 4 Appuyez sur le bouton ou pour modifier la luminosit puis sur le bouton ou pour modifier le contraste...

Page 25: ...LOR TEMP Utilisez les boutons et de l OSD pour choisir une temp rature de couleur pr d finie 9300 K ou 6500 k La temp rature de couleur s lectionn e prend effet imm diatement La diff rence observ e d...

Page 26: ...ucheux La surface de l cran du moniteur LCD est tr s fragile Veillez viter tout contact avec cette surface doigt crayon etc et soyez tout particuli rement prudent durant un transport car les heurts et...

Page 27: ...scintille ou est instable Le fichier de configuration choisi pour le moniteur n est peut tre pas le bon Pour toutes informations sur la configuration du moniteur sous Windows 9x ME 2000 ou XP consult...

Page 28: ...xels Syst me audio Amplificateur 1W sous 8 ohms 1 kHz 15 kHz Haut parleurs 1W cr te 2W nominale Adaptateur secteur Tension d entr e 110 240 V CA 50 60 Hz max 1 5 A Tension de sortie 12 V CC max 4 16 A...

Page 29: ...ered from TCO Development SE 114 94 Stockholm Sweden Fax 46 8 782 92 07 Email Internet development tco se Current information regarding TCO 99 approved and labelled products may also be obtained via t...

Reviews: