AIRBLADE® DRYER
Mix and Match
52
Belanger, Inc. * 1001 Doheny Ct. * Northville, MI 48167 * Ph (810) 349-7010 * Fax (810) 380-9681
1MANUL011
Installation
6-Nozzle Frame Assembly: Floor Mounted
The following information is laid out installing the frames from exit end to entrance end. This could be
different at your location due to tunnel configuration, equipment layout, etc.
There are two head beam assemblies. One has the nozzles set at a 10° angle and the other is set
straight up and down. The one with the 10° angle is to be installed on the entrance end frame.
Exit End Frame Installation
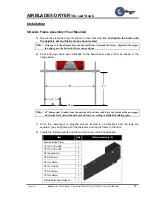
1) Locate the following parts:
Item
Qty
Corner Clamp Pieces (2)
Dryer Leg Weldment
2
Corner Clamp Assembly
2
Black Plastic Caps
4
Lag Bolt 3 Zinc 5/8 x 6
8
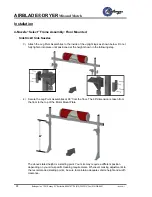
2) Locate the skid that the head beam assembly shipped on. Clamp the head beam
assembly to the forks of the forklift and position it in its tunnel location.
3) Lift it until there is a 91” clearance from the bottom surface of the head beam to the floor.
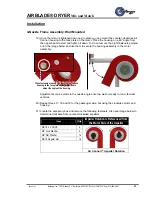
4) Slide one of the clamp assemblies and one of the legs into place as shown below but
do
not tighten the bolts until the height is set and the frame has been leveled
. Be sure
the base of the legs face the entrance of the tunnel.
Before
After

