background image


14


5.4  Setting the weighing parameters 

For a correct use of the scale, you can set the right settings of the weighing parameters 
according to the environment of use. 
This section describes the parameters of autozero, filter, stability and unit of measurement of 
the weighing. 
 

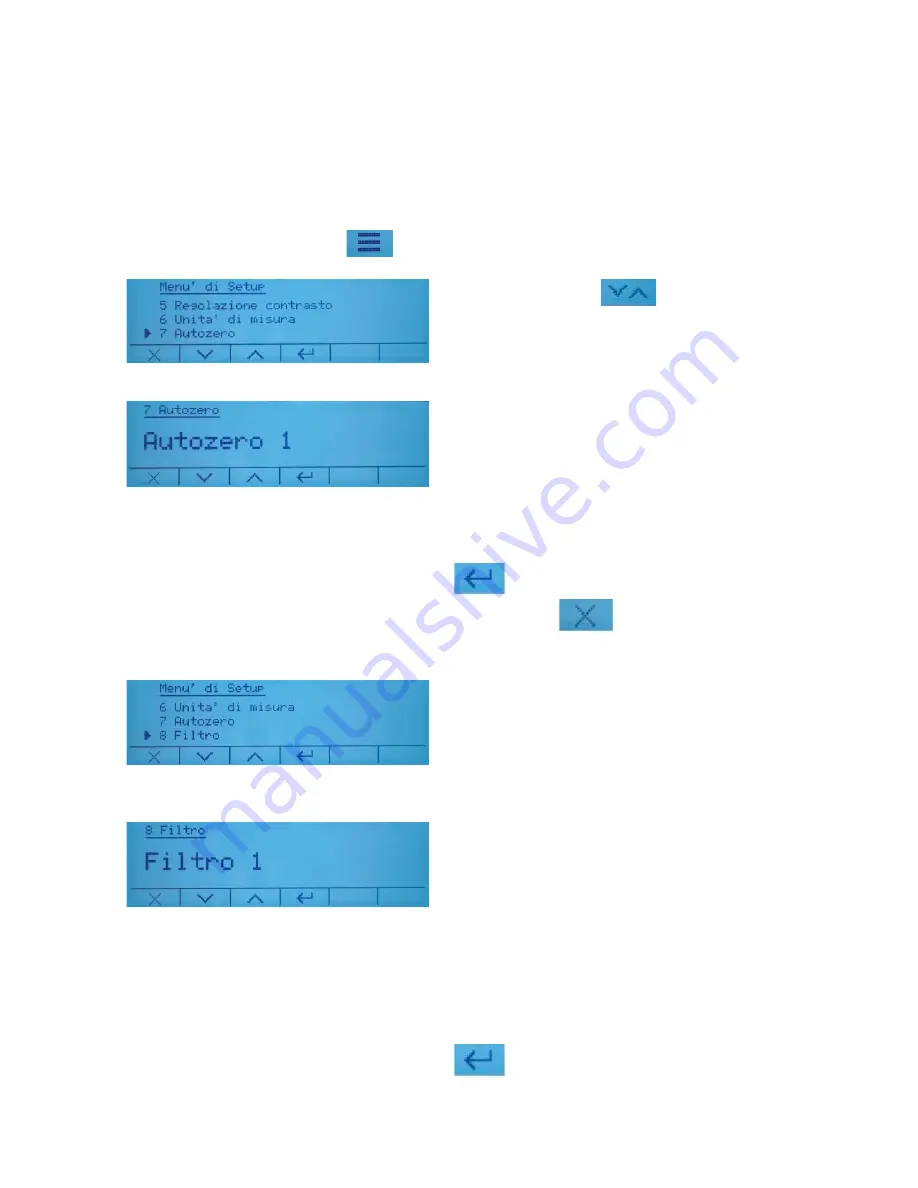
Press and hold the menu key 

 for 2 seconds 


Use the arrow keys 

 to move up and 

down in the menu and go to section 

7 - 

Autozero.


Autozero: 

automatic zero correction 

constantly adjusts the value of zero. These 
possible variations can be due for example to 
the dirt that can be deposited on the plate. 
You can deactivate this function by selecting 
the "Off" mode. Level 1 is the one with the 
lowest correction until you reach level 3E that 
is the maximum correction. 

 
Select the desired level and confirm with the key 

Press the key 

 to exit without changing 

the value. 
 
Use the arrow keys to move up and down in the 
menu and go to section 

8 - Filter


Filter2:

 the filter function makes it possible to 

speed up or slow down the response of the 
scale according to the weighing requirements 
and environmental conditions. Selecting level 
1, the response will be immediate but the 
scale will remain more sensitive to 
environmental disturbances such as 
ventilation and vibrations. Increasing the level, 
the response will be slower and the indication 
more stable 


Level 1:

 dosage conditions 


Level 2:

 stable conditions 


Level 3:

 unstable conditions 

 
Select the desired level and confirm with the key 


Summary of Contents for i-Thermo G Series

Page 1: ...MAN_B_iThermoG_EN_BPgTh_1_00_Rev1 docx Created on 19 04 19 User manual i Thermo G163M GA64M and i Thermo G62L G163L Revision of the software BPgTh_1_00 ...

Page 2: ... 6 2 GLP SETUP 22 6 3 HEATER CALIBRATION DATA 23 6 4 SCALE CALIBRATION 23 6 5 TEMPERATURE TEST 23 6 6 HEATER CALIBRATION 24 7 MOISTURE DETERMINATION 25 7 1 TEMPERATURE SETTING 25 7 2 SETTING THE DRYING END METHOD 25 7 3 START OF THE ANALYSIS 27 7 4 FEATURES AVAILABLE DURING AND AT THE END OF THE DRYING CYCLE 29 8 SERIAL INTERFACE CONNECTIONS 32 9 TECHNICAL FEATURES 32 10 TIPS FOR THE DETERMINATION...

Page 3: ...vapors when heated If electrical equipment is used in systems and in environmental conditions that require greater safety measures comply with the provisions of the directives for the installation of this material in force in your country The device must only be used by qualified personnel who know the properties characteristics of the sample used Before operating the device for the first time che...

Page 4: ... transport and that there are all the accessories listed below 2 1 Package Contents 1 Moisture determination tool 2 VDE power cable 3 15 pole M F cable for connection of the scale heater 4 Underplate 5 Sample holder plate extractor 6 Tray with antiventilation cylinder 7 10 sample plates 8 CD with instruction manual ...

Page 5: ...he device is placed in radiators or in places exposed to sunlight Do not place the device near explosive and flammable materials Place the device on a stable and level surface Avoid shaking during weighing The humidity of the environment of use of the scale must be between 40 and 70 Do not expose the device to prolonged intense humidity Unwanted condensation on the device can occur when it is cold...

Page 6: ... to the heater via a 15 pole M F cable Insert the cable into the two connectors on the back of the device as shown in the figure Insert the VDE cable supplied into the power connector on the back of the device N B Check that the power supply shown on the label of the device corresponds to the one in use in the Country where you are installing the device Then connect the VDE cable to the socket loc...

Page 7: ... it is moved to another location It is recommended not to drop objects of excessive weight on the weighing plate of the scale to avoid damaging it The assistance service must be performed by specialized personnel and the spare parts used must be original To do this contact the retailer where the device was purchased ...

Page 8: ... to be performed and is indicated in the part above the key in the lower area of the display Key bar available on simple weighing screens Reset tare operation activation key Device standby mode key Drying mode setting key Drying temperature setting key Start cycle analysis key Simple Key Press to access the main menu Long press of the key 2 sec to access the scale setup menu ...

Page 9: ...ure R Dry residue A Other Ratio between initial weight and final weight expressed in g Weight Key bar available at the end of the drying cycle Exit key from the drying function Key for activating deactivating and modifying GLP parameters Key for selecting the end of drying parameter to be displayed in rotation M Moisture R Dry residue A Atro Ratio between initial weight and final weight expressed ...

Page 10: ...ming the system test it will be positioned on the standby screen Press the key corresponding to the power symbol to start the device The device will be initialized and will display the weighing screen To return to the standby status press the key again Shutdown To completely switch off the device remove the plug from the mains socket ...

Page 11: ...ial to be weighed on the scale and wait for the stability symbol to light up before detecting the value Also during use in simple weighing mode on the display in the upper part besides the date and time the information relating to the settings of the drying cycle is displayed xxx C in the weight display it indicates the value of the temperature set for the drying cycle while during the drying cycl...

Page 12: ...e up and down Confirm the selection with the key Press the key to exit without changing the language 5 2 Setting Date Time Press and hold the menu key for 2 seconds Use the arrow keys to move up and down in the menu and go to section 2 Time and Date Confirm the selection with the key Select the desired date format dd mm or mm dd using the and keys Press the key to move on to adjust the next parame...

Page 13: ...y Select the mode with backlighting enabled On or disabled Off using the up and down arrows Confirm the selection with the key Press the key to exit without changing the setting Use the arrow keys to move up and down in the menu and go to section 5 Contrast Adjustment Confirm the selection with the key Select the desired contrast level using the and keys The range of contrast adjustment is from 0 ...

Page 14: ...f mode Level 1 is the one with the lowest correction until you reach level 3E that is the maximum correction Select the desired level and confirm with the key Press the key to exit without changing the value Use the arrow keys to move up and down in the menu and go to section 8 Filter Filter2 the filter function makes it possible to speed up or slow down the response of the scale according to the ...

Page 15: ...the environmental working conditions When using the device in a virtually vibration free environment select level 0 The default level is 2 Use level 3 for very noisy environments Level 1 For poorly stable environments Level 2 For unstable environments Level 3 For highly unstable environments Select the desired level and confirm with the key ...

Page 16: ... performing the calibration procedure check that the plate is empty You can calibrate the scale using the default weight Or through automatic weight recognition Use the arrows to switch from one mode to another Then confirm the selection with the key Default weight method By selecting the default calibration mode when the calibration command is given the required weight will be the factory default...

Page 17: ...ity Load the weight or press the key to cancel the calibration procedure Wait for the weight to be acquired If the operation is successful the weighing screen will be displayed with the value of the calibrated weight Remove the weight from the plate 5 6 Display and print of the scale calibration data This section describes how to view and print the calibration data Press the menu key to access the...

Page 18: ...tion with the key You access to the following menu 1 Print Interval 2 Printer 3 Baud rate 4 GLP On Off Use the arrows to switch from one setting to another Then confirm the selection with the key 1 Print Interval this function allows you to define the print interval Off print interval disabled End Measure automatic printing of test results at the end of the analysis In Time print the analysis data...

Page 19: ...0 printer model 3 Baud rate parameter for selecting the transmission speed of the serial port The selectable speeds are the following 1200 Baud 2400 Baud 4800 Baud 9600 Baud 1 GLP On Off function that allows you to activate or deactivate the printing of g l p data prior entry by the user On print of g l p data enabled On print of g l p data disabled For information entry and g l p database managem...

Page 20: ...election with the key 6 1 1 Heater setup this function allows you to set the following parameters Temperature profile Warm up Startup mode Delayed start Stability test 1 Temperature profile allows you to set the heating mode for the drying cycle Select the heating mode and temperature according to the substance to be analyzed For all heating modes the temperature values that can be set range from ...

Page 21: ... the preheating screen will be displayed Press to cancel the preheating and start immediately with the drying cycle N B the active preheating function allows you to obtain more repeatable results as each cycle takes place with the same starting condition of the heater 3 Startup mode this function allows you to choose the mode for starting the drying program 2 Manual with this mode every preparatio...

Page 22: ...of the weigh before the drying cycle starts On stability test enabled Off stability test disabled 6 2 GLP Setup This function allows you to enter and customize the g l p parameters Scale ID Project ID User ID Enter the desired data using the keys to scroll through the available characters and the key to move the cursor Pressing the key once allows eliminating the character underlined by the cursor...

Page 23: ... Temperature used for the 2nd section 6 4 Scale calibration This function allows the scale to be calibrated for more information refer to chapter 5 5 6 5 Temperature test This function allows you to enter a temperature value for which you want to carry out a verification test of correctness N B To perform the test the STCi 02 accessory must be placed Refer to the instructions supplied with the acc...

Page 24: ...cialized personnel To perform the test the STCi 02 accessory must be placed Refer to the instructions supplied with the accessory for correct use Use the keys to increase and decrease the temperature and the keys to switch from T lo to T hi Confirm and proceed with the calibration by pressing the key To cancel the calibration operation press the key ...

Page 25: ...se the value Keeping the key pressed for a long time the value is increased or decreased rapidly Confirm the value set with the key To cancel the operation and exit press the key N B the temperature that can be set ranges from a minimum of 35 C to a maximum of 160 C 7 2 Setting the drying end method From the weighing screen press the key to set the end of drying mode The end drying parameter is th...

Page 26: ...o change the Autostop method parameters The available options are as follows Auto automatic program with parameters defined by the manufacturer suitable for most of the substances to be analyzed 1 mg 30sec up to 10mg 30sec you can choose the weight loss threshold below which the drying cycle is interrupted The selectable values range from 1mg to 10mg every 30 seconds Confirm the value set with the...

Page 27: ...e drying end method the device is ready to start the analysis cycle Just press the key and follow the instructions on the display If the preheating function is enabled you will be asked to switch off the heater if it is ON Switch off the heater and wait Press the key to skip the preheating phase When the preheating phase ends the readiness screen is displayed to start the analysis Press the key to...

Page 28: ...by pressing the key Load the substance to be analyzed on the sample tray and switch off the heater With the Manual start mode Perform the zeroing if necessary by pressing the key Load the substance to be analyzed on the sample tray and switch off the heater Then press the key to confirm N B The minimum weight of substance allowed for the drying cycle varies according to the scale resolution Resolu...

Page 29: ...io between initial weight and final weight expressed in G Weight Abort by pressing the key the drying cycle will be canceled and you will return to the start screen To cancel the analysis confirm by pressing the key Stop by pressing the key the drying will be interrupted and the End screen will be displayed To stop the analysis confirm the selection by pressing the key Current heater temperature M...

Page 30: ... the display of the drying parameter by pressing the key 2 Display the drying result by pressing the key Indications relating to the time and amount of substance at the beginning of the analysis Indications relating to the time and amount of substance at the end of the analysis 3 Set the GLPs for printing by pressing the key so you can modify and enable disable the GLP information for printing Use...

Page 31: ...ettings 5 Leave the test result and return to the weighing screen by pressing the key To exit the results screen and return to the weighing screen confirm the selection by pressing the key 12 06 19 10 40 47 AM Scale ID xxxx User ID yyyy Project ID zzzz Standard 100 C Time 15 Min 12 06 19 10 46 02 Initial W 1 345g 12 06 19 11 01 02 Final W 1 345g Humidity 0 00 M Signature ...

Page 32: ...hose of the instrument According to the printer parameters set correctly the transmission speed and the type of printer See chapter Peripheral settings 9 Technical features The models to which this manual refers are all intended for internal use Maximum height of use 4000m Degree of pollution 2 Overvoltage category II Power supply INPUT 220 240Vac 110V at request 50Hz Power consumption 430 VA Drye...

Page 33: ... results that are not less repeatable Preparing the samples of solid substances Arrange evenly on the sample pan powdered substances or granules If the samples are large seeds chop them with special instruments During this process avoid overheating the substance Preparing the samples of liquid substances In the case of liquids or samples subjected to fusion we recommend using glass fabric filters ...

Page 34: ...tenance of your balance guarantees the safety of your measuring tool Cleaning Before cleaning the balance unplug the power supply unit from the wall socket Do not use harsh products solvents or similar agents but a damp cloth with a mild detergent Prevent the penetration of liquids into the device during cleaning after cleaning dry with soft cloth Remains of sample and dust can be removed with the...

Page 35: ...rom air flows or from vibrations of the working table ERR02 impossible to start the calibration due to instability of the balance Protect the balance from air flows or from vibrations of the working table ERR03 calibration weight not correct or balance unstable Calibrate with correct weight or protect the balance from environment disturbs ...

Page 36: ...ple Temperature sensor dirty or broken The weight value changes continuously Draught Table support surface vibration Electromagnetic fields static charging choose another place of positioning of the balance if possible turn off the system causing the problems 14 Replacing electrical fuses The VDE socket placed on the back of the device is equipped with a pan containing the electrical protection fu...

Page 37: ...C 40 C Storage humidity 45 75 Keep the packaging of the balance in the event of possible deployment for customer service unplug all cables and any accessories to prevent unnecessary damage Do not expose the balance unnecessarily to extreme temperatures and humidity and avoid violent shocks 17 Disposal If the packaging is no longer used it can be delivered to the local waste disposal center The pac...

Reviews: