EN / 48
• Do not use hard metal scrapers and ab-
rasive cleaners. They may damage the
surfaces.
• Ensure that the joints of the components
of the product are not left damp and with
detergent. Otherwise, corrosion may occur
on these joints.
7.2 Cleaning Accessories
Do not put the product accessories in a
dishwasher unless otherwise stated in the
user’s manual.
7.3 Cleaning the Control Panel
• When cleaning the panels with knob-con-
trol, wipe the panel and knobs with a
damp soft cloth and dry with a dry cloth.
Do not remove the knobs and gaskets un-
derneath to clean the panel. The control
panel and knobs may be damaged.
• While cleaning the inox panels with knob
control, do not use inox cleaning agents
around the knob. The indicators around
the knob can be erased.
• Clean the touch control panels with a
damp soft cloth and dry with a dry cloth. If
your product has a key lock feature, set
the key lock before performing control
panel cleaning. Otherwise, incorrect de-
tection may occur on the keys.
7.4 Cleaning the inside of the oven
(cooking area)
Follow the cleaning steps described in the
"General Cleaning Information" [
according to the surface types in your oven.
Cleaning the side walls of the oven
The side walls in the cooking area can only
be covered with enamel or catalytic walls. It
varies by model. If there is a catalytic wall,
refer to the “Catalytic surfaces” [
47] section
for information.
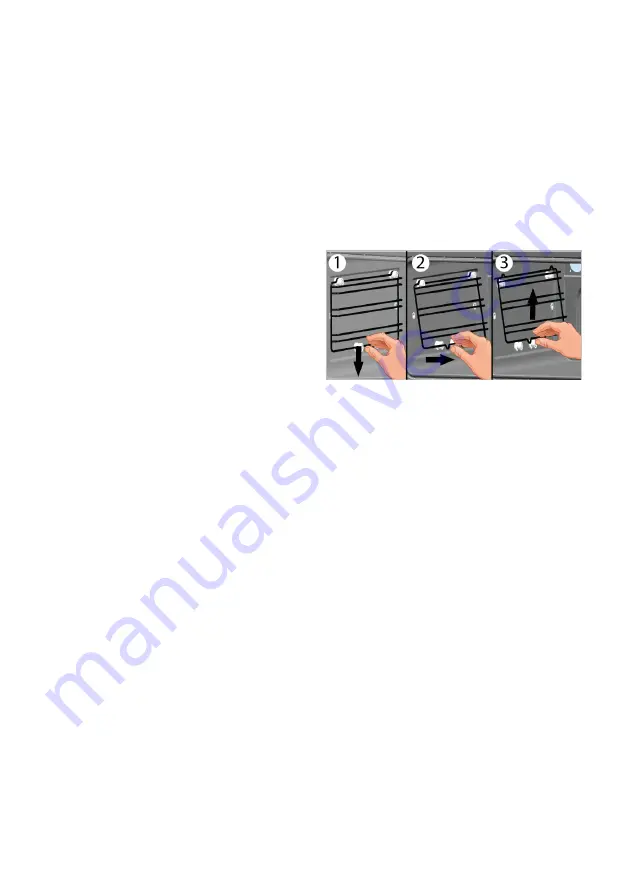
If your product is a wire shelf model, remove
the wire shelves before cleaning the side
walls. Then complete the cleaning as de-
scribed in the "General Cleaning Informa-
tion" [
46] section according to the side wall
surface type.
To remove the side wire shelves:
a. Hold the side wire shelf at the bottom.
Pull it down and free it from the bottom
slots.
b. Pull the side wire shelf in the opposite dir-
ection of the side wall.
c. Completely remove the side wire shelf by
pulling it up.
7.5 Cleaning the Oven Lamp
In the event that the glass door of the oven
lamp in the cooking area becomes dirty;
clean using dishwashing detergent, warm
water and a soft cloth or sponge and dry
with a dry cloth. In case of oven lamp failure,
you can replace the oven lamp by following
the sections that follow.
Replacing the oven lamp
General Warnings
• To avoid the risk of electric shock before
replacing the oven lamp, disconnect the
product and wait for the oven to cool. Hot
surfaces may cause burns!
• This oven is powered by an incandescent
lamp with less than 40 W, less than 60
mm in height, less than 30 mm in dia-
meter, or a halogen lamp with G9 sockets
with less than 60 W power. Lamps are
suitable for operation at temperatures
above 300 °C. Oven lamps are available
from Authorised Services or licensed tech-
nicians. This product contains a G energy
class lamp.
• The position of the lamp may differ from
that is shown in the figure.
Summary of Contents for BBCW12400X
Page 52: ...EN 52 ...
Page 53: ...EN 53 ...
Page 54: ...EN 54 ...
Page 55: ...EN 55 ...
Page 56: ...EN 56 ...
Page 57: ...EN 57 ...
Page 58: ......
Page 59: ......
Page 60: ......


