Behringer Virtualizer Pro DSP1024P User Manual Download Page 18

18

VIRTUALIZER PRO DSP1024P

Connect the two Input phone jacks with the Aux Send outputs of the mixing console, and the Output jacks of

the VIRTUALIZER PRO with the Aux Return inputs of the console. If you want to use the BEHRINGER

VIRTUALIZER PRO in mono or dual mode, connect one audio channel (left or right) to one aux bus.

+

Turn  down  the  volume  on  your  amplifier  to  protect  your  equipment  against  damage.  All

devices you wish to interconnect should remain switched off until they are wired correctly.

Let’s suppose you wish to use the VIRTUALIZER PRO in a live application, interfaced with the F.O.H. mixer,

to enhance the guitar sound with a subtle chorus effect.
Connect the VIRTUALIZER PRO to the aux bus of your mixing console (fig. 3.1). Connect the units to the

mains and adjust the operating level(s) if necessary. Switch on the VIRTUALIZER PRO and set the levels

appropriately (see 3.1). Press the Mix combination to make sure that the unit is set to Mix External mode.

Press the EFFECT key and use the JOG WHEEL to select and thus activate the chorus effect (#19). Slowly

turn up the aux bus level until the effect portion added to the guitar signal suits your needs. Subsequently, you

can make all necessary fine-adjustments. We assume that you wish to edit the modulation frequency of the

chorus effect: press the VARIATION key and set the modulation frequency with the JOG WHEEL. To set the

modulation delay, press the EDIT A key. The modulation depth of the chorus effect can be set by pressing the

EDIT B key. Having edited all parameters as desired, you can save the changes to the original (or any other)

preset.

3.3 Using the VIRTUALIZER PRO in the insert path

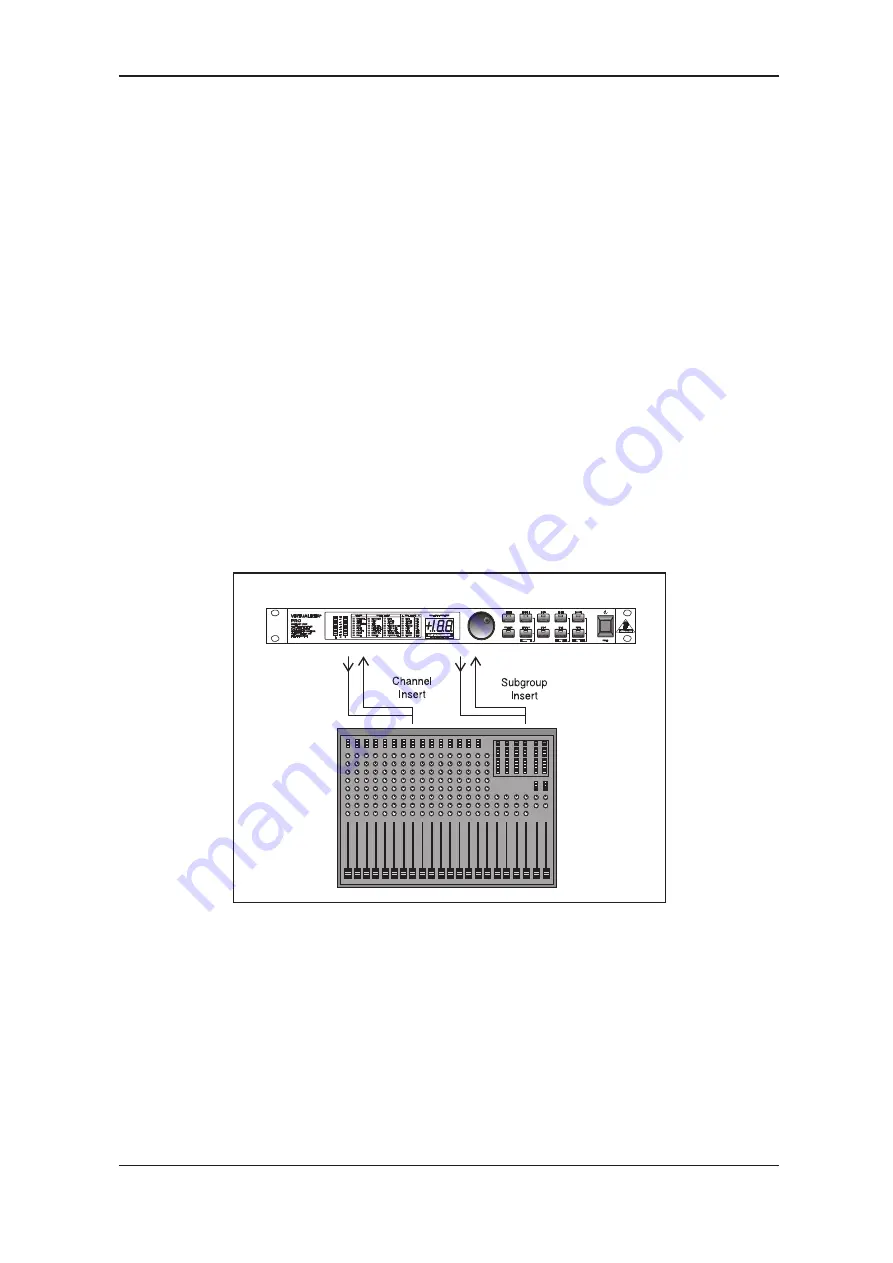
Basically, you can also insert the VIRTUALIZER PRO in a channel or subgroup of your mixing console. Use a

dedicated insert cable. Inserting the VIRTUALIZER PRO in a single channel will be useful only if you wish to

process a specific signal (e.g. vocals) with the VIRTUALIZER PRO, or if any other insert facilities of your

mixing console are already in use.

Fig. 3.2: Wiring the VIRTUALIZER PRO in the insert path

With  certain  special  effects,  for  example  the  “Vocoder”  effect,  it  is  even  more  useful  to  insert  the

VIRTUALIZER PRO in a specific channel rather than connecting it to the aux bus. Proceed as follows: the

signal  from  which  you  are  going  to  generate  the  vocoder  sound  is  routed  to  the  left  audio  channel

(e.g. keyboard sound), while the right audio channel can be used to control and modify this sound. Use a

dedicated insert cable to connect the left audio channel with a channel insert on your mixing console (fig. 3.2).

Connect the signal source to be processed with the vocoder effect (e.g. keyboard) to the normal channel input

(XLR/jack). Connect the right audio channel of the VIRTUALIZER PRO with a controller (e.g. a microphone

channel direct out). Talk into the microphone to control the keyboard sound with your voice, i.e. anything you

sing or talk into the microphone is reproduced together with the keyboard sound.

3. APPLICATIONS

All manuals and user guides at all-guides.com

Summary of Contents for Virtualizer Pro DSP1024P

Page 1: ...User s Manual Version 1 0 August 2000 www behringer com ENGLISH VIRTUALIZER PRO DSP1024P All manuals and user guides at all guides com a l l g u i d e s c o m...

Page 2: ...the ventilation openings Heat The appliance should be situated away from heat sources such as radiators heat registers stoves or other appliance including amplifiers that produce heat Power Source Th...

Page 3: ...e the most important member of the BEHRINGER family With your highly competent suggestions for new products you ve greatly contributed to shaping our company and making it successful In return we guar...

Page 4: ...nt of the sound sources s Free VIRTUALIZER design software allows for total remote control via PC download at www behringer com s 24 bit A D and D A converters with 64 128 times oversampling for ultra...

Page 5: ...2 Using the VIRTUALIZER PRO in the aux bus 17 3 3 Using the VIRTUALIZER PRO in the insert path 18 3 4 Using the VIRTUALIZER PRO as an effects device for instruments 19 3 5 Using the VIRTUALIZER PRO i...

Page 6: ...wing criteria ensure the pro level processing of audio signals s Extremely low noise and high precision 24 bit AD DA converters s A professional sampling rate of 46 kHz ensures a high signal resolutio...

Page 7: ...ty certification requirements Please make sure that all units have a proper ground connection Please make sure that all units have a proper ground connection For your own safety do not remove the grou...

Page 8: ...e wheel to select a program directly which is shown by a dot lit up in the DISPLAY While this dot is on you can select a program though its settings will not take immediate effect When the JOG WHEEL h...

Page 9: ...1024P against user errors three important edit commands have been implemented as a series of key combinations For example in normal operating modes the presets cannot be reset to their factory default...

Page 10: ...used with different mains voltage ratings Please check the description on the back of the unit and the box 1 4 The effect algorithms In a digital effects device all effect programs are based on algor...

Page 11: ...pth EDIT B ENG R stereo width and to make them sound fresher EDIT B ENG L brilliance Additionally you can set the reverb time with VARIATION and the diffusion with EDIT A Designed for live application...

Page 12: ...channel is used to modulate another signal in the left e g synth sound which sounds as if the synth was talking robot voice VARIATION determines the type of vocoder EDIT A the degree of distortion an...

Page 13: ...s way you can use the DSP1024P s dual engine processor as if it were two separate mono effects devices Pitch Reverb Here you have a pitch shifter in the left channel ENGINE L with the usual edit optio...

Page 14: ...used To select another preset use the JOG WHEEL to enter the preset number of your choice Turn the wheel clockwise to increment the preset number or counterclockwise to decrement it Please note that t...

Page 15: ...activated to the other channel so that both of them have an identical set of parameter values Finally you can also save the changes made to the preset 2 4 Saving programs Use the STORE key to save an...

Page 16: ...e MIDI backup and restore operations without express confirmation at the VIRTUALIZER PRO It is therefore recommended to disable flag 0 this mode as soon as the intended data transfer has ended This is...

Page 17: ...levels deteriorate the dynamics of the music signal which results in a poor weak and noisy sound On the other hand excess levels overdriving the converters in the VIRTUALIZER PRO should also be avoide...

Page 18: ...IT A key The modulation depth of the chorus effect can be set by pressing the EDIT B key Having edited all parameters as desired you can save the changes to the original or any other preset 3 3 Using...

Page 19: ...the effect intensity present at the output of the VIRTUALIZER PRO is 100 and you can use the effect loop to determine the amount of effect added to the guitar signal Instrumentalists can benefit from...

Page 20: ...MIDI mode see 2 5 Then start the sequenzer to automatically transmit each preset data set back to the VIRTUALIZER PRO Press the STORE key select a program location to store the data and then press the...

Page 21: ...ed to determine the position of a sound source In certain situations this capability can be very useful or even of vital importance The fact that we can actually hear the size of a room shows how stro...

Page 22: ...its shape architecture and the materials used to construct it For this reason experts in architectural acoustics design rooms concert halls recording studios etc to produce a specific sound and rever...

Page 23: ...reverb quality s Mass production allows for reducing the prices of digital reverb devices s Many parameters can be modified and stored s With their compact design digital devices are easily portable...

Page 24: ...ged See the technical specifications in the appendix A safety fuse protects the unit from serious defects If the fuse blows this is a warning sign and always indicates that the circuit is overloaded T...

Page 25: ...oard effect devices typically digital reverberation and delay units The VIRTUALIZER PRO may be controlled in real time in this studio environment MIDI for Musical Instruments Digital Interface The MID...

Page 26: ...rtion Type Delay Time x 10 ms Delay Mix 15 ROTARY SPEAKER Rotary Type Horn Speed Rotor Speed 16 VOCODER Vocoder Type Vocoder Distortion Vocoder Sens 17 PITCH Cent Cent Semi Tone Semi Tone 18 FLANGER M...

Page 27: ...60 3190 10 14 0 630 3200 3830 10 15 640 1270 1280 1910 10 16 640 1270 1920 2550 10 17 640 1270 2560 3190 10 18 640 1270 3200 3830 10 19 1280 1910 1920 2550 10 20 1280 1910 2560 3190 10 21 1280 1910 32...

Page 28: ...X X X X Aux Messages Local ON OFF All notes OFF Active Sense Reset X X X X X X X X Notes O YES X NO Mode 1 OMNI ON POLY Mode 2 OMNI ON MONO Mode 3 OMNI OFF POLY Mode 4 OMNI OFF MONO Tab 6 3 MIDI Imple...

Page 29: ...er 14 18 14 16 Vocoder 4 10 56 17 Pitch 0 0 0 0 18 Flanger 1 6 56 6 56 19 Chorus 1 32 63 32 63 20 Tremolo Delay 19 63 63 0 0 21 Delay Reverb 21 63 9 57 56 22 Pitch Reverb 6 0 50 52 23 Flanger Reverb 4...

Page 30: ...ket IN OUT THRU Digital Processing Converters 24 bit Sigma Delta 64 128 times Oversampling Sampling Rate 46 875 kHz Display Type 2 digit numeric LED Display Power Supply Mains Voltages USA Canada 120...

Page 31: ...the product needs to be modified or adapted in order to comply with applicable technical or safety standards on a na tional or local level in any country which is not the country for which the product...

Reviews: