background image

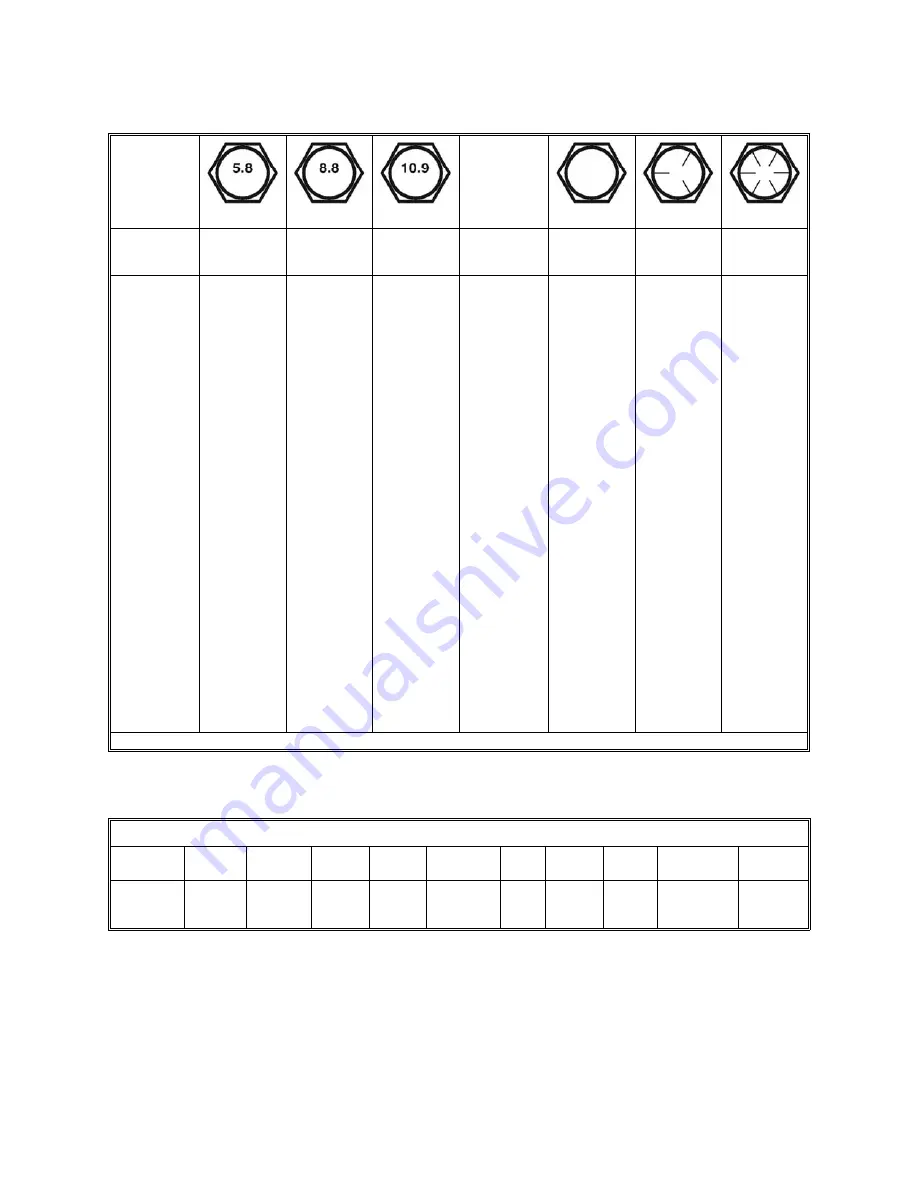
TABLE 1 - TORQUE SPECIFICATIONS

When using lock washers with nuts, increase torque values by 5%.

3557

4823

2194

2974

978

1326

12

1-1/2”

2607

3535

1830

2482

1131

1534

4

M36

3161

4286

1949

2643

869

1179

6

1-1/2”

1659

2250

1180

1600

738

1000

2

M30

2712

3677

1673

2268

746

1011

12

1-3/8”

1499

2033

1047

1420

668

906

3.5

M30

2382

3230

1469

1992

655

888

6

1-3/8”

1176

1594

825

1119

530

719

2

M27

2012

2728

1241

1682

553

750

12

1-1/4”

1103

1496

774

1050

484

656

3

M27

1817

2463

1120

1519

500

677

7

1-1/4”

808

1095

567

769

360

488

2

M24

1445

1958

891

1208

397

539

12

1-1/8”

750

1017

526

714

327

444

3

M24

1288

1746

794

1077

354

480

7

1-1/8”

644

873

452

613

281

381

1.5

M22

995

1348

704

955

273

371

12

1”

595

807

418

567

254

344

2.5

M22

909

1232

644

873

250

339

8

1”

476

646

335

454

212

288

1.5

M20

668

906

473

642

184

249

14

7/8”

437

592

306

415

189

256

2.5

M20

606

822

430

582

167

226

9

7/8”

343

465

241

327

150

203

1.5

M18

420

569

297

403

192

261

16

3/4”

327

443

229

311

145

196

2

M18

376

509

266

361

172

233

10

3/4”

310

421

218

295

133

181

2.5

M18

240

325

170

230

110

149

18

5/8”

236

320

161

218

104

141

1.5

M16

212

287

150

203

97

132

11

5/8”

223

302

152

206

97

131

2

M16

171

232

121

164

79

106

18

9/16” 

154

209

105

142

69

94

1.5

M14

154

208

109

147

70

95

12

9/16” 

144

195

98

133

62

84

2

M14

120

163

85

115

55

75

20

1/2”

98

133

66

90

44

59

1.25

M12

106

144

75

102

48

66

13

1/2”

94

128

64

87

41

56

1.5

M12

78

106

55

75

36

48

20

7/16”

91

123

62

84

40

54

1.75

M12

70

95

49

67

32

43

14

7/16”

58

78

39

53

26

35

1

M10

49

67

35

47

23

31

24

3/8”

55

75

38

51

24

33

1.25

M10

44

59

31

42

20

27

16

3/8”

52

71

35

48

23

31

1.5

M10

27

37

19

26

13

17

24

5/16”

28

38

19

26

13

17

1

M8

25

33

17

24

11

15

18

5/16”

27

36

18

25

12

16

1.25

M8

14

19

10

13

6

8

28

1/4”

11

15

7

10

4

6

1

M6

12

16

8

11

5

7

20

1/4”

7

9

4

6

3

4

0.8

M5

ft-lb

N.m

ft-lb

N.m

ft-lb

N.m

Thread

inch

tpi

Bolt
size

inch

ft-lb

N.m

ft-lb

N.m

ft-lb

N.m

Thread

mm

Bolt
size

mm

Grade 8

Grade 5

Grade 2

Inch (SAE)
treaded
bolts head
marking

Class 10.9

Class 8.8

Class 5.8

Metric (ISO)
treaded
bolts head
marking

TABLE 2 - C30 ENGINE MOWER - TECHNICAL FEATURES

Briggs &

Stratton

11.5 HP

4 - 8.4”x3.2”

2 BX

1” - 4”

3

14173

2673

460

65”

60”

C30-CE5H

Engine

# Wheels &

size 

# Belts

& type

Cutting

height

#

Blades

Blades tip

speed ft/min

Rotor

rpm/min

Weight

lb.

Overall

width

Working

width

Model

Series C30, rear discharge, cat. 1 ball

M

AINTENANCE

29

BEFCO

C

YCLONE

O

PERATOR

S

 M

ANUAL

Summary of Contents for C30-CE5H

Page 1: ...O Operator s Manual CYCLONE Engine Driven Grooming Mower C30 CE5H serial 345293 above The operator s manual is a technical service guide and must always accompany the machine Manual 960 395B January 2...

Page 2: ...r each have been selected using the following guidelines DANGER Indicates an imminently hazardous situation that if not avoided will result in death or serious injury WARNING Indicates a potentially h...

Page 3: ...20 3 11 Uneven Terrain 19 3 10 Operating Techniques 19 3 09 Working Speed 17 3 08 Start Up 16 3 07 Offsetting the Mower 14 3 06 Attaching to the Vehicle 14 3 05 Pre Operational Check 12 3 04 Cutting...

Page 4: ...lement will travel when going forward see fig 2 1 02 Warranty Information Carefully read the Warranty section1 detailing coverage and limitations of this warranty Warranty is provided for customers wh...

Page 5: ...e borne by the owner NOTE Engine warranty service and parts must be obtained through an authorized service center for Briggs Stratton engines 1 03 Model and Serial Number ID Attached to the frame is a...

Page 6: ...ation 1 Before operating equipment read and understand the operator s manual and the safety signs see fig 2 2 Thoroughly inspect the implement before initial operation to assure that all packaging mat...

Page 7: ...observe area behind mower before backing up 8 Stop mower engine and watch out for traffic when crossing gravel drives walks or roads 9 Stop mower engine towing vehicle engine and set parking brake bef...

Page 8: ...t mower before working underneath Additional warning and operating decals are available at no extra charge Please specify model and serial number when ordering Fig 2 Safety decals implement replace im...

Page 9: ...ght even in undulating ground conditions The cutting height ranges from a minimum of 1 to a maximum of 4 and is adjusted by adding or removing spacers to each wheel 3 01 Operational Safety CAUTION Our...

Page 10: ...tors 15 Never operate towing vehicle and mower under trees with low hanging limbs Operators can be knocked off the towing vehicle and then run over by the rotating blades 16 The rotating parts of this...

Page 11: ...ct condition and ready to be used It is his responsibility to ensure that the customer is aware of all safety aspects and operational procedures for the mower and the engine He must also fill out the...

Page 12: ...at will allow you to keep the drawbar as level as possible when attached to the tractor Ball joint will arrive already assembled to hitch bracket Note All hardware needed for assembly will be found on...

Page 13: ...r to the supplied height adjustment stand using a 19 pin and 4 cotter pin see fig 5 6 Place the height adjustment stand to the side of the mower and position the U shaped tip of the stand to straddle...

Page 14: ...d and the blade bolts properly torqued4 5 All hardware is tight 6 All safety shields and guards are in place and tightly attached 7 No people or animals are in the work area WARNING Shut off mower eng...

Page 15: ...help the unit track behind the tractor correctly Set for the back wheels to have some pivot to help the mower turn with the tractor see fig 9 To attach the mower to be pushed in front of the ATV UTV d...

Page 16: ...re that the towing vehicle s tire pressure is correct according to the vehicle s operator s manual DANGER Failure to ensure a secure hitching of the implement to the towing vehicle can cause serious i...

Page 17: ...perator s manuals 5 To have read and understood all safety decals on the mower 6 Checking the condition of the blades Worn or damaged blades should be changed before starting5 7 Checking to ensure tha...

Page 18: ...underneath the mower When starting the engine place one foot on the mower deck and one foot firmly anchored to the ground safely away from underneath the mower deck To start cutting ensure that 1 The...

Page 19: ...ces the possibility of thrown objects This is particularly important when mowing around schools public parks and golf courses If you are using a mulching kit you need to reduce your ground speed to un...

Page 20: ...teriorates rapidly in hot weather and invites weed growth during growing season Plan your pattern to travel straight forward whenever possible The rear tires of the mower are locked in the running pos...

Page 21: ...the terrain 2 Beware of traffic on public roads Install a SMV Slow Moving Vehicle sign when traveling on roads or streets Comply with all federal state and local laws 3 Reduce ground speed when turnin...

Page 22: ...Before working on the machine shut off both engines set the brakes remove the ignition key and disconnect spark plug wire 5 Be certain all moving parts on attachment have come to a complete stop befor...

Page 23: ...result of their use 17 Unauthorized modifications to the machine may impair the function and or safety of the machine and reduce its life If equipment has been altered in any way from original design...

Page 24: ...ension12 4 03 Blade Maintenance WARNING To avoid possible injury always wear proper eye and hand protection when servicing mower blade In order for the mower to work properly and to always obtain a pr...

Page 25: ...g 14 Spindle assembly 1 3 5 7 8 9 2 4 6 10 11 1 grease fitting 2 hexagonal nut 3 pulley 4 rotor support 5 cover 6 shaft 7 blade 8 cup washer 9 blade bolt 10 cutting edge close to ground 11 lift wing G...

Page 26: ...xcessive pitting and dulling of the blades Sharpen both ends of the blade equally for balance and always maintain corners Always keep all three blades sharpened equally in order to maintain balance CA...

Page 27: ...ing connecting a tensioner pulley to a fixed hitch plate with 2 positions see fig 17 Upon delivery the spring is located in the first position When the belt stretches after use adjust the tension by r...

Page 28: ...ront nuts holding central plate 6 Release spring tensioner to loosen secondary belt 7 Lift the front of the central plate and remove old belts 8 Replace both belts 9 Lower central plate Replace front...

Page 29: ...141 1 5 M16 212 287 150 203 97 132 11 5 8 223 302 152 206 97 131 2 M16 171 232 121 164 79 106 18 9 16 154 209 105 142 69 94 1 5 M14 154 208 109 147 70 95 12 9 16 144 195 98 133 62 84 2 M14 120 163 85...

Page 30: ...TABLE 3 OVERALL DIMENSIONS MAINTENANCE 30 BEFCO CYCLONE OPERATOR S MANUAL 91 24 60 65...

Page 31: ...ed to 118 lb ft 5 02 Suggested Spare Parts It is suggested that the following spare parts be kept on hand for the mower at all times to prevent a minor problem from delaying work 2 Belts 3 Washers 3 B...

Page 32: ...ncorrectly Belts are tight when installing Allow grass to dry Raise mower shift to lower gear make two passes over grass Mow grass high 1st pass 2nd pass cut to desired height Wet grass Grass too high...

Page 33: ...tch disengaged Throttle lever not on CHOKE Carburetor flooded Engine not grounded Mower engine does not start Increase engine speed Decrease speed Refer to Engine Operator s Manual Mower engine speed...

Page 34: ...sive vibration or overheating of bearings Operator s Manual Review the Operator s Manual with the customer Explain the following Warranty Safe operation and service Correct machine installation and op...

Page 35: ...breach or performance of any warranty on the Company s Machine are those set forth herein In no event will the dealer the Company or any company affiliated with the Company be liable for a Injuries or...

Page 36: ...s shop It is assumed that the dealer has the appropriate general and special tools to service the Machine Time required for replacement of knives oil grease and to remove excessive dirt from the Mach...

Page 37: ...and understand clearly that there were and are no other representations of warranties either expressed or implied made by anyone I have been advised on proper operation maintenance and lubrication pr...

Page 38: ...Cut along this line Sender Fold here BEFCO Inc Warranty Department P O Box 6036 Rocky Mount NC 27802 6036 Place stamp here...

Page 39: ...BEFCO Parts Manual CYCLONE Engine Driven Grooming Mower C30 CE5H serial 345293 above Parts Manual 0121 C30 CE5H Ver D BEFCO C30 CE5H 345293 US lwp Printed on January 11 2021...

Page 40: ...CYCLONE BELTS SPINDLES OPERATOR S MANUAL C30 CE5H PARTS MANUAL 40 BEFCO 0121...

Page 41: ...25 1 50 Z 000 6698 21 3 Key 8x7x25 000 6639 20 12 Bolt HH M10 1 50x30 C8 8 Z F 000 1278 19 1 Nut HH M10 1 50 C6 TK Z 000 1279 18 1 Bolt HH M10 1 50x35 C8 8 Z F 009 1281 17 1 Bolt HH M20 2 50x45 C8 8 Z...

Page 42: ...CYCLONE MOTOR THROTTLE SWITCH OPERATOR S MANUAL C30 CE5H PARTS MANUAL 42 BEFCO 0121...

Page 43: ...Nut HH M10 1 50 C6 Z TK 000 1279 20 2 Washer lock 10 000 1280 19 1 Central plate 60 C30 CE5H 020 8430B 18 1 Spacer belt tensioner 503 370B 17 1 Nut HH M12 1 75 C6 Z MD 000 1106 16 1 Bolt HH M12 1 75x...

Page 44: ...CYCLONE BELT SHIELDS WHEEL ARMS OPERATOR S MANUAL C30 CE5H PARTS MANUAL 44 BEFCO 0121...

Page 45: ...8526 18 4 Wheel yoke C30 CE5H 000 8776 17 8 Nut PT M10 1 50 C6 TK Z 003 0156 16 8 Bolt HH M10 1 50x30 C8 8 Z F 000 1278 15 2 Nut HH M10 1 50 C6 TK Z 000 1279 14 2 Washer lock 10 Z 000 1280 13 6 Washe...

Page 46: ...CYCLONE DRAWBAR OPERATOR S MANUAL C30 CE5H PARTS MANUAL 46 BEFCO 0121...

Page 47: ...39 11 6 Bolt U M12 1 75x76x51 Z 000 8754 10 1 Attachment bracket drawbar 000 8741 9 1 Drawbar 000 8731 8 3 Hairpin cotter 4 Z 009 1507 7 3 Pin 19x140 Z 502 933B 6 3 Plastic cap 50 mm 008 2760 5 1 Hitc...

Page 48: ...CYCLONE DECALS OPERATOR S MANUAL C30 CE5H PARTS MANUAL 48 BEFCO 0121...

Page 49: ...4B 8 1 Decal Cyclone 950 298B 7 1 Decal CAUTION To avoid serious injury 950 111B 6 1 Decal WARNING Safety kill switch 950 191B 5 1 Decal WARNING Crushing and pinching hazard 950 407B 4 1 Decal WARNING...

Page 50: ...CYCLONE ACCESSORIES FRONT ROLLER AND MULCHING KIT OPERATOR S MANUAL C30 CE5H PARTS MANUAL 50 BEFCO 0121...

Page 51: ...r 3 006 7358 10 1 Roller pin 000 8929 9 2 Nut HH M12 1 75 C6 Z TK 000 3038 8 11 Nut PT M10 1 50 C6 Z TK 003 0156 7 7 Washer fender 10 Z 003 0157 6 2 Bolt HH M10 1 50x35 C8 8 Z F 009 1281 5 5 Bolt HH M...

Page 52: ...BEFCO C30 CE5H 345293 US lwp Printed in the USA January 11 2021 P O Box 6036 Rocky Mount NC 27802 6036 Tel 252 977 9920 Fax 252 977 9718 www befco com...

Reviews: