background image

1.


Sample Prep

a.


Prepare samples in the TC hood and bring to bench in ependorf or conical tubes.

b.


Make the necessary dilutions to keep your cell concentration within the correct
range.

2.


At the lab bench, add 600 

µ

L of solution to sample cup.  

Exact volume does NOT

matter as the instrument sucks up entire solution and only uses 500 

µ

L.

3.


Place sample cup in next available carousel position.

4.


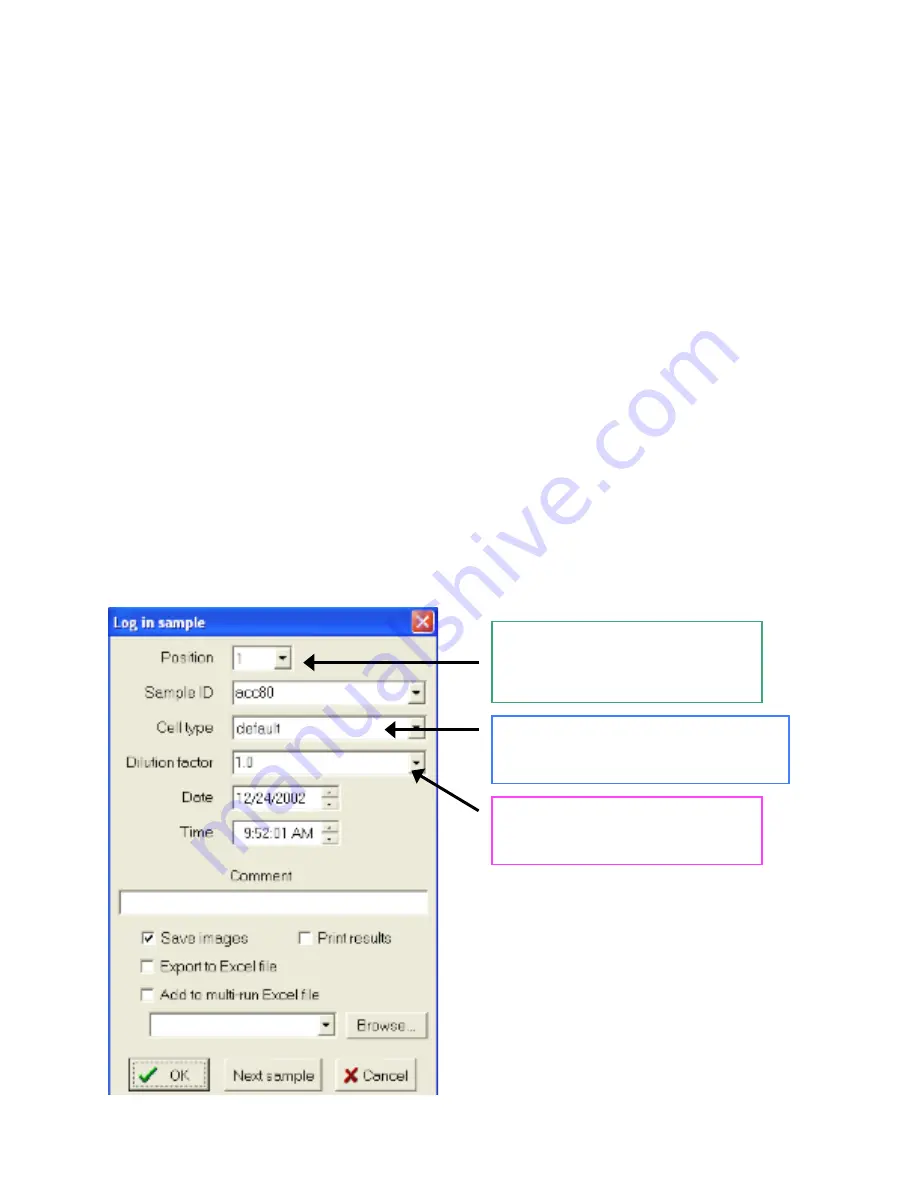
Log in sample on the computer by clicking on the 

Log in sample

 button: (log in window

shown below)

a.


Select cup position on carousel

b.


Enter your 

Sample ID

 (the software is smart and will increment for you with

multiple samples)

c.


Choose a 

Cell type 

(*first time choose default)

d.


Select a dilution factor

e.


Click 

OK

 or 

Next sample

 to enter additional sample data  (*once you start the

queue you can continue to enter samples, so it saves time to start the queue first)

5.


From the navigation menu, choose 

Autosampler queue

 to see your samples in the queue.

From this screen, you can also edit/remove samples in the queue while a run is in
progress.

6.


Click on 

Start queue

 to begin sample analysis.  Once the run begins, your sample will

disappear from the queue and you will only see it on the main screen.  The bottom of the
screen will tell you exactly what the instrument is doing (i.e. mixing trypan blue, loading
flow cell, etc) and right side displays the run data (i.e. image #, % viable, cell count).

Indicates which position in the carousel
you are putting your sample in.  NOTE:
the current three positions at the back of
the carousel do NOT appear in the menu

Each user will be able to set their preferences
for the default setting.  Also, we will create
new cell types for common lab cell lines.

The dilution factor will automatically be
added into the result calculation by the
instrument.  Choices are 1.0 to 20.0

Summary of Contents for Vi-Cell XR

Page 1: ...tem administrator In addition everyone will be given a user account and password to log on to the instrument There will be a main system log in which user activity will be recorded So if you allow someone else to use your account then you will be the responsibility party in the use log if something happens to the instrument UROPs will not be given user accounts and will be the responsibility of th...

Page 2: ...isplayed in the main window Camera Image allows for the viewing of sample images during and after a run Autosampler Queue shows the completed samples along with the list of samples in the queue this is where you can modify remove samples that are already in the queue Cell Types displays windows with the information for each specific cell type this is where you create or remove new cell types Biopr...

Page 3: ...ue to enter samples so it saves time to start the queue first 5 From the navigation menu choose Autosampler queue to see your samples in the queue From this screen you can also edit remove samples in the queue while a run is in progress 6 Click on Start queue to begin sample analysis Once the run begins your sample will disappear from the queue and you will only see it on the main screen The botto...

Page 4: ...roll down to click on reanalyze At this point the default cell type window will open up and you can adjust the necessary parameters and click ok The cell images will then be analyzed using the new parameter values and the data will be displayed on the right side of the screen Reanalyzing a sample does not overwrite the original data and the new data is not automatically saved So you need to choose...

Page 5: ...spending your cells in a solution that is also hazardous you need to write that information on the waste card as well every time you use the cell counter As for the instrument reagents these will be ordered from Beckman Coulter by the lab manager and stocked near the instrument Only the Beckman Coulter reagents are compatible with this instrument Do NOT use any other brand of trypan blue If we are...

Page 6: ...ed on spot brightness spot area Live Cell Reject Non Circular Objects Separate Cells from Background Based on brightness sharpness Vi CellXR Cell Image Analysis Scheme Not Viable Debris Meets Min Circularity Viable Decluster Cells Dead Cell ...

Page 7: ...delete a cell type 2 choose File from toolbar then click on Image Reanalyze and you will be given the option to add modify or delete a cell type 3 choose Instrument Reanalyze from toolbar then you will be given the option to add modify or delete a cell type Sample Prep Options Parameter Range Default Details Aspiration Cycles 1 to 7 3 of times sample is mixed in syringe set according to cell sensi...

Page 8: ...o include more objects Increase to include less objects Spot Brightness 75 Determines cell viability Increase value more cells counted as dead Decrease value more cells counted as live Spot Area 1 20 5 Ratio of the bright spot to total area Determines cell viability Increase value more cells counted as dead Decrease value more cells counted as live Minimum Circularity 0 0 5 0 Excludes dead cells s...

Reviews: