background image

Page 10

INSTALLER GUIDE

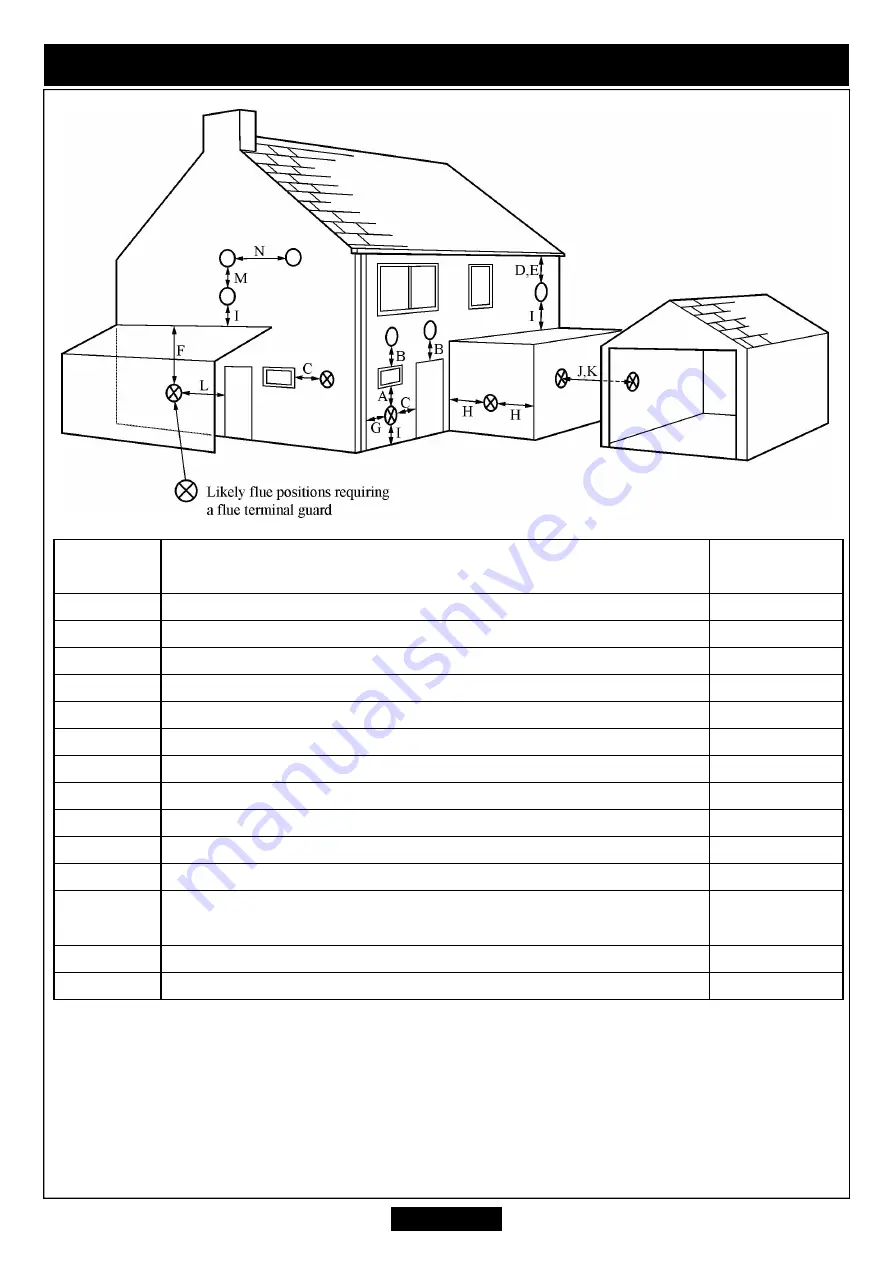
Figure 3

Dimension

Terminal Position

Minimum

Distance

A*

Directly below an opening, air brick, opening window etc.

300mm

B*

Above an opening, air brick, opening window etc.

300mm

C*

Horizontally to an opening, air brick, opening window etc.

300mm

D

Below gutters, soil pipes or drain pipes

75mm

E

Below eaves

200mm

F

Below balconies or car port roof

200mm

G

From a vertical drain pipe or soil pipe

150mm

H**

From an internal or external corner

200mm

I

Above ground, roof or balcony level 

300mm

J

From a surface facing the terminal

600mm

K

From a terminal facing the terminal

1200mm

L

From an opening in a car port (e.g. door, window) into
dwelling

1200mm

M

Vertically from a terminal on the same wall

1500mm

N

Horizontally from a terminal on the same wall

300mm

*In addition, the terminal should not be nearer than 150mm to an opening in the building
fabric formed for the purpose of accommodating a built-in element such as a window frame
or door frame (See figure 3b).

** The reference to external corners does not apply to building protrusions not exceeding
450mm, such as disused chimneys on external walls.

Summary of Contents for 661 Heat Engine

Page 1: ...E IS FOR USE WITH PROPANE GAS G31 THIS APPLIANCE IS SUITABLE ONLY FOR INSTALLATION IN THE UNITED KINGDOM GB AND THE REPUBLIC OF IRELAND IE Model 661 Heat Engine POWER FLUE INSET GAS FIRE GC No 32 810 15 Baxi Heating U K Ltd For technical advice firstly contact your retailer If further advice is required then call 0161703 8157 for The Midlands and North or 01462 813 138 for The South ...

Page 2: ...urer is a member of the Society of British Gas Industries which works to ensure high standards of safety quality and performance Careful Installation The manufacturer is a CORGI registered company This gas fire must be installed by a competent CORGI Registered Installer in accordance with our Installer Guide and should not be fitted directly on to a carpet Baxi Fires Division Erdington Birmingham ...

Page 3: ...rboard etc 20 7 10 Fixing the appliance in position 21 7 11 Prepare flue assembly 22 8 INSTALLATION OF ELECTRICS FIREBOX AND FAN BOX 22 8 1 Fan box installation preparation 23 8 2 Securing firebox to wall cable retention 24 8 3 Securing firebox to wall using fixing brackets 25 8 4 Completing the fan box installation 25 8 5 Electrical installation 26 8 6 Refitting the burner unit 26 8 7 Electrical ...

Page 4: ...ch are man made vitreous silicate fibres Excessive exposure to these materials may cause irritation to eyes skin and respiratory tract Consequently it is important to take care when handling these articles to ensure that the release of dust is kept to a minimum To ensure that the release of fibres from these RCF articles is kept to a minimum during installation and servicing we recommend that you ...

Page 5: ... installation must also be in accordance with a All the relevant parts of local regulations b The current edition of the Building Regulations issued by the Department of the Environment and the Welsh Office or the Building Standards Scotland Consolidation Page 5 INSTALLER GUIDE Gas Natural G20 Propane G31 Inlet Pressure 20mbar 37mbar Input Max Gross 6 0kW 20 472Btu h 6 1kW 20 813Btu h Input Min Gr...

Page 6: ...the finished wall surface 600mm 23 5 8in max These dimensions are from the finished internal wall surface including any surround material to the external wall surface 3 1 5 Installation to a timber framed building should be in accordance with the relevant sections of Institute of Gas Engineers publication IGE UP 7 Gas installations in timber frame buildings Please note that advice should be sought...

Page 7: ...e wall Installations It is recommended that a hearth should be installed as in figure 1 If a reduced depth Hearth is fitted the fire must be installed so that the distance from the base of the fireplace opening in the wall to the finished floor level is at least 88 mm It is recommended that the reduced hearth has a depth from the fixing plane of the fire of 100mm minimum This is necessary to suppo...

Page 8: ...m which ventilation for the appliance is taken if it does not affect the safe performance of the appliance Note the spillage test requirements detailed further on in this manual If the fan is likely to affect the appliance the appliance must not be installed unless the fan is permanently disconnected or provision is made to ensure that the fan and the appliance cannot be used at the same time A fa...

Page 9: ...face which projects beyond the front of the appliance is 100mm For access purposes a 50mm clearance is recommended from non combustible surfaces 3 1 16 A concealed gas supply connection can be made through the rear panel Visible front connection can be from the left or right side after an opening has been cut in the appropriate side of the hearth casting Electrical connection is from the right sid...

Page 10: ... 200mm I Above ground roof or balcony level 300mm J From a surface facing the terminal 600mm K From a terminal facing the terminal 1200mm L From an opening in a car port e g door window into dwelling 1200mm M Vertically from a terminal on the same wall 1500mm N Horizontally from a terminal on the same wall 300mm In addition the terminal should not be nearer than 150mm to an opening in the building...

Page 11: ...Page 11 INSTALLER GUIDE Figure 3b ...

Page 12: ...IDE NOTE ALL DIMENSIONS ARE APPROXIMATE AND SUBJECT TO MANUFACTURING DEVIATION Figure 4 Appliance dimensions Shown with fascia that is close fitted to the outer flanges of the hotbox Dimensions A and B may differ depending upon the fascia fitted ...

Page 13: ...ncut 150mm min M Fan box projection 205mm when sited outside wall 55mm when recessed in outer wall N 285mm O Flue tube diameter 125mm P Terminal guard 305mm Q 355mm R Recess width 390mm min 425mm max S Recess depth 140mm min T Recess height 560mm min 580mm max U Clearance to wall etc projecting forward of appliance firebox 100mm min ...

Page 14: ...Woodscrews 2 Taptite screws For fan box 1 Rockwool jacket top section 2 Cable ties 1 Firebox fixing bracket assembly 2 brackets 2 self tapping screws 1 Terminal guard fixing assembly 4 screws washers 1 Terminal guard In separate pack 2 Black machine screws For fascia fitting 2 Fascia infill panels Not shown 3 M5 x 8 screws For securing infill panels to fascia 1 M4 x 10 screw For securing infill pa...

Page 15: ...Page 15 INSTALLER GUIDE Figure 5 Contents ...

Page 16: ...e burner unit out from the hotbox and place immediately in front of the hotbox Do not attempt to lift the burner module away from the front of the firebox as this may damage the solenoid leads Disconnect the solenoid leads from the control box 7 WALL PREPARATION 7 1 General 1 Make sure that the installation will comply with all the relevant requirements in part 3 of this manual 2 Attempt to keep t...

Page 17: ...ing Main case recessed into wall Figure 9 1 This installation has the fire box recessed into the inner wall of the building The front flanges of the fire box and the appliance fascia will abut the front surface of the wall 2 The non combustible hearth must project at least 300mm in front of the convection box front flanges and be at least 625mm wide Figure 1 The recess in the inner wall for the fi...

Page 18: ... the masonry and clearing debris If the cavity has loose fill e g granular insulation material pack the edges of the opening with Rockwool as you proceed to hold back the insulating material 6 The wall cavity must not be bridged other than by the flue tube assembly The fire box must not project into the cavity between the inner and outer walls by more than 10mm See wall preparation for flue tube T...

Page 19: ...mbly when tightening the fixing screws Where necessary non combustible packing pieces should be used to provide a satisfactory fixing surface 2 Before cutting the hole in the wall make sure that the height to the top surface of the finished floor is known The height from this surface to the flue hole centre is shown in figure 14 3 If a loose hearth or plinth is to be used the height from its top s...

Page 20: ... diameter hole through a non combustible brick etc outer wall 5 Fit the steel sleeve The sleeve should not protrude more than 10mm into the cavity The sleeve should be sealed to the inner leaf of the wall at both ends with a non setting thermal mastic sealant 6 If the outer wall is combustible drill a 177mm hole and fit the liner sleeve through to this wall 7 Cover the hole with a steel plate size...

Page 21: ... as shown in figure 14 2 Drill the fixing holes to a minimum depth of 42mm using a 7mm masonry drill 3 Insert four fibre wallplugs supplied in loose parts pack 4 Now firmly screw in four eyebolts also supplied in loose parts pack 7 10 1 Provision for main loom It may be necessary to cut a groove in the flue hole to ensure that there is adequate clearance for both the flue tube and the electrical l...

Page 22: ...aging from the flue unit Remove all polystyrene from the flue unit after cutting 4 Now the flue tube is ready for installation 8 INSTALLATION OF ELECTRICS FIREBOX AND FAN BOX Important Under no circumstances should the electrical loom be fed between the inner and outer sections of the flue tube Ensure the mains electrical supply to the appliance is in place and is isolated Important We strongly re...

Page 23: ...he air outlet face of the fan box See figure 19 4 Use a hammer and chisel to cut an aperture of 230mm by 280mm Vertical 5 Place the fan box in position with the spigot located in the flue pipe Ensure the box is firmly located and correctly aligned against the wall and mark off the four screw fixing positions on the wall 6 Remove the fan box Drill at the market positions four holes using a number 1...

Page 24: ...ontrol unit in future servicing 8 2 Securing firebox to wall cable retention See section 9 1 Gas supply connection 1 Assemble retention cables into firebox 2 Insert cables into cable anchor points in upper rear of firebox and then tape together adjoining edges of the jacket as shown in figure 21 3 Offer the firebox up to the wall and feed the retention cable through the installed eyebolts 4 Return...

Page 25: ...r between the box and wall 3 Stow the excess cable as shown in figure 24 Leave about 200mm of free length for fan motor connection Secure the stowed cable inside the fan box with cable ties 4 Replace the fan unit taking care not to snag or otherwise damage the electrical fitments Connect the cable loom to the fan unit See figure 25 5 Upon completion of cable installation ensure that the loom and c...

Page 26: ...moval See section 6 and figure 7 8 7 Electrical test Switch on power supply to the appliance The control box is mounted under the burner module Press the on switch Within a few seconds the Fan motor should start and the neon indicator will light The neon light is an indication that the fan is in boost mode After a few seconds the fan motor should reduce in speed and be operating at normal speed Th...

Page 27: ...ff the four fixing positions on wall Remove the terminal guard and drill at the marked positions four holes using a no 10 drill Insert wall plugs reposition the terminal guard and secure to wall using four screws supplied 9 GAS SUPPLY INSTALLATION 9 1 Gas supply connection 1 Connect the supply line to the appliance 2 Unless the supply pipe connection is from the left front side the supply pipe wil...

Page 28: ... turning The spark should ignite the pilot When pilot ignition has been achieved keep the control knob depressed for approximately ten seconds to allow the thermocouple probe to warm up and then release it If the pilot does not remain alight ensure that the air has been purged that the pilot orifice is clear and that the thermocouple connections are sound Replace the pilot unit if necessary See se...

Page 29: ...screw for gas soundness with a suitable leak detection fluid Do not use leak detection sprays on this appliance Sprays may affect the operation of electrical components Keep all liquid detection fluids clear of electrical components 9 4 Fitting the burner tray trim Fit the burner tray trim to the burner tray as in figure 31 The lip at the back of the trim should locate over the front edge of the b...

Page 30: ...e control operation must be fully rechecked See section 9 2 12 2 Check for spillage Close all doors and windows in the room containing the appliance Turn on the fan Light the appliance and turn the control knob to HIGH Leave the appliance on for five minutes INSTALLER GUIDE Figure 32 Firefront minimum open area requirements The firefront may differ from that shown A spillage check must be made bef...

Page 31: ...s no spillage from these appliances when the Powerflue is operating with its fan on Check these other appliances by the procedure supplied by the manufacturer 12 3 Flame supervision and spillage monitoring system The pilot unit incorporates a system which will automatically shut off the gas supply if the pilot flame goes out or if there is insufficient oxygen due to spillage or lack of ventilation...

Page 32: ... clearance of the products of combustion with consequent health hazards Recommend that the appliance should be serviced by a competent person at least annually 14 SERVICING PARTS AND REPLACEMENT Always turn off the gas and isolate the electric supply before commencing any servicing and make sure that the appliance is completely cold The inlet T connector for this appliance incorporates an isolatin...

Page 33: ...undness and spillage after servicing the appliance and check operation of all controls Do not use leak detection sprays on this appliance Sprays may affect the operation of electrical components Keep all liquid detection fluids clear of electrical components 14 1 To remove the complete burner module 1 Remove the ceramic fuel effect and place carefully aside The ceramic fuel effect pieces can disco...

Page 34: ...t unit to the burner See figure 37 6 Remove the pilot unit and place it aside 7 Refit in the reverse order Make sure no leads are trapped Note 1 The pilot unit must be replaced as a whole assembly Its individual components are not separately replaceable 14 3 To remove the burner from the burner module See figure 38 1 Remove the complete burner module See section 14 1 2 Support the elbow injector a...

Page 35: ...nect the inlet pipe at the solenoid junction 5 Disconnect the main burner pipe at the gas valve 6 Disconnect the pilot pipe at the gas valve 7 Pull off the control knob 8 Remove the gas tap fixing nut 9 Pull the gas valve and solenoid unit clear 10 To separate the gas valve from the solenoid detach the solenoid unit at the gas valve end 11 Replace in the reverse order 14 6 To remove the piezo gene...

Page 36: ...ive brown and neutral blue leads from the mains lead connector Always hold the wire terminals never pull on the wires 3 Unscrew the two mains lead connector screws located on the outer housing See figure 42 4 The mains lead connector has two tags that hold it in place There is a slot in the top of the control box housing for access to the top tag See figure 43 Press the top and bottom tags and sli...

Page 37: ... When replacing Ensure that the vacuum tubes are connected to the correct sensing points The positive sensing point marked on the switch runs to the metal sensing pipe positioned nearest to the side of the fan box Note When fitted correctly both leads will run neatly but if incorrectly fitted they will twist across each other Ensure the electrical connector is correctly and firmly connected 14 11 ...

Reviews: