background image

KNOW YOUR PRODUCT

ASSEMBLING YOUR  LAWN  MOWER

Parts List

• Grass Catcher Bag
• 36V Battery (Pre-installed at the factory)
• Battery Charger
• Manual

Note:

• Carefully remove the parts from the box.
• Inspect the parts carefully in order to verify that no breakage or damage occurred during shipping.
• Do not discard the packing material until all parts have been examined.

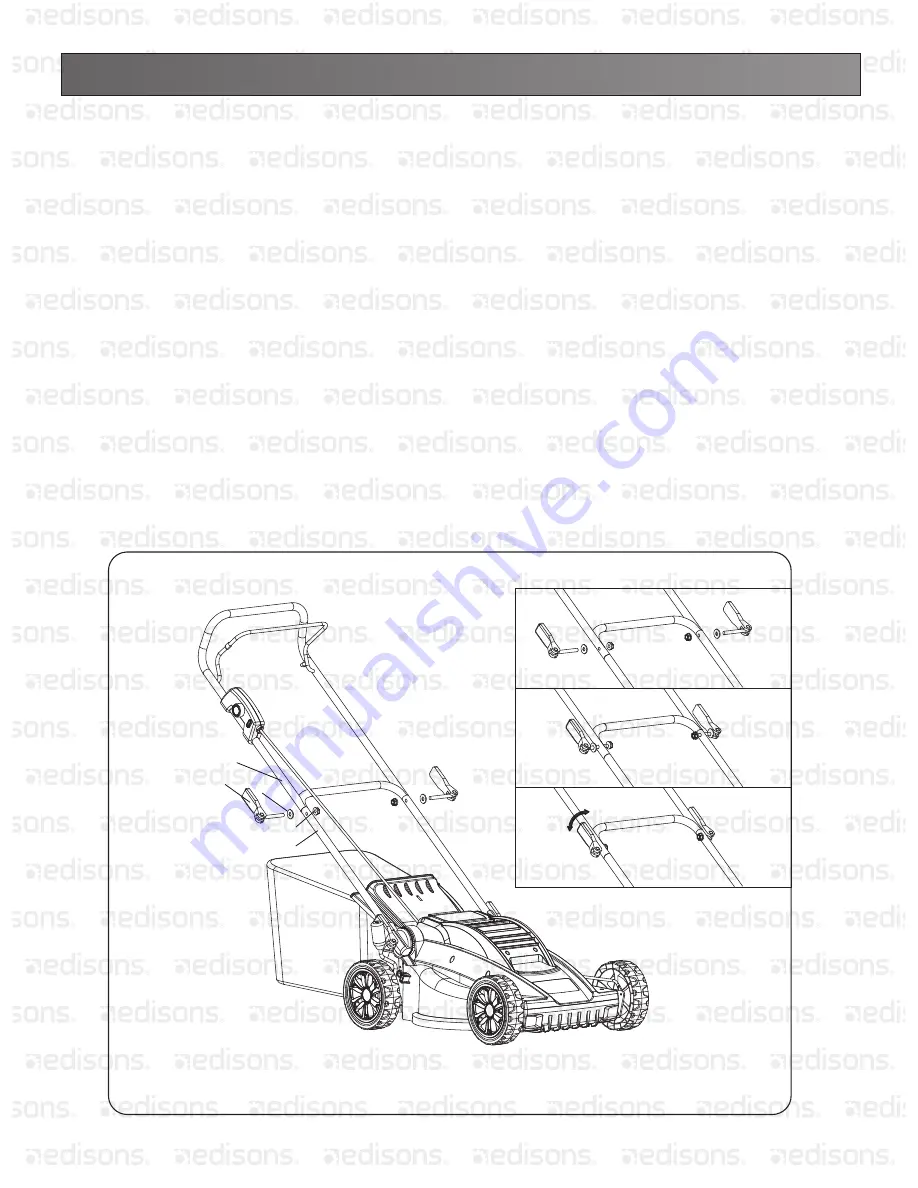
ASSEMBLING THE HANDLE

1. Remove any packing material which may have been lodged between the upper and lower handles for shipping purposes.
2. Pull up and back on the upper handle to raise the handle into the operating position. Make certain the lower handle is 
seated securely into the handle mounting bracket (see Fig. 

2

).

3. Align the holes between the upper handle (1) and lower (5) handles. Insert the quick clip bolts (4),washer and tighten 


them with the handle nut (4) provided (see Fig. 3).
4. Pull the quick clip, then lock the handle (Fig. 3).

Fig. 2

2

Fig. 3-3

Fig. 3-2

Fig. 3-1

3

4

1

5

T

ight

 Loose

25

Summary of Contents for E force 360

Page 1: ...FORCE E FORCE BEFORE USING YOUR MOWER Carefully read and understand the owner s manual Save this manual for future use Read and follow all warnings on the mower battries charger and in the Owner s Manual ...

Page 2: ...E FORCE E FORCE i ...

Page 3: ...lish EMERGENCY PROCEDURE SYMBOLS SAFETY INSTRUCTIONS BATTERY WORK INSTRUCTIONS MAINTENANCE DISPOSAL GUARANTEE SERVICE DEFECTS SEARCHING Please read the instructions carefully before starting the machine 1 ...

Page 4: ...1 Assembly 2 ...

Page 5: ...1 D Montage GB Assembly F Assemblage I Montaggio NL Montage CZ Montáž SK Montáž H Szerelés SLO Montaža HR Montaža BG Монтаж RO Montaj BIH Montaža 2 Battery 3 ...

Page 6: ...1 D Montage GB Assembly F Montage I Montaggio NL Montage CZ Montáž SK Montáž H Szerelés SLO Montaža HR Montaža BG Монтаж RO Montaj BIH Montaža 2 Battery 4 ...

Page 7: ...1 D Montage GB Assembly F Assemblage I Montaggio NL Montage CZ Montáž SK Montáž H Szerelés SLO Montaža HR Montaža BG Монтаж RO Montaj BIH Montaža 2 Cutting height setting 5 ...

Page 8: ...3 Operation 6 ...

Page 9: ...4 Mow collect 7 ...

Page 10: ...taža BG Монтаж RO Montaj BIH Montaža 4 Mow eject SPECIFICATIONS 30V LITHIUM LAWN MOWER Battery 30V Samsung Lithium Battery Cutting Length 320mm Speed 3600rpm 5 Working Area About 150m2 Grass catcher 30L Height adjustments 3 position 25 65mm Motor Type Brushless Motor Charger specs 3 5 hours Charger SAA plug 8 ...

Page 11: ...1 D Montage GB Assembly F Assemblage I Montaggio NL Montage CZ Montáž SK Montáž H Szerelés SLO Montaža HR Montaža BG Монтаж RO Montaj BIH Montaža 4 Cutting Instructions 9 ...

Page 12: ...1 D Montage GB Assembly F Assemblage I Montaggio NL Montage CZ Montáž SK Montáž H Szerelés SLO Montaža HR Montaža BG Монтаж RO Montaj BIH Montaža 5 Cleaning Maintenance D 10 ...

Page 13: ...1 81 dB A Wear ear protectors Vibration details Vibration emission value triaxial vector sum Determined properly EN 60335 Vibration emission value ah 1 513 m s2 Uncertainty K 1 5 m s2 Charging equipment 2A 25 L 25 2 V Input voltage 100 240 V Frequency 50 60 Hz Output voltage 30 V Output current 2 0 A Std Input power 75 W Protection class II Charging time ca 2 Ah 70 min WARNING The vibration emissi...

Page 14: ...es The mower must also not be used as a crusher for mulching tree cuttings and hedges or levelling any terrain roughness structions before using the appliance Apart from the detailed instructions Persons over 18 years of age can only L âge minimal de l utilisateur est déterminé selon les dispositions locales Using the appliance only requires corre Residual risks Rotating blades may lead to serious...

Page 15: ...tion Protection class II Battery Protect the battery against water and moisture MAX 40 C Protect the battery against temperatures above 40 C Li Ion Do not throw the batteries in household waste Deliver the batteries to a collection centre of old batteries where they will be recycled in an environmentally friendly way General Power Tool Safety Warnings WARNING Failure Save all war nings and instruc...

Page 16: ...urns 6 Service a This will ensure that the safety of the power tool is maintained SafetyinstructionsforCordlesslawn mower c Do not expose power tools to rain or wet con the risk of electric shock d Do not abuse the cord Never use the cord for Keep cord away from heat oil sharp edges increase the risk of electric shock e When operating a power tool outdoors use an Use of a cord suitable for outdoor...

Page 17: ...il all rotating parts have stopped and the unit has cooled down Take out the key whenever you leave the lawnmower To release a blocked blade To adjust the mowing height To empty the collection bag Check the machine if working perfectly after catching an undesirable object Repairs must be executed before putting the machine into operation again To lift the machine or take it away lawn or across a r...

Page 18: ...e clean carefully the cutter bar Wipe it with a cloth moistened in oil or apply metal treatment spray on it Keep the machine clean Regularly clean the grass ejection chute and machine body Apply environment friendly oil to all moving parts Check the collection bag at regular intervals for any wear and aging Use only original accessories and original spare parts Only a regularly maintained and trea...

Page 19: ...damaged Replace the blade Blade is loose Check and tighten the blade clamping Poor mowing catching performance Blade is blunt Have the blade sharpened or replaced Battery is defective Have it replaced in a Güde authorised service centre Collection bag is blocked Empty the collection bag 7 Mowing height adjustment not regulated Adjust the mowing height 5 Grass is not collected Blocked channel Full ...

Page 20: ... Lawn Mower BEFORE USING YOUR MOWER Carefully read and understand the owner s manual Save this manual for future use Read and follow all warnings on the mower battries charger and in the Owner s Manual 37CM 36V Li Ion E FORCE 18 ...

Page 21: ...OLS Severing of toes or fingers rotary mower blade SYMBOL NAME SYMBOL NAME Thrown objects from mower deck Keep bystanders children away Safety alert Slip on slope Read the operator s manual CPSC Danger label Please read and understand this entire manual before attempting to assemble operate or install the product These safety instructions are not meant to cover every possible conditions that could...

Page 22: ...e with care Keep cutting edge sharp and clean for best and safest performance and to reduce the risk of injury Follow instructions for lubricating and changing accessories Keep handles dry clean and free from oil and grease l Check damaged parts Before further use of the appliance a guard or other part that is damaged should be carefully checked to determine that it will operate properly and perfo...

Page 23: ...ear or under the machine Keep clear of the discharge opening at all times 3 Only allow responsible adults who are familiar with the instructions to operate this machine 4 Clear the area of objects such as rocks wire toys etc which could be thrown by the blade Stay behind the handle when the motor is running 5 Be sure the area is clear of bystanders before operating Stop machine if anyone enters th...

Page 24: ...e often attracted to the machine and the mowing activity Never assume that children will remain where you last saw them 1 Keep children out of the mowing area and under the watchful eyeof a responsible adult other than the operator 2 Be alert and turn mower off if a child enters the area 3 Never allow children to operate the machine 4 Use extra care when approaching blind corners shrubs trees or o...

Page 25: ...use If all of the following conditions are met the mower can be stored with the charger disconnected 1 The mower is fully charged before storing 2 The average temperature of the storage location is not below 50 F 10 C 3 The battery should not be stored for more than 3 months CHARGER SAFETY RULES Charge the mower battery in a dry area that is protected from the weather Do not expose the mower or th...

Page 26: ...mpare the illustration below to the mower in order to become familiar with the location of the various controls and adjustments Save this manual for future reference Switch Rear bag Wheels Start rod Safety key Upper handle Lower handle Motor housing Height adjustment lever Fig 1 Quick clip Battery cover Rear cover 24 ...

Page 27: ...HE HANDLE 1 Remove any packing material which may have been lodged between the upper and lower handles for shipping purposes 2 Pull up and back on the upper handle to raise the handle into the operating position Make certain the lower handle is seated securely into the handle mounting bracket see Fig 2 3 Align the holes between the upper handle 1 and lower 5 handles Insert the quick clip bolts 4 w...

Page 28: ...ROM MOWER 2 While holding up the rear cover 1 place the grass bag hanger hooks 2 into the opening on the chute cover 1 to allow the hanger hooks to attach to the hole 3 on the deck which secures the chute rear cover NOTE For optimal performance empty the grass bag often during use A full grass bag will inhibit performance of the mower and collection of grass clippings 2 Fig 4 1 3 26 ...

Page 29: ... THE MOWER See Fig 6 Control rod Start butto Safety key 1 Insert the safety key 2 Pull the start button 3 Start mower Stop mower ADJUST THE CUTTING HEIGHT See Fig 7 1 Simply depress the lever 1 towards the wheel and move to desired position This sets all wheels to the same position 2 To raise the height pull the height adjustment lever from the current stop position towards the back of the mower 3...

Page 30: ...M MOWER Note The battery can be removed from the mower Step 1 Open the battery cover Step 2 Pull the fixing buckle OPERATING YOUR MOWER Fig 8 1 Open the battery cover 2 Pull the fixing buckle 3 Remove the battery Step 3 Remove the battery 28 ...

Page 31: ...l go out and the green light will come on when the battery is completely charged it takes approximately 2 5 hours to charge a fully discharged battery WARNING BATTERY USE Push the Battery Capacity Indicator BCI switch The lights will indicate the battery s capacity according to the following chart Lights 3 Green Lights 2 Green Lights 1 Green Light Red Light The battery is at full capacity The batt...

Page 32: ...f grass clippings New or thick grass may require a narrower cut The ground speed should be adjusted to the condition of the lawn If mowing has been delayed and the grass has been allowed to grow longer than 4 in 10 cm mow the lawn twice in order to reduce the grass height to a maximum of 3 1 4 in 8 3 cm 4 Walk at a steady pace Overlap the cutting rows Do not let the grass get too tall If the grass...

Page 33: ...ts side and scrape it clean with an appropriate tool STORAGE The following steps should be taken to prepare the lawn mower for storage Remove Safety Key Clean mower as instructed in previous section Inspect and replace sharpen blade if required Refer to the Maintenance section Store mower in a dry clean area Do not store next to corrosive materials such as fertilizer and rock salt Store mower indo...

Page 34: ...ery pack DO NOT ATTEMPT TO REPAIR IT To avoid injury and risk of fire explosion or electric shock and to avoid damaging the environment Cover the battery s terminals with heavy duty adhesive tape DO NOT attempt to remove or destroy any of the battery pack components DO NOT attempt to open the battery pack If a leak develops the released electrolytes are corrosive and toxic DO NOT let the solution ...

Page 35: ...i e bent cracked or worn 8 For best and safest performance maintain the mower with care Keep the mower blade sharp and clean Mower blades are sharp and can cut Wrap the blades or wear gloves and use extra caution when servicing 8 Keep all nuts bolts and screws tight in order to be sure that the equipment is in safe working condition 9 Never tamper with safety devices Check them regularly for prope...

Page 36: ...en access to the product The product has been supplied by a general merchandise retailer that may not be familiar with your specific applic ation or your description of the application Be sure to attain third party approval for your application from a qualified specialist before use regardless of prior assurances by the retailer or its representatives This product is not intended for use where fai...

Reviews: