background image

Care and safe use guidelines

SAFETY INFORMATION

W

ARNINGS:

• 

This appliance will become very hot in use, do not move it during operation.

• 

Always use heat resistant gloves when adding fuel or when using any safety tool (where supplied).

•  Do not use this appliance in a confi ned and/or habitable space e.g. houses, tents, caravans, motor homes or

boats. Danger of carbon monoxide poisoning fatality. 

•  Keep children and pets away

.

• 

Do not use this appliance as a furnace.

FIRE HAZARD:

• 

This appliance must be installed on a secure level base before use.

•  Do not use this appliance on wooden decking or any other fl ammable surfaces such as dry grass, wood chips,

leaves or decorative bark, etc.

•  Do not use this appliance on artifi cial grass or other surfaces that are not heat resistant.

•  Hot embers may be emitted whilst in use.

Ensure that this appliance is positioned at least 2 meters away from any fl ammable materials and has a minimum

clearance of 2 metres from overhead and adjacent surroundings.

CARE & USE

•  When lifting or moving this appliance, never drag it; seek assistance as necessary

.

•  As this appliance has components made from steel and/or cast iron, the surface will age and develop surface

rust over time once it is exposed to natural weather elements. This is to be expected and does not constitute an

appliance fault.

For safety reasons, it is recommended to inspect this appliance before each use for signs of fatigue and damage. 

Be sure to replace any appliance that has reached the end of its natural life.

• 

If this appliance is left outside a suitable cover must be used, once it has cooled completely.

•  This appliance could mark or stain a patio; to protect against this place onto a separate patio slab or brick base.

• 

The cooking grill should be cleaned with a solution of washing up liquid in warm water. It is not suitable for

cleaning in a dishwasher.

SOLID FUEL TYPES & LEVELS

•  For outdoor heating, the following fuel types may be used with this appliance: untreated wood, logs and

Easylogs.

• 

For cooking food, it is essential to use lumpwood charcoal (1kg recommended).

• 

Do not burn coal in this appliance.

•  Do not overload with fuel: one or two logs is recommended (800g-1.6kg); 

•  The recommended amount of fuel must not be exceeded by greater than 50%.

LIGHTING, REFUELLING & EXTINGUISHING

•  WARNING! Do not use spirit or petrol for lighting or re-lighting! Use only fi relighters complying to EN 1860-3.

•  Prepare a stack of loosely crumpled newspaper and place in the fi re compartment.

•  Pile fi nely split, dry, fi rewood on top of the paper.

• 

Add half of the fuel leaving access to light the paper.

• 

To light the paper, use long safety matches or a long reach lighter.

•  Once the fi re is established add the remaining fuel.

• 

Always use heat resistant gloves when adding fuel.

•  Do not drop or throw fuel into the appliance as this can cause cracks/fractures to the appliance.

•  To extinguish the fi re after use: stop adding fuel and allow the fi re to die; alternatively douse it with sand. Do not

use water as this may damage the appliance, and will also create excess ash particles.

2

Summary of Contents for MARCO FTB-51661

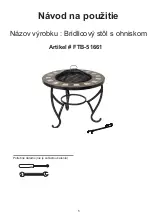
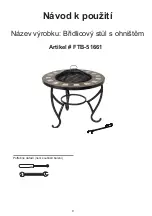
Page 1: ...Tools required not included INSTRUCTION MANUAL Item FTB 51661 Product name Slate Fire Pit Table 1 ...

Page 2: ...age Be sure to replace any appliance that has reached the end of its natural life If this appliance is left outside a suitable cover must be used once it has cooled completely This appliance could mark or stain a patio to protect against this place onto a separate patio slab or brick base The cooking grill should be cleaned with a solution of washing up liquid in warm water It is not suitable for ...

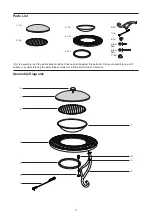
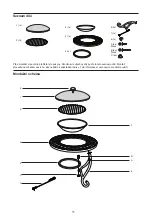
Page 3: ...ctions carefully Check all parts against this parts list Carry out assembly on a soft surface to avoid scratching the paint Please retain this information for future reference A 6x 1 1x 2 1x 3 1x 4 1x 7 1x 6 3x 5 1x Bolt C 6x 8 1x B 6x Bolt 3 A 6 B 7 8 2 1 4 5 C 3 ...

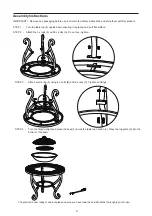
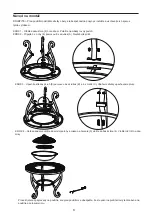
Page 4: ...t flat surface STEP 2 Attach the 3 x legs 6 with 6 x bolts A Do not over tighten STEP 3 Attach centre ring 5 using 6 x bolts B and 6 x nuts C Tighten all fixings STEP 4 Turn the firepit upright and place the bowl 3 inside the table top section 4 Place the log grate 2 into the bottom of the bowl The product is now ready to use but please ensure you have read these instructions thoroughly prior to u...

Page 5: ...Potrebné náradie nie je súčasťou balenia Artikel FTB 51661 Návod na použitie Názov výrobku Bridlicový stôl s ohniskom 5 ...

Page 6: ...m Každý spotrebič ktorý dosiahol koniec svojej prirodzenej životnosti vymeňte Pokiaľ spotrebič nechávate vo vonkajšom prostredí po vychladnutí ho zakryte vhodnou pokrývkou Tento prístroj môže zanechať škvrny na terase alebo inom podklade Doporučujeme ho umiestniť na samostatnú časť terasy tehlový alebo iný vhodný podklad Varný gril by mal byť čistený roztokom teplej vody a vhodného čistiaceho pros...

Page 7: ...pokyny Skontrolujte všetky diely podľa tohto zoznamu dielov Montáž vykonajte na mäkkom povrchu aby nedošlo k poškriabaniu farby Tieto informácie si uschovajte pre ďalšie použitie A 6x 1 1x 2 1x 3 1x 4 1x 7 1x 6 3x 5 1x Skrutka C 6x 8 1x B 6x Skrutka 3 A 6 B 7 8 2 1 4 5 C 7 ...

Page 8: ...te 3 x nohy 6 pomocou 6 x skrutiek A Neuťahujte príliš KROK 3 Upevnite stredový kruh 5 pomocou 6 x skrutiek B a 6 x matíc C Utiahnite všetky upevňovacie prvky KROK 4 Celé zariadenie otočte do zvislej polohy a misku na horenie 3 vložte do časti stola 4 Vložte rošt 2 na dno misy Produkt je teraz pripravený na použitie ale pred použitím sa ubezpečte že ste pozorne prečítali celý tento návod na použit...

Page 9: ...Potřebné nářadí není součástí balení Artikel FTB 51661 Návod k použití Název výrobku Břidlicový stůl s ohništěm 9 ...

Page 10: ...zařízení které dosáhlo konce své přirozené životnosti vyměňte Pokud zařízení necháváte ve venkovním prostředí po vychladnutí ho zakryjte vhodnou pokrývkou Toto zařízení může zanechat skvrny na terase nebo jiném podkladu Doporučujeme ho umístit na samostatnou část terasy cihlový nebo jiný vhodný podklad Varná mísa by měla být čištěna roztokem teplé vody a vhodného čistícího prostředku Není vhodný d...

Page 11: ...to pokyny Zkontrolujte všechny díly podle tohoto seznamu dílů Montáž proveďte na měkkém povrchu aby nedošlo k poškrábání barvy Tyto informace si uschovejte pro další použití A 6x 1 1x 2 1x 3 1x 4 1x 7 1x 6 3x 5 1x Šroub C 6x 8 1x B 6x Šroub 3 A 6 B 7 8 2 1 4 5 C 11 ...

Page 12: ... Připojte 3 x nohy 6 pomocí 6 x šroubů A Neutahujte příliš KROK 3 Upevněte středový kruh 5 pomocí 6 x šroubů B a 6 x matic C Utáhněte všechny upevňovací prvky KROK 4 Celé zariadenie otočte do zvislej polohy a misku na horenie 3 vložte do časti stola 4 Vložte rošt 2 na dno misy Produkt je nyní připraven k použití ale před použitím se ujistěte že jste pozorně přečetli celý tento návod k použití a po...

Page 13: ...Potrzebne narzędzia brak w zestawie Item FTB 51661 Instrukcja użycia Nazwa produktu Palenisko z mozaiką 13 ...

Page 14: ...ciem Wymień urządzenie którego żywotność dobiegła końca Jeśli zostawisz urządzenie na zewnątrz po wystygnięciu przykryj je odpowiednią pokrywą To urządzenie może pozostawiać plamy na tarasie lub innej powierzchni Zalecamy umieszczenie go na wydzielonej części tarasu cegłach lub innej odpowiedniej podstawie Grill do gotowania należy czyścić roztworem ciepłej wody i odpowiedniego środka czyszczącego...

Page 15: ...rzed montażem Sprawdź wszystkie części zgodnie ze spisem części Instaluj na miękkiej powierzchni aby uniknąć zarysowania farby Zachowaj te informacje do wykorzystania w przyszłości A 6x 1 1x 2 1x 3 1x 4 1x 7 1x 6 3x 5 1x Śrub C 6x 8 1x B 6x Śrub 3 A 6 B 7 8 2 1 4 5 C 15 ...

Page 16: ...wierzchni KROK 2 Przymocuj 3 x nóżki 6 za pomocą 6 x śrub A Nie przykręcaj KROK 3 Przymocuj pierścień środkowy 5 za pomocą 6 śrub B i 6 nakrętek C Dokręć wszystkie mocowania KROK 4 Obróć całe urządzenie do pozycji pionowej i włóż palenisko 3 do części stołu 4 Włożyć ruszt 2 na dno miski Produkt jest teraz gotowy do użycia ale przed użyciem upewnij się że dokładnie przeczytałeś i zrozumiałeś całą i...

Page 17: ...Szükséges eszközök nem tartozék Tételszám FTB 51661 Kézikönyv Termék neve Tűztál 17 ...

Page 18: ...amelynek természetes élettartama lejárt Ha a készüléket a szabadban hagyja lehűlés után fedje le megfelelő fedéllel Ez a készülék foltokat hagyhat a teraszon vagy más felületen Javasoljuk hogy a terasz külön részére téglára vagy más alkalmas talajra helyezze A grillezőt meleg vízzel és megfelelő tisztítószerrel kell megtisztítani Mosogatógépben nem mosható A SZILÁRD TÜZELŐANYAGOK TÍPUSAI ÉS MENNYI...

Page 19: ...Ellenőrizze az összes alkatrészt ennek az alkatrészlistának megfelelően Telepítse puha felületre hogy elkerülje a festék karcolódását Őrizze meg ezeket az információkat későbbi felhasználás céljából A 6x 1 1x 2 1x 3 1x 4 1x 7 1x 6 3x 5 1x csavar C 6x 8 1x B 6x csavar 3 A 6 B 7 8 2 1 4 5 C 19 ...

Page 20: ...atlakoztasson 3 x lábat 6 6 x csavarral A Ne húzza meg túlzottan 3 LÉPÉS Rögzítse a középső gyűrűt 5 6 x csavarral B és 6 x anyával C Húzza meg az összes rögzítőelemet 4 LÉPÉS Fordítsa az egész készüléket függőleges helyzetbe és helyezze be az égéstálat 3 az asztal 4 részébe Helyezze az állványt 2 a tál aljára A termék használatra kész de használat előtt győződjön meg róla hogy figyelmesen elolvas...

Reviews: