background image


18

Automatic safety cut-off 
 

o


The automatic safety cut-off is activated when a cooking zone 
has been left on longer than the maximum default working 
time. This is a safety function in the event of the hob being left 
on accidentally.  


o


The default working times for the various power levels are 
shown in the table below.  


Power level 

1  2  3  4  5  6 7 8 9 

Default working time (hours)  8  8  8  4  4  4 2 2 2 


o


If the pot has been removed from the cooking zone, the 
induction hob will stop heating immediately and the hob will 
automatically switch off after 2 minutes.  

 
Suitable cookware 
 

o


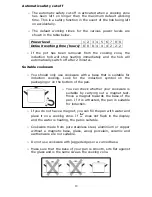
You should only use cookware with a base that is suitable for 
induction cooking. Look for the induction symbol on the 
packaging or on the bottom of the pan. 


o


You can check whether your cookware is 
suitable by carrying out a magnet test. 
Move a magnet towards the base of the 
pan. If it is attracted, the pan is suitable 
for induction.  


o


If you do not have a magnet, you can fill the pan with water and 
place it on a cooking zone. If 

 does not flash in the display 

and the water is heating, the pan is suitable.  


o


Cookware made from pure stainless steel, aluminium or copper 
without a magnetic base, glass, wood, porcelain, ceramic and 
earthenware are not suitable.  


o


Do not use cookware with jagged edges or a curved base.  


o


Make sure that the base of your pan is smooth, sits flat against 
the glass and is the same size as the cooking zone.  


Summary of Contents for BHI300

Page 1: ...1 BHI300 Domino touch control induction zone hob ...

Page 2: ... Manual contains important information including safety installation points which will enable you to get the most out of your appliance Please keep it in a safe place so that it is easily available for future reference for you or any person not familiar with the operation of the appliance GS 23 02 12 ...

Page 3: ...the timer as a minute minder 15 16 Setting the timer to turn one cooking zone off 16 17 High temperature protection 17 Detection of foreign objects 17 Automatic safety cut off 18 Suitable cookware 18 19 Cooking tips 19 20 Hob guidelines 21 22 Cleaning and maintenance 22 23 Cleaning the ceramic hob top 22 After each use 22 Cleaning table 22 23 Using a ceramic hob scraper 23 Using a specialist ceram...

Page 4: ...4 Environmental note o The packaging materials that Baumatic uses are environmentally friendly and can be recycled o Please discard all packaging material with due regard for the environment ...

Page 5: ...ven above o Any damage caused by the appliance being installed in contravention of this temperature limit will be the liability of the owner o Your new appliance is guaranteed against electrical or mechanical defects subject to certain exclusions that are noted in Baumatic s Conditions Of Guarantee The foregoing does not affect your statutory rights o The use of this appliance for any other purpos...

Page 6: ...with the relevant standards If you notice any scratches splits or cracks in the ceramic glass you should immediately switch off the appliance and disconnect it from your mains supply Otherwise there is the risk of electric shock occurring During use Any film or stickers that are present on the hob surface when it is delivered should be removed before use Care should be taken when utilising the app...

Page 7: ...ed on a cooking zone that is switched on it can get hot Cleaning o Cleaning of the hob should be carried out on a regular basis o IMPORTANT Before attempting to clean the appliance it should be disconnected from the mains and allowed to cool o Great care should be taken whilst using this appliance and when following the cleaning procedure o You should not use a steam jet or any other high pressure...

Page 8: ...a trained person for domestic purposes only To avoid damaging your appliance o The ceramic glass can be damaged by objects falling onto it o The ceramic glass edge can be damaged by knocks from cookware o Cast iron and cast aluminium cookware with damaged bases may scratch the ceramic surface if they are dragged across it o Pans should be lifted on and off the hob surface and not dragged o Cooking...

Page 9: ...e dimensions Depth 505 mm Width 273 mm Height 150 mm Product specifications o 1 x 2 00 kW induction zone o 1 x 1 50 kW induction zone o Front touch control operation o Automatic safety cut off o Residual heat indicator o Timer o Safety lock Standard accessories o Ceramic hob scraper ...

Page 10: ... which can be found on the rating plate and the date of purchase which can be found on your sales invoice The rating plate of your hob is located on the underneath of the appliance Therefore it is a good idea to record this information before you install your appliance Model Number Serial Number Date of Purchase Ceramic hob surface layout 1 1 x 2 00 kW induction zone 2 1 x 1 50 kW induction zone 3...

Page 11: ...porate any humidity that has formed on the heating elements during transit o Do not burn off more than one zone at once o You must place a saucepan filled half full with cold water on each zone as you burn it off Otherwise the induction zone will not operate Touch controls o All operations are performed by means of the touch controls that can be found on the control panel The controls respond to t...

Page 12: ...conomical cooking technology o It works by electromagnetic vibrations generating heat directly in the pan rather than indirectly through heating the glass surface The only heat present on the glass surface is from the pan which warms it up Cooking on an induction zone o Press the ON OFF button 1 A buzzer will beep once and all the displays will show indicating that the induction hob has entered st...

Page 13: ...If the display flashes alternatively with the heat setting this means that o The pan is not placed on the correct cooking zone o The pan you are using is not suitable for induction cooking No heating will occur unless there is a suitable pan on the cooking zone o The pan is too small or not properly centred on the cooking zone The display will automatically turn off after 2 minutes if no suitable ...

Page 14: ...ng pasta 9 o Stir frying o Searing o Bringing soup to the boil o Boiling water Turning off the induction zone after cooking o Press the relevant heating zone selection button for the zone that you wish to turn off o Turn the cooking zone off by setting the power level to 0 using the plus and minus buttons 2 or by pressing both of these buttons together You should ensure that the display shows 0 o ...

Page 15: ...afety lock is turned on all the buttons except the ON OFF button 1 will be disabled o To turn the safety lock on press the safety lock button 5 The timer display will show Lo to indicate that the lock has been activated o To unlock the controls you need to ensure that the hob is turned on Then press and hold the safety lock button 5 for a few seconds The safety lock will then be deactivated Using ...

Page 16: ...ash for 5 seconds o When the set countdown time is reached the buzzer will sound for 30 seconds and the timer indicator will show Setting the timer to turn one cooking zone off You are able to link the timer to a cooking zone so after the countdown time is complete the cooking zone will turn off automatically o Turn the hob on by pressing the ON OFF button 1 o Press the relevant heating zone selec...

Page 17: ...l indicator will illuminate to show the cooking zone that has the linked timer o When the countdown time is complete the corresponding cooking zone will switch off automatically IMPORTANT If in use the other cooking zone will remain on High temperature protection o A temperature sensor in the hob can monitor the temperature inside of the hob When an excessively high temperature is detected the ind...

Page 18: ...are with a base that is suitable for induction cooking Look for the induction symbol on the packaging or on the bottom of the pan o You can check whether your cookware is suitable by carrying out a magnet test Move a magnet towards the base of the pan If it is attracted the pan is suitable for induction o If you do not have a magnet you can fill the pan with water and place it on a cooking zone If...

Page 19: ...ry quickly At very high temperatures oil and fat will ignite spontaneously which presents a serious fire risk o When food comes to the boil reduce the power level setting o Using a lid on pans will reduce cooking times and save energy by retaining the heat o Minimise the amount of liquid or fat used to reduce cooking times o Start cooking on a high power setting and reduce the power level when the...

Page 20: ... well cooked you want it Times may vary from about 2 8 minutes per side Press the steak to gauge how cooked it is The firmer it feels the more well done it will be o Leave the steak to rest on a warm plate for a few minutes to allow it to relax and become tender before serving Stir frying o Choose an induction compatible flat based wok or a large frying pan o Have all the ingredients and equipment...

Page 21: ... the surface of the hob This will allow the heat to transfer more easily o The best thickness for the bottom of the pans is 2 3 mm of enamelled steel and 4 6 mm for stainless steel with sandwich type bottoms o If these rules are not followed then there will be a great loss of heat and energy Heat not absorbed by the saucepan will spread to the hob frame and surrounding cabinets o Preferably cover ...

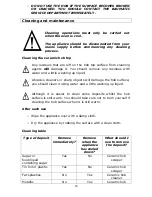
Page 22: ...aners or sharp objects will damage the hob surface you should clean it using water and a little washing up liquid Although it is easier to clean some deposits whilst the hob surface is still warm You should take care not to burn yourself if cleaning the hob surface when it is still warm After each use o Wipe the appliance over with a damp cloth o Dry the appliance by rubbing the surface with a cle...

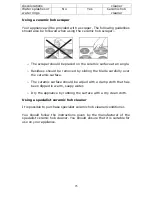
Page 23: ...idues should be removed by sliding the blade carefully over the ceramic surface o The ceramic surface should be wiped with a damp cloth that has been dipped in warm soapy water o Dry the appliance by rubbing the surface with a dry clean cloth Using a specialist ceramic hob cleaner It is possible to purchase specialist ceramic hob cleaner conditioner You should follow the instructions given by the ...

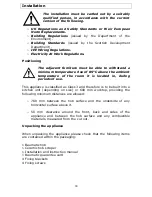
Page 24: ...ure of the room it is located in during periods of use This appliance is classified as Class 3 and therefore is to be built into a kitchen unit depending on size or 600 mm worktop providing the following minimum distances are allowed o 760 mm between the hob surface and the underside of any horizontal surface above it o 50 mm clearance around the front back and sides of the appliance and between t...

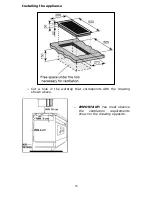
Page 25: ...25 Installing the appliance o Cut a hole in the worktop that corresponds with the drawing shown above o IMPORTANT You must observe the ventilation requirements shown in the drawing opposite ...

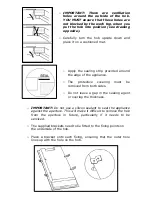
Page 26: ... appliance o The protective covering must be removed from both sides o Do not leave a gap in the sealing agent or overlap the thickness o IMPORTANT Do not use a silicon sealant to seal the appliance against the aperture This will make it difficult to remove the hob from the aperture in future particularly if it needs to be serviced o The supplied brackets need to be fitted to the fixing points on ...

Page 27: ...he rating plate corresponds with your mains supply voltage WARNING THIS APPLIANCE MUST BE EARTHED o This appliance should be wired into a 20 A double pole switched fused spur outlet having 3 mm contact separation and placed in an easily accessible position adjacent to the appliance The spur outlet must still be accessible even when your hob is located in its housing o THIS APPLIANCE MUST NOT BE CO...

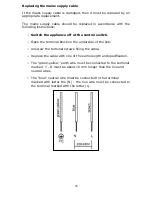
Page 28: ...witch o Open the terminal block on the underside of the hob o Unscrew the terminal screws fixing the cable o Replace the cable with one of the same length and specification o The green yellow earth wire must be connected to the terminal marked It must be about 10 mm longer than the live and neutral wires o The blue neutral wire must be connected to the terminal marked with letter the N the live wi...

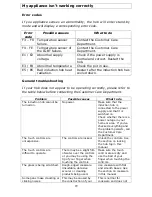
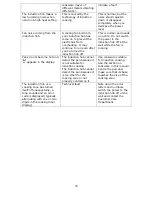
Page 29: ...b cannot be turned on No power Make sure that the induction hob is connected to the power supply and that it is switched on Check whether there is a power outage in your home or area If you ve checked everything and the problem persists call the Customer Care Department The touch controls are unresponsive The controls are locked Unlock the controls See the section on locking the hob top in this ma...

Page 30: ...b off at the wall while the fan is running Pans do not become hot and appears in the display The induction hob cannot detect the pan because it is not suitable for induction cooking The induction hob cannot detect the pan because it is too small for the cooking zone or not properly centred on it Use cookware suitable for induction cooking See the section on cookware in this manual Centre the pan a...

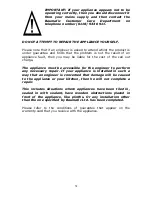
Page 31: ...for the cost of the call out charge The appliance must be accessible for the engineer to perform any necessary repair If your appliance is installed in such a way that an engineer is concerned that damage will be caused to the appliance or your kitchen then he will not complete a repair This includes situations where appliances have been tiled in sealed in with sealant have wooden obstructions pla...

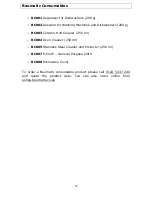
Page 32: ...g o BC003 Ceramic Hob Cleaner 250 ml o BC004 Oven Cleaner 250 ml o BC005 Stainless Steel Cleaner and Protector 250 ml o BC007 E Cloth General Purpose Cloth o BC008 Microwave Cover To order a Baumatic consumable product please call 0123 5437 244 and quote the product code You can also order online from eshop baumatic co uk ...

Page 33: ...aumatic co uk Facebook www facebook com baumatic uk Republic of Ireland Service Telephone 1 890 812 724 Spares Telephone 091 756 771 Czech Republic Baumatic CR spol s r o Lìpovà 665 460 01 Liberec 4 Czech Republic 420 483 577 200 www baumatic cz Slovakia Baumatic Slovakia s r o Galvániho 7 D Slovakia 421 255 640 618 Germany Baumatic Gmbh Bachstr 10 12 D 32 257 Bünde Deutschland 49 0 5223 99408 0 w...

Page 34: ...34 ...

Page 35: ...35 ...

Page 36: ...36 ...

Reviews: