background image

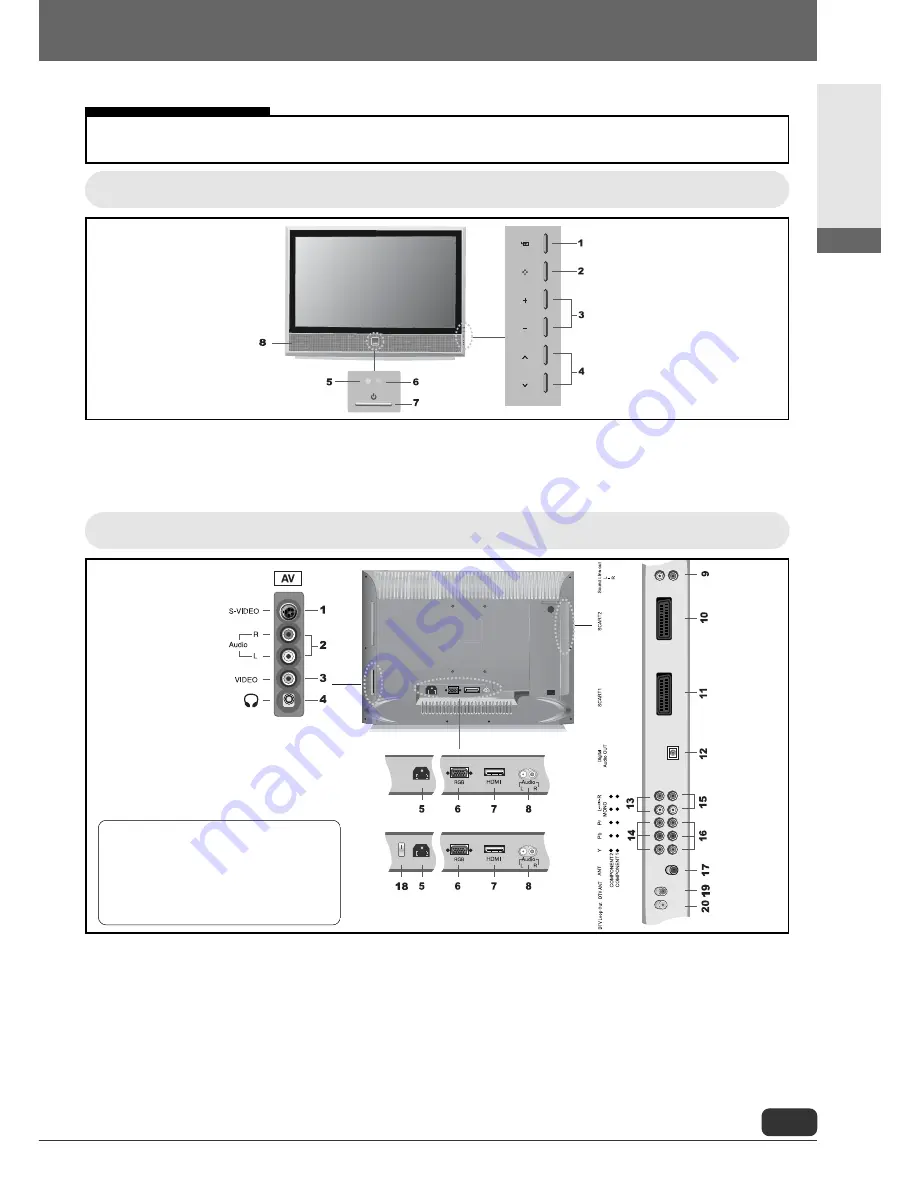
Viewing the Control Panels

English

7

Front View

Rear View

1

AV S-VIDEO Input

2

AV AUDIO Input

3

AV VIDEO Input

4

Headphone Jack

5

Power Inlet

6

Analog RGB Input (PC)

7

HDMI Input

8

Audio Input (PC)

9

Sound Line Out

10

Euro-scart Jack (SCART2)

11

Euro-scart Jack (SCART1)

12

Digital Audio Out (Optical)

- 5.1 channel sound output for Home-theater system 

through the optical cable

13

DTV/DVD Audio Input (COMPONENT2)

14

DTV/DVD Video (Y/Pb/Pr) Input (COMPONENT2)

15

DVD Audio Input (COMPONENT1)

16

DVD Video (Y/Pb/Pr) Input (COMPONENT1)

17

Antenna Input Jack

18

Power Switch (Main) (32” model only)

19

DTV Antenna (Option)

20

DTV Loop Out (Option)

1

Input source selection button

2

MENU selection button

3

Volume adjustment button

4

Channel selection button

5

Remote control sensor

6

Power Indicator

7

Power button

8

Speaker

26”

32”

Viewing the Control Panels

SPDIF OUT (Optical)

may have 

the signal compatibility problems with
certain A/V receiver and this is known
issues. Due to the problems, it may
have difficulty in output sound.

Summary of Contents for DT2620D

Page 1: ...LCD TV Operating Instructions 26 32 P N 6P9 A30 107100...

Page 2: ...eo Games 12 Connecting to a Computer 14 Connecting to External Devices with Component Input 14 Connecting the Digital Audio Output 15 Connecting Several Devices 15 Connecting Mains Cable 15 Connecting...

Page 3: ...g the Daylight Saving Time Summer Time 42 Setting the Factory Default 43 System Information 43 TV RADIO Switching 44 EPG Electronic Program Guide 44 Channel Information 44 Watching 45 Watch Current Te...

Page 4: ...002 96 EC All electric and electronic devices must be disposed of separately from household waste at publicly established facilities Avoid hazard to the environment and dangers to your personal health...

Page 5: ...proof plugs and wall outlets only If the provided plug does not fit your outlet consult an electrician to replace the outdated outlet Lay the power cable in a manner that does not obstruct anyone Make...

Page 6: ...to handle the battery to prevent leakage of the batteries and related health hazards or damage to material follow the instructions below Mind the polarity of the batteries when inserting Use only simi...

Page 7: ...rfaces Do not place the unit close to the outlets of air conditioners or heaters Make sure the unit is easily accessible from all sides Make sure that no liquids can enter the unit Avoid extreme chang...

Page 8: ...NT2 14 DTV DVD Video Y Pb Pr Input COMPONENT2 15 DVD Audio Input COMPONENT1 16 DVD Video Y Pb Pr Input COMPONENT1 17 Antenna Input Jack 18 Power Switch Main 32 model only 19 DTV Antenna Option 20 DTV...

Page 9: ...Reveal 1 2 3 4 6 5 7 8 9 10 18 19 20 21 22 23 16 17 14 15 13 12 11 1 Power On Off button 2 Numeric buttons 3 One Two Digit Channel Selection 4 Favorite Channel Selection 5 Picture Still 6 Sleep Timer...

Page 10: ...ist stored in TV EPG Display Program Guide of Digital TV CH DTV Channel Up Down CC Closed Caption On Off TEXT Display Teletext 1 2 3 4 6 5 7 8 9 10 18 19 20 21 22 23 16 17 14 15 13 12 11 1 Power On Of...

Page 11: ...h SCART Socket The unit has two SCART sockets You can connect two devices by the SCART sockets at the same time On how to select one device for display on the screen see Select Source on Page 37 1 Con...

Page 12: ...th analog and digital signals are available connect each signal to the corresponding antenna jack If only one antenna signals is available connect the signal to DTV Antenna input jack and then connect...

Page 13: ...of the unit If you connect a headset to the unit the main speaker will be switched off You can use the television set to connect camcorder and video games Use either the cinch sockets or one of the S...

Page 14: ...nd connect the cable to the output socket of the external device Connecting Camcorders and Video Games by SCART Cable Use a SCART cable with a SCART plug on one end and AV plugs on the other end 1 Plu...

Page 15: ...x Connect the audio and video cables from the external equipment s output jacks to the TV input jacks as shown in the figure When connecting the TV to external equipment match the jack colors Connecti...

Page 16: ...n be applied if there is the HDMI Output connector on the external device Connecting to the HDMI Connection Connecting Mains Cable Connecting Several Devices What is HDMI High Definition Multimedia In...

Page 17: ...energy However when misused or not used according to the intention they may leak In extreme cases there is a danger of explosion or fire Therefore please understand that the manufacturer will not be...

Page 18: ...does not consume any power You can adjust various settings of the unit to adapt it to your requirements Settings Switching On Setting up for Operation Switching Off Settings If it is not explicitly s...

Page 19: ...he desired menu Or 4 Press or to select the desired sub menu 5 Press or to set the desired sub menu 6 Press to move one menu level up 7 Press or to select the desired setting 8 Press to activate the d...

Page 20: ...n menu press several times 2 Press or and select INSTALL 3 Press or and select AUTO TUNING 4 Press 5 Select the country where you want to operate the unit 6 Press or to select the desired setting 7 Pr...

Page 21: ...red setting 6 Press to save the settings The following settings are available Auto PAL SECAM NTSC The automatic tuning function sets the unit automatically to the received signal This is why the menu...

Page 22: ...s manually 1 Press To return to the main menu press several times 2 Press or and select INSTALL 3 Press or and select PROGRAMME 4 Press or and select the desired channel 5 Press or and select MANUAL T...

Page 23: ...eral times 2 Press or and select INSTALL 3 Press or and select PROGRAMME 4 Press or and select the desired channel 5 Press or and select NAME 6 Press 7 Press or to select the desired letter 8 Press or...

Page 24: ...xit Weak Signal Boost On Off Improve Signal Quality Set Channel Use this function to improve poor signal quality 1 Press To return to the main menu press several times 2 Press or and select INSTALL 3...

Page 25: ...o reduce picture noise 1 Press To return to the main menu press several times 2 Press or and select OPTION 3 Press or and select NOISE REDUCTION 4 Press 5 Press or to select the desired setting 6 Pres...

Page 26: ...l times Set Wide Screen Format Use this function to display programms broadcast in wide screen format 1 Press To return to the main menu press several times 2 Press or and select SETUP 3 Press or and...

Page 27: ...Normal The format 16 9 is suppressed The format 4 3 is not adapted a black area is displayed on the left and the right Full The format 16 9 is displayed as broadcast The format 4 3 is horizontally spr...

Page 28: ...cture mode Custom 1 Press To return to the main menu press several times 2 Press or and select PICTURE 3 Press or to select the desired menu 4 Press to open the desired menu 5 Press or to select the d...

Page 29: ...press several times 2 Press or and select AUDIO 3 Press or and select BALANCE 4 Press 5 Press or to select the desired setting 6 Press to save the settings Set volume 1 Press To return to the main men...

Page 30: ...a better surround sound For this the SRS WOW technology is used is a registered trademark 1 Press To return to the main menu press several times 2 Press or and select AUDIO 3 Press or and select SRS W...

Page 31: ...ss 5 Press or to select the desired setting 6 Press to save the settings The following settings are available Main You will hear the sound of the main screen Sub You will hear the sound of the small s...

Page 32: ...to the time broadcast by the station 1 Press To return to the main menu press several times 2 Press or and select TIMER 3 Press or and select UPDATE PR 4 Press or and select the desired channel 5 Pres...

Page 33: ...2 Press or and select TIMER 3 Press or and select OFF TIMER 4 Press 5 Press or and select ON or OFF 6 Press or and select AM for times between 00 00 hours and 12 00 hours or PM for the times between 1...

Page 34: ...it Switch Off if no Key is Pressed This function switches the unit automatically off if no key is pressed for a longer time 1 Press To return to the main menu press several times 2 Press or and select...

Page 35: ...ess several times 2 Press or and select OPTION 3 Press or and select OSD SETTING 4 Press 5 Press or and select OSD TRANSPARENCY 6 Press or to select the desired setting 7 Press to save the settings Yo...

Page 36: ...r Activate Child Lock on page34 and select OFF Use this function to set the character set for teletext to your region 1 Press To return to the main menu press several times 2 Press or and select OPTIO...

Page 37: ...emory Digital Tuner setup is done through a submenu available by pressing the setup button on the bottom left corner of the remote control Do not press the menu key located in the centre of the remote...

Page 38: ...button to select the Physical Number Frequency box Use the to activate either the Physical number or Frequency setting mode the active mode is indicated by a black dot on the right of the box Enter th...

Page 39: ...rey showing it has been disabled 6 Alternatively press the button on an already disabled channel to enable it the selected channel then turns Green showing it has been enabled 7 Press the EXIT button...

Page 40: ...button to add a channel to the favorite channel and press again to delete the channel from the favorite channel If a channel is added to favorite channel the colour of the channel number is changed t...

Page 41: ...or the signal which carries age limit information Changing the Password 1 Press the SETUP button 2 Press the button to select SYSTEM and press the OK button The SYSTEM menu is displayed with Parental...

Page 42: ...ption by pressing the button and press the OK button to change the setting The following options are available Opacity1 Opacity2 Opacity3 Opacity4 5 Press the EXIT button to return to the previous men...

Page 43: ...the following order NSW ACT New South Wales ACT VIC TAS Victoria Tasmania QLD Queensland SA South Australia WA Western Australia NT Northern Territory Auto Time Zone 5 Press the EXIT button to return...

Page 44: ...turing date 1 Press the SETUP button 2 Press the button to select SYSTEM and press the OK button 3 Press the button to select About and press the OK button This information is necessary when you downl...

Page 45: ...al from service providers If the channel does not carry any signal on the guide data this function may not work properly 2 Press the button to select channel Then you can see current or next programme...

Page 46: ...ess to switch the sound on again Press or to scroll through the channels Switch to Last Channel Use this function to toggle between the last two channels you have watched 1 Press Show Channel Informat...

Page 47: ...ly want to watch specific subjects On how to store channels as your favourites see Channel Groups on page 24 1 Press 2 Press repeatedly until you select the desired channel Use this function to select...

Page 48: ...ch Second Picture Off 1 Press several times Toggle Sound between Main Screen and Sub Screen 1 Press Display Two Pictures at the same Time 1 Press several times This function is only available if you h...

Page 49: ...vailable if the current station broadcasts teletext 1 Press to display teletext Teletext is not available for PIP The following settings are available Cancels the current function Opens a sub page if...

Page 50: ...inutes the unit will switch off 1 Press until the desired number of minutes is displayed Use this function to adjust the picture optimally to the content 1 Press until the desired mode is displayed Fo...

Page 51: ...ed For further information on the settings refer to Adjust Individual Audio Frequencies on page 28 Use this function to turn the stereo sound on or off 1 Press The displays controls the processing and...

Page 52: ...roperly connected Check whether a signal source is selected See chapter Select Source on page 37 and Select Input on page 46 Check wether the sound is set to mute or if it is turned down See chapter S...

Page 53: ...resolution or the frequency of the graphic board in the computer cannot be displayed Change the settings in the computer Check wether the connecting cable is properly connected to the computer and the...

Page 54: ...or Max Resolution RF Input Video Input Audio Input HD Component Input Y Pb Pr PC Input 15Pin D sub Headphone Jack a Si TFT Active Matrix LCD 16 9 1366x768 16M 480i P 576i P 720P 1080i PAL SECAM BG DK...

Page 55: ...Settings 54 Memo Memo...

Reviews: