Installation and Maintenance Manual: RLVAC
Published February 2022
37
9. For the first installation of a new belt, tighten until the spring side of the tension indicator is
aligned with the very end of the indicator window (indicated by “maximum tension” in Figure 25:
Tension Indicators). The belt will stretch during its initial run-in period and setting a higher initial
tension will reduce the number of times it needs to be re-tensioned.
Do not exceed the “maximum tension” indicator setting for the relevant belt splice type.
Damage to the belt or belt splice may result.
10. After tensioning the new belt, check and adjust the tension after an initial run-in period of 4 hours.
Use care if the conveyor will be heavily loaded during this first 4 hour run-in period. If
the belt tension drops too far, it can slip on the drive pulley, which will damage the belt
facing if the slippage is not immediately corrected. For applications where heavy loads
are expected immediately after belt installation, it may be necessary to monitor and re-
tension the belt one or more times during the run-in period.
11. For adjusting tension or re-tensioning an existing belt, tighten until the tension indicator is within
the raised portion of the indicator window (indicated by “target tension” in Figure 25: Tension
The tension indicators will only display correct tension when the belt is at rest and
unloaded. When the belt is moving with a load on the conveyor, belt tension will read
lower than its actual (static) value.
12. Measure between the tension indicator and the edge of the drive frame on each side of the drive.
If the takeup carriage is not square to the frame, this distance will be different on one side. Adjust
and correct until the distances are equal.
13. Lock the takeup screws in place by tightening the takeup jam nuts on each side.
14. Snug the sleeve jam nuts against the spring sleeves on each side. Do not overtighten or the ends
of the spring sleeves can be damaged.
15. Reinstall the takeup guards and the yellow access panels that were removed in section 5.5.1.
16. Once the conveyor is running, check belt tracking through the drive. If adjustments are
necessary, it is recommended to adjust the tracking bracket on the non-motor side only for easier
access.
17. If the belt is not centered when it enters at the drive pulley, it will be necessary to fix the belt
tracking upstream, typically at the infeed tail.
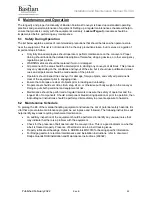
Figure 23: Screw Takeup Drive Belt Routing


