background image


- 43 - 


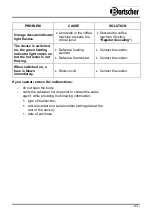
PROBLEM 

CAUSE 

SOLUTION 

Orange descale indicator 
light flashes. 

 Limescale in the coffee 

machine exceeds the 
critical level.  

 Descale the coffee 

machine (Section: 

“Regular descaling“

The device is switched 
on, the green heating 
indicator light comes on 
but the hot water is not 
flowing. 

  Defective heating 

element  

  Defective thermostat. 

  Contact the vendor. 


  Contact the vendor. 

When switched on, a 
fuse is blown 
immediately. 

  Short-circuit 

  Contact the vendor. 

If you cannot remove the malfunctions: 

-


do not open the body, 

-


notify the customer service point or contact the sales 
agent, while providing the following information:  

  type of malfunction;  

  article number and serial number (rating plate at the 

rear of the device); 

  date of purchase.  


Summary of Contents for Aurora 22

Page 1: ...Aurora 22 190157 Original Gebrauchsanleitung V1 1018...

Page 2: ...520 405 390 150 215...

Page 3: ...8 6 11 9 5 1 7 2 3 4 10 9...

Page 4: ...3 Transport packaging and storage 31 3 1 Delivery check 31 3 2 Packaging 31 3 3 Storage 31 4 Technical data 32 4 1 Technical specification 32 4 2 Overview of parts 34 5 Installation and operation 35 5...

Page 5: ...essible for anyone carrying out the installation servicing maintenance or cleaning Please keep these instructions and give them to future owners of the device 1 Safety This device is designed in accor...

Page 6: ...and information aimed for effective and trouble free device operation 1 2 Safety instructions The device can be used by children 8 years and up as well as by people with disabilities and those with li...

Page 7: ...the device Do not attempt to repair the device yourself Do not use any accessory or spare parts that have not been recommended by the manufacturer These can be dangerous for the user or lead to damag...

Page 8: ...ed by customer service or a qualified electrician in order to avoid dangers The supply cable must be disconnected from the socket only by pulling the plug Never carry or lift the device by the supply...

Page 9: ...tions below to avoid the hazard During the brewing a small amount of hot steam is produced To avoid burns be careful when removing the thermos pump jug from the lower plate Drain the water from the wa...

Page 10: ...is used for its intended purpose and according to the instructions included in this manual The coffee machine is intended only for preparing brewed filter coffee beverages using ground coffee filter a...

Page 11: ...by violation of advice concerning operation and cleaning use other than designed alterations made by user use of inadequate spare parts We reserve the right to make technical changes for purposes of...

Page 12: ...er The outer and inner packing material should be removed completely from the device before installation If you liked to dispose the packing consider the regulations applicable in your country Supply...

Page 13: ...Thermo pump jug Number 1 Material stainless steel Capacity 1 9 litres Brewing time 8 minutes for 1 9 litres Maximum brewed amount 0 5 litres Max output 12 cups ON OFF switch Control rocker switch Ind...

Page 14: ...ter paper 250 90 L 1000 Filter papers per box Basket filter paper 250 90 S 250 Filter papers per box Code No 190014 Code No 190015250 Thermo pump jug 1 9L ST Capacity 1 9 liters Code No 190117 Fast de...

Page 15: ...sert 6 Water tank 7 Bottom plate 8 Thermo pump jug 9 RESET button 10 Power cable 11 Water drain screw Indicator lights Green heating indicator light indicates that the coffee machine is brewing coffee...

Page 16: ...onment Never place the device on the flammable surfaces Place the device so that the plug is easily accessible and can be quickly removed from its socket in case of necessity Connection DANGER Electri...

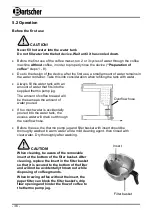
Page 17: ...rewed will be the same as the amount of water poured If too much water is accidentally poured into the water tank the excess water will drain out through the overflow hose Before the use the thermo pu...

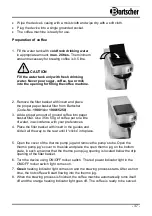
Page 18: ...offee per one litre of water in accordance with your preferences 4 Place the filter basket with insert in the guides and slide it all the way to the rear until it clicks into place 5 Open the cover of...

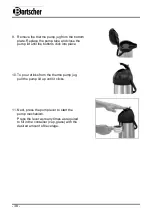
Page 19: ...ump lid until the buttons click into place 10 To pour drinks from the thermo pump jug pull the pump lid up until it clicks 11 Next press the pump lever to start the pump mechanism Press the lever as m...

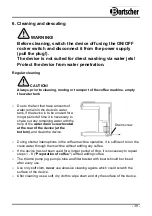
Page 20: ...to shake out any remaining water with the help of the water drain screw located at the rear of the device at the bottom and clean the device o During shorter interruptions in the coffee machine operat...

Page 21: ...proper operation and quality of brewed coffee cannot be ensured o If it is not possible to clean the coffee machine immediately it is still possible to brew several pots of coffee before descaling o...

Page 22: ...t may scratch the surface of the thermo pump jug Use only a soft cloth for cleaning Never place the thermo pump jug in a dishwasher Never place the thermo pump jug in water Open the pump lid of the th...

Page 23: ...t the red power indicator light in the ON OFF rocker switch has not come on Incorrectly connected plug The power supply fuse is blown Defective indicator light Defective switch Connect plug correctly...

Page 24: ...t water is not flowing Defective heating element Defective thermostat Contact the vendor Contact the vendor When switched on a fuse is blown immediately Short circuit Contact the vendor If you cannot...

Page 25: ...the device at the dedicated local collection point separately from household waste NOTE Electric devices should be used and disposed of properly to prevent the impact on the environment Disconnect the...

Reviews: