background image

Tech 500                                          

User Guide rev1.0  

                                            JUNE  2013 


22 


TOOLKIT 

Program Sensor 

 
Access to program Aftermarket sensors. For more information, please log into the 
tools.bartecusa.com account. 
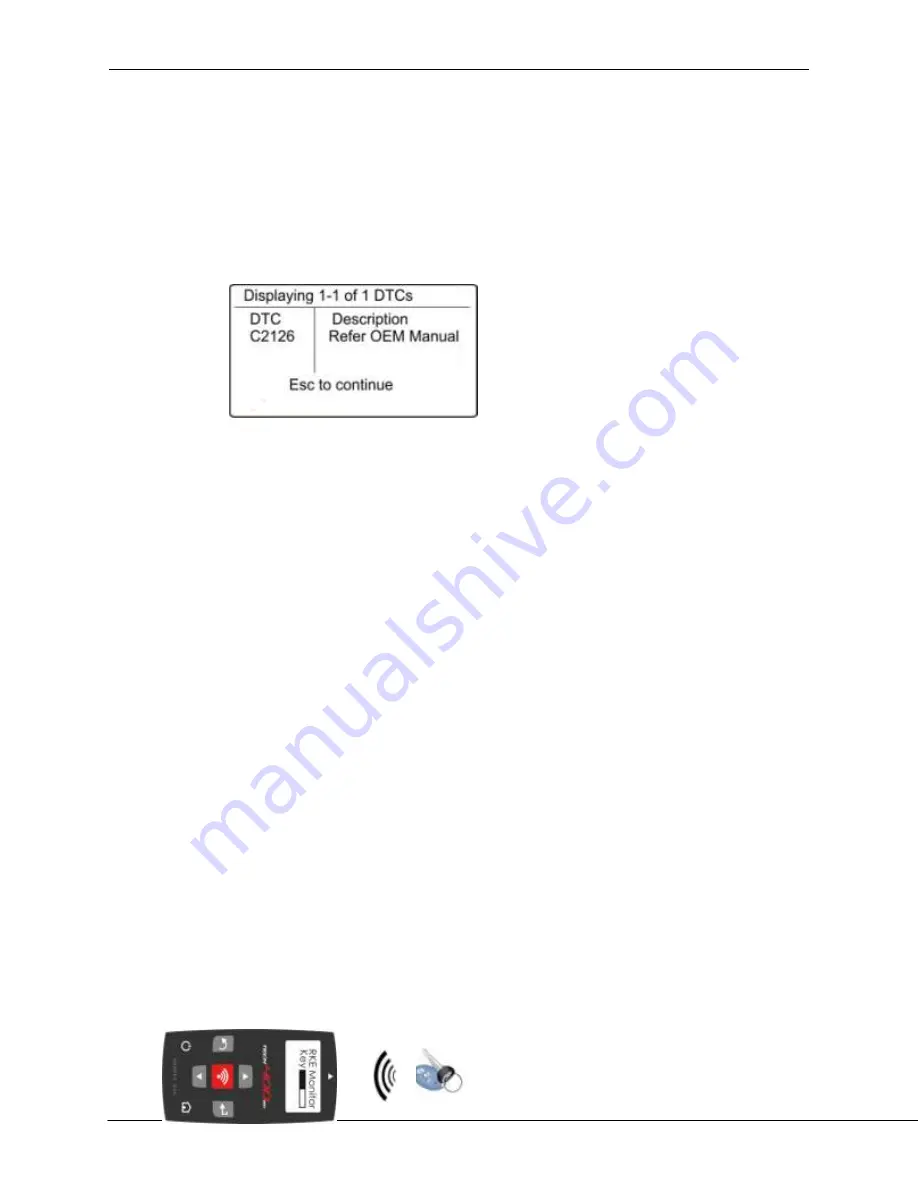


RKE Test 

 
Once the Screen appears as below, hold the Key Fob as shown, and press the function buttons 
on  the  FOB.  The  Tech500  will  check  only  for  a  signal  present.  Verifying  the  Key  Fob  is 
transmitting is important when performing relearn processes that use the Key Fob. 


Summary of Contents for Tech500

Page 1: ...H RELEARN REVIEW DATA TOOLKIT MY TOOL 11 TOOL POSITIONING READING A SENSOR 20 UPDATING YOUR TOOL PC 29 UPDATING YOUR TOOL SD Card 32 UPDATING YOUR TOOL Wireless APPENDIX A INDUCTIVE CHARGING APPENDIX...

Page 2: ...e customer informed of any changes that might affect the tools performance FCC Compliance Model DSW FCC ID SX8T500 IC 5736A T500 Contains FCC ID QOQWT12 IC 5123A BGTWT12A Contains FCCID YOPGS1011MIP I...

Page 3: ...is equipment generates uses and can radiate radio frequency energy and if not installed and used in accordance with the instruction manual may cause harmful interference to radio communications Operat...

Page 4: ...rocess your registration which can take up to 24hrs once submitted Update your Tool Once your tool is registered verify the software level loaded to the level available online and update your tool if...

Page 5: ...is powered up using the ON OFF key On Off Key To power the unit on press the On Off Key for approx 2 seconds the display will light showing a logo and software version The unit will then display the...

Page 6: ...off is after 5 minutes of inactivity The unit automatically powers up when the charger or USB port is in use auto power off is not operational CHARGING TOOL NOTICE Only use the power supply or USB ca...

Page 7: ...t the factory For optimum performance always keep your Tech500 sufficiently charged It is recommended that you charge the tool 2 hours before first use The charge port is located on the right side of...

Page 8: ...a computer Once communication has been established results data can be viewed on the pc via the Mass Storage Device feature Use the PC explorer program HTM File When the USB lead is removed the USB i...

Page 9: ...n there is an insufficient amount of power remaining in the battery the Tech500 will flash its battery icon for two seconds save all of the TPM Data and then power itself off Results Data Available In...

Page 10: ...nnect your tool to the PC using the supplied USB Cable MENU SYSTEM The Tech500 s menu system provides a hierarchy of instructions and commands The top line of the display will always indicate the curr...

Page 11: ...current menu ENTER Key Navigates to the next menu or actions the currently selected item Back ESC Key Navigates to the previous menu item All menus wrap around The enter key will primarily move to a s...

Page 12: ...ould select the vehicle make model and year Used when relearning the sensor ID s to the vehicle 3 Review Data This item is a sub menu pressing the Enter Key will take the user to the results screens P...

Page 13: ...and decoded but does not match the protocol for the Make Model Year that the tool was set up for Failed Sensor Read No Sensor Activation or Decode May be wrong sensor fitment or non functioning sensor...

Page 14: ...h getting a status of the vehicle prior to service by verifying the sensors are working and when supported verify the Diagnostic Trouble Codes DTC To verify year use 10th digit of the VIN Vehicle Oper...

Page 15: ...ll prompt user to connect to OBD and retrieve Diagnostic Trouble Codes The Tech500 has the ability to Read out vehicle DTCs Diagnostic Trouble Codes Once read you will need to reference these codes wi...

Page 16: ...a series of functions on the vehicle to place the vehicle into this mode Once the vehicle is in Learn Mode using your Tech500 to activate the sensors the vehicle will listen for the sensor IDS and lea...

Page 17: ...n the ON position Start vehicle and ensure light is off To verify year use 10th digit of the VIN Follow on screen instructions Vehicle Operations Screen Active Drive Relearns Active or Drive Relearns...

Page 18: ...modes Once 4 TPM ID s are stored within the Tech500 it can be connected to the OBD interface using the provided cable Vehicle Operations Screen Home Test Before You Touch Relearn Review Data Toolkit M...

Page 19: ...comes up during the COMS process Refer to Appendix F for COMS error trouble shooting Indirect system Vehicle may require calibration at point of service or replacement No wheel sensors on this type o...

Page 20: ...Capture all 4 ID s Turn ignition to ON Plug OBDII Cable and select Write ID s to Vehicle Leave vehicle in the ON position Start vehicle and ensure light is off To verify year use 10th digit of the VI...

Page 21: ...ct access to specific screens that display the TPM data No menu page name is provided instead the screen provides all of the TPM Data available from the TPM Type read this may include TPM ID Hexadecim...

Page 22: ...tion please log into the tools bartecusa com account RKE Test Once the Screen appears as below hold the Key Fob as shown and press the function buttons on the FOB The Tech500 will check only for a sig...

Page 23: ...is used for advanced diagnostics to determine if our signals may be causing issues during sensor activation and vehicle relearns MY TOOL Settings TPM ID Select whether the tool displays the TPM ID in...

Page 24: ...r French Profile Allows user to select the profile For more information visit the tools bartecusa com site Tool Info Gives the operator the ability to reference Software Version currently loaded Build...

Page 25: ...cess refer to UPDATE TOOL section of User Guide Usage Gives the operator the ability to track the number of Power Cycles Sensor Activations OBD Relearns Support On screen reference for Bartec USA Tech...

Page 26: ...tool should be placed alongside the valve stem and the Test key pressed Note with Ford Banded sensor s the tool should be held 180 away from the stem Magnet Activated Sensors If the TPM requires a mag...

Page 27: ...for a successful read different makes of TPM respond at different speeds time intervals Sensor activation can be aborted at any time by pressing the BACK key When the activation is aborted the user w...

Page 28: ...sensor or have been supplied the wrong sensor If you get a during testing verify the MMY you have selected as well as the sensor part number that was fitted Sensor Not Found Response If the search per...

Page 29: ...your USB cable to the computer ONLY Make sure computer is on and you have no programs running Power the Tech500 on and from the Main Menu Select My Tool then select Update Tool Tool will prompt user t...

Page 30: ...paste Drag and Drop the Update file MFU provided to you into the Removable Disk Window Once Transfer is complete disconnect tool Step 4 The tool will now load the file update to the operating system O...

Page 31: ...must request to be part of the SD card program Step 1 Remove OLD SD card Making sure not to mix Insert the NEW SD card Power the Tech500 On and From the Main Menu Select Update Tool Step 2 The tool wi...

Page 32: ...Tech 500 User Guide rev1 0 JUNE 2013 32 UPDATING YOUR TOOL Wireless...

Page 33: ...tant not to accidentally press the enter key on the tool at the same time as connecting to the pc The Tech500 will produce a single file for each type of TPM Part that has been read and a separate rec...

Page 34: ...ormat that displays not only information regarding the TPM s but also automatically updates with the date It provides data entry typing areas for other tester and vehicle data Leaving Audit Mode To le...

Page 35: ...using the Tech500 it is important to verify the Model Year you are working on to help insure that you are looking for that proper sensor and are using the proper vehicle COMs when necessary 10 Digit i...

Page 36: ...ehicle s Model Year Refer to that vehicle s VIN and locate the 10th digit from the left Take that digit and reference the chart on this sheet This will be the Model Year that you will want to select o...

Page 37: ...l might have 2 or 3 possible sensor variations to accommodate high and low pressure ranges frequency etc 3 I just rotated the vehicle s wheels Do I need to re learn the sensors to the vehicle Answer Y...

Page 38: ...Type of LF signal that wakes Schrader Style Sensors Modulated Wave A patterned LF signal that is designed for specific sensors UHF Ultra High Frequency 315 and 433 92 MHz what the sensor transmits Re...

Page 39: ...light comes on and stays on for an extended period of time this would be a pressure problem Check the tire pressures and adjust to placard NOTE Some vehicles are equipped with sensors in the spare Als...

Page 40: ...rder for vehicle COMS process to complete Check cable to tool connection Insure the cable is connected at the DB15 and thumb screws are finger tight Check cable connection at vehicle Make sure OBDII c...

Page 41: ...u access to Technical Information on the website that may assist you with your current issue Sensor Part Number if you have installed 1 or more sensors to this vehicle please have the part number read...

Page 42: ...onger Claims of all defects must be submitted within 30 days of occurrence and verified by an authorized Bartec representative To obtain service for your Bartec tool the purchaser must obtain a Return...

Page 43: ...ht Damage Decals Overlays or Decorative Items Misuse or misapplication or failure to follow the directions or failure to follow cautions or warnings on product operation service guides etc Minor stres...

Page 44: ...ations or improvements without any obligation to install the same on previously sold or delivered products It is expressly agreed that the liability of Bartec is limited and we do not function as an i...

Page 45: ...____________________ Serial Number ________________________________ Model _______________________________________ Email Address ________________________________ User name _____________________________...

Reviews: