


15
R
elaint
1500 M
anual
3
Preparing for Operation
Once the Streamfeeder Reliant 1500 Universal Friction Feeder is in-
stalled on your inserter, you are then ready to prepare the machine for
operation. To do so, you must perform several adjustments with the
material you are going to be feeding. And, you must do a test run with
this material to verify that it is set correctly before you begin cycling
the inserter.
You will have to perform this procedure for material that
you plan to feed.
The adjustments you must make (in order) are as follows:
1: Gate assembly adjustment
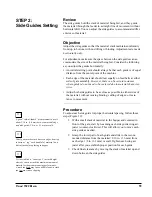
2: Side guides setting
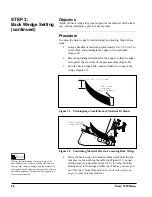
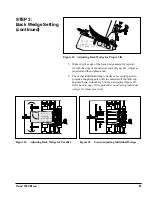
3: Back wedge setting
4: Photo sensor setting
!
!
!
When performing initial feeder adjustments
prior to operation, always make sure you turn
Off the main power switch and disconnect
the inserter from the electrical power source.
Failure to do so can expose you to a potential
start-up, and therefore moving parts which
can cause serious injury. In steps 1–3, do the
same for the feeder.
Do not attempt to make any adjustments while
the feeder(s) and inserter are running. Failure
to do so can expose you to moving parts which
can cause serious injury. Do not wear loose
clothing when operating the feeder.
Avoid making adjustments with loose or
unsecured parts. This can potentially damage
parts.
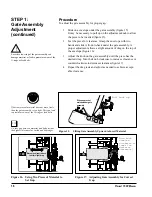
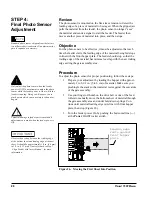
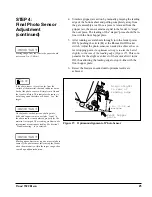
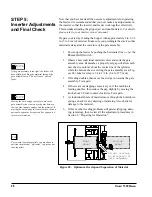
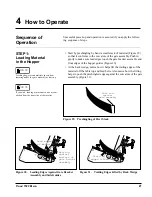
STEP 1:
Gate Assembly
Adjustment
Review
The gate assembly provides the curvature to help preshingle mate
-
rial and provides the proper gap to help the feed belts pull material
through the gate assembly area — one at a time. The downward pres
-
sure (or weight) of the stack in the hopper will provide the force to
help push the material against the curvature of the gate assembly, and
help it contact the feed belts. This preshingling will allow the gate as
-
sembly to separate (and singulate) material as it moves toward the gap.
To achieve the optimum separation, you have to use the adjustment
knob to either increase (clockwise) or decrease (counter-clockwise)
the gap between gate assembly and the feed belts. Depending on the
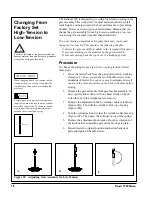
characteristics of the material you are using, you may have to change
the gate assembly from the factory-set
high
spring tension to a
low
spring tension. See “Changing from Factory Set High-Tension to
Low-Tension” to follow (page 17).
Objective
Adjust the gate assembly for minimum gap, with minimum pressure
on the material. Your objective is to adjust the clearance so that a
single piece of material passes without resistance. The optimum set
-
ting should be a gap adjustment of 1.5 thickness of material.
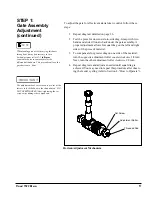
Review
NO TE
NO TE
Keep in mind that the gate assembly works with
the wedge to provide the proper lift, curvature of
the material, and proper belt/material contact to
separate and feed one piece at a time.
Hopper refers to the space where the material is
stacked (made up of the side guides).
IMPOR TANT
Feeding problems will occur with either too
much pressure on the material, or too large a gap
between the gate assembly and the material.
Summary of Contents for Thiele Technologies Streamfeeder Reliant 1500
Page 1: ...Manual Reliant 1500 ...
Page 12: ...6 Reliant 1500 Manual ...
Page 36: ...30 Reliant 1500 Manual ...
Page 46: ...40 Reliant 1500 Manual ...
Page 49: ...43 Relaint 1500 Manual 8 Electrical Schematics 120V Electrical Schematic ...
Page 50: ...44 Reliant 1500 Manual 240V Electrical Schematic ...
Page 51: ...45 Relaint 1500 Manual 120V Electrical Schematic with Vacuum Select ...
Page 52: ...46 Reliant 1500 Manual 240V Electrical Schematic with Vacuum Select ...
Page 53: ...47 Relaint 1500 Manual 9 Mechanical Components ...
Page 57: ...51 Relaint 1500 Manual ...
Page 59: ...53 Relaint 1500 Manual ...
Page 61: ...55 Relaint 1500 Manual ...
Page 65: ...59 Relaint 1500 Manual ...
Page 67: ...61 Relaint 1500 Manual ...
Page 69: ...63 Relaint 1500 Manual ...
Page 70: ...64 Reliant 1500 Manual ...
Page 71: ......
Page 72: ... 2009 Thiele Technologies Inc Streamfeeder Printed in the USA ...


