background image

1.  
2.  

3.  
4.  
5.  
6.  

7.  

8.  

DHCP Hostname

When DHCP is the chosen protocol it is possible to indicate the Hostname 
of the DHCP server to be sent in the DHCP request. It's an optional field.

IP Address

It is the fixed IP address of the RetailPlayer device. The IP address is the unique 
identifier of a device on a network, in case of static assignment make sure that no 
other device on the same network has the same IP address assigned to the 
RetailPlayer

Netmask

In addition to the IP address, it is mandatory to provide information about the 
subnet mask. The subnet mask indicates which bits in the IP address are used 
for the network portion and which bits for the host portion. It is common in Class 
C LAN to see 255.255.255.0, this configuration indicates that the first 3 octets of 
the IP address (e.g. 

.100) are dedicated to the network identification, 

192.168.1

while the last octet (e.g. 192.168.1.

) is dedicated to the host identification on 

100

the network

Gateway IP Address

The Gateway IP is the address of the device that bridges your Local Area 
Network with the Internet. Typically is a router where devices on a LAN are 
connected. For using the RetailPlayer in all its cloud-based features, but also to 
receive a stream from an internet radio in stand-alone mode, for example, it is 
essential to provide this address. If you are not sure about the Gateway address 
in your network contact your network administrator

Network Settings - Wireless

RetailPlayer devices are equipped with 2x USB ports in the front panel that can be used for a WiFi Dongle to be connected, in this way the device 
can connect to the network wirelessly. It is necessary to configure the wireless parameters to access the WiFI network. 

To connect your RetailPlayer to a wireless network:

Insert your WiFi USB dongle in one of the USB ports (no matter which one you choose)
Refresh the web user interface from your web browser or if your device was powered off, power it on. You should now see an indication 
stating "not configured" close to the WIRELESS label
Select the SSID to which you intend to connect to from the drop-down list
Set the Security protocol to WPA
Insert the password for the SSID selected
The method for IP assignment is set to DHCP, in the firmware version 5.3.0, static IP assignment is not available for the WLAN interface. 
Make sure that also the Ethernet method is set to DHCP or your device will not connect to the wireless network
Click on Submit at the bottom of the page. The device will apply the configured settings and will reboot. After reboot, the WiFi status 
should be connected, indicated by a green dot next to the WIRELESS label. Visit also the Status page of the web UI and locate the 
Wireless settings, here you can check the IP address configured on the device, mark it down if you intend to access the device via WiFi

Switch off the RetailPlayer and detach the Ethernet cable, power it back on, wait until boot process is over (if Sonic IP is on it will 
announce its IP address over the audio output) and verify that the wireless connection is fully working

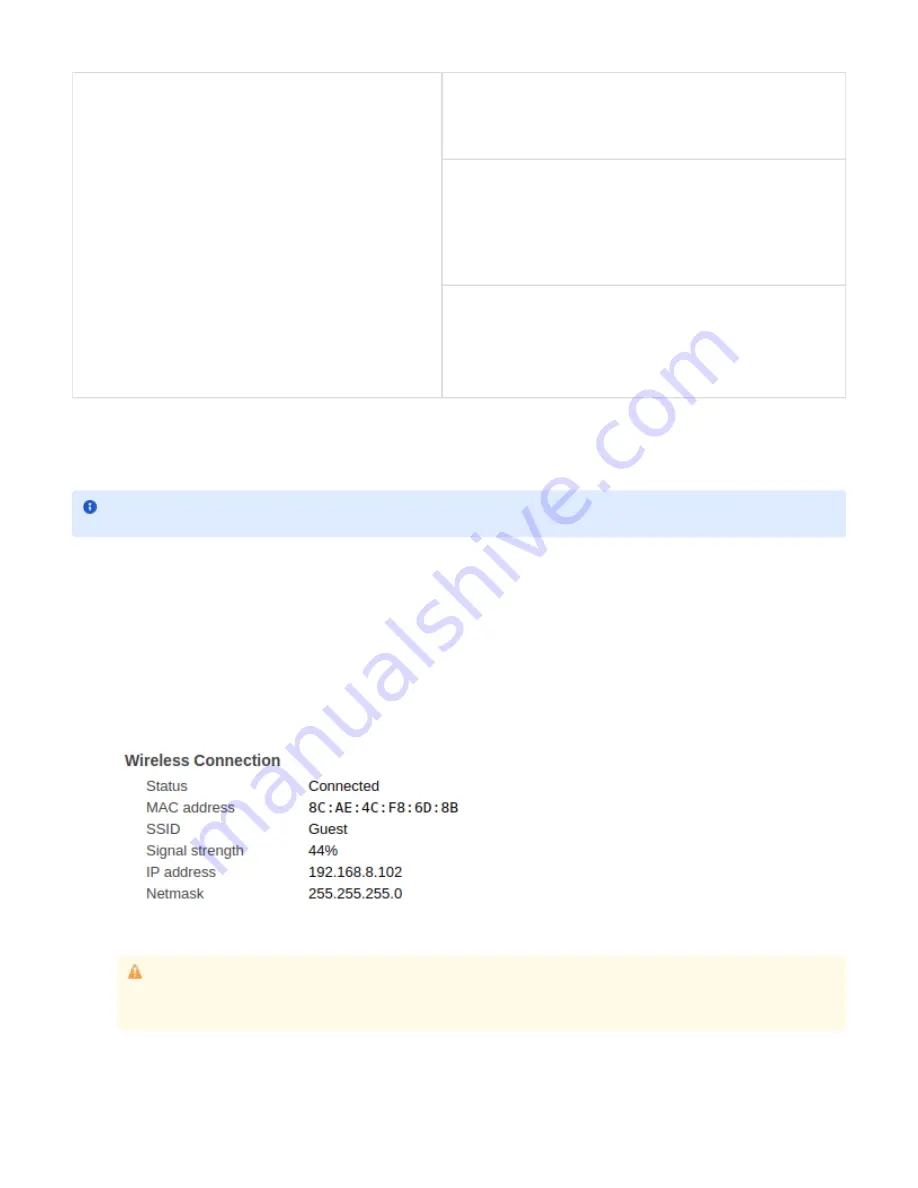
When the device connects correctly to a wireless network it will be indicated in the web UI as follow:

NOTE: RetailPlayer devices are compatible with the Realtek RTL8188EU chipset. 

 for the full list of compatible vendors and 

Click here

product IDs.

While it is possible to use DHCP or Static IP methods for assigning an IP address at the Ethernet (wired) interface of the 
RetailPlayer it is not possible to do the same with the wireless interface, which supports only the DHCP method. If you run your 
RetailPlayer using solely Wireless connection (no Ethernet cable plugged), make sure to set the Ethernet method field to DHCP, f
ailing in doing so will result in the impossibility to connect your device to the wireless network.

Summary of Contents for Retail Player S400

Page 1: ...Defaults Page Reset to factory defaults Soft reset Reboot Page The RetailPlayer Portal Portal Login Devices management Device registration Device Settings Device Control Device Status Automation Opening Hours Scheduler Weekly Streaming Channel Scheduler Asset Scheduler Trigger Sets Remote Control Channel Management Create a new channel Channel Lists Add channel lists IMPORTANT How to play only tra...

Page 2: ...e when the RetailPlayer is first operated In stand alone mode the RetailPlayer devices do not connect to the Portal and are configured singularly via their own web user interface It is possible to configure a device in Portal or stand alone mode in its web user interface Applications RetailPlayer is suitable for Distributing background music e g in retail stores restaurants gyms hotels etc Radio d...

Page 3: ...igured audio streams or channels and connecting to the amplification system In the following chapters are described in detail their physical connections and their web user interface s functions Both the S400 and SP400 are ultra compact and sturdy devices that can be easily installed anywhere by almost anyone Little maintenance is required The MTBF Mean Time Between Failures value of 200 000 hours ...

Page 4: ...it 44 1kHz stereo big endian CPU Barix IPAM400 processor module Quad Core ARM Cortex A7 User Interface Web user interface for configuration RetailPlayer management Portal Memory 2GB DDR3 SDRAM 16MB SPI Flash 8GB SD Card Flash Power requirements 5VDC 10 Watt max IEEE802 3af PoE Dimensions 78mm x 70mm x 26mm 3 07 x 2 76 x 1 02 Weight 140g Connecting the RetailPlayer S400 SP400 The RetailPlayer offer...

Page 5: ...nic IP announced If you are using S400 connect the power cable to the power connector The device will boot as soon as the current is flowing Listen to the Sonic IP announced Boot is finished when the LED is solid green Portal connection established or blinking Portal connection not established but device is ready Retrieve the IP address using the Discovery Tool Other than the Sonic IP function the...

Page 6: ...ortal mode which means that its configuration is managed by the Portal In the following paragraphs the settings and the different sections of the web user interface are described The Settings Page As soon as the web user interface is accessed it visualizes the SETTINGS page The window is organized in The top navigation bar settings status logs defaults update reboot In addition on the top right co...

Page 7: ... be indicated in the main URL field Player Volume In Portal mode the volume is set from the Portal Only available in stand alone mode It sets the output audio volume in percentage from 0 to 100 Main URL In Portal mode the Main URL is set from the Portal s channel configuration Only available in stand alone mode It is the URL from which the device expects an incoming stream to be played The device ...

Page 8: ...are downloaded by the device one by one when the channel list is assigned to the device in the Portal If a channel list is already assigned the failover tracks can be modified in real time and the device will update the tracks when the user saves the modified channel list The maximum number of failover tracks supported per each channel list is 200 Network Settings Ethernet In this area it is possi...

Page 9: ...f the USB ports no matter which one you choose Refresh the web user interface from your web browser or if your device was powered off power it on You should now see an indication stating not configured close to the WIRELESS label Select the SSID to which you intend to connect to from the drop down list Set the Security protocol to WPA Insert the password for the SSID selected The method for IP ass...

Page 10: ...in Auto the DHCP server will provide the address of a DNS server to contact for the IP name resolution process DNS Manual If DNS is set to Manual the device expects the Primary and Alternative DNS server fields to be filled with the related information When Ethernet IP method is set to Static DNS will always be set Manual and it is mandatory to provide the address information Primary DNS and Alter...

Page 11: ...e to associate an IP Address to the DN or an IP Address It is possible to check the system time in the Status page of the device or from the Portal status page NTP is used to set the time only at device boot when the connection with the Portal is established the time is set by the Portal where it is also possible to choose the Time Zone where the device is installed to set the time accordingly Sec...

Page 12: ...n the settings page This is the stream with the highest priority if it is received it will overlap any other stream currently playing Main stream The main stream URL configured on the settings page Failover stream The failover stream URL configured on the settings page Current playback volume The playback volume of the player currently set If the device is used in Portal mode the volume is set fro...

Page 13: ... interface to the network IP Address The current IP address of the Ethernet interface Netmask The subnet mask on which the device is operating Wireless Connection Status Shows if the device is connected via the Ethernet interface to the network MAC Address Media Access Control address This is the hardware address of the wireless interface of the inserted WiFi USB dongle SSID The Service Set Identi...

Page 14: ...e web user interface Reset to factory defaults Hard reset On the RetailPlayer device It is also possible to perform a hard reset A hard reset will revert all settings to factory defaults including the network settings To perform a hard reset locate the reset button on the front panel of the RetailPlayer device and keep it pressed for approximately 10 seconds using a sharp pointed tool while the de...

Page 15: ...n be forced by power cycling the RetailPlayer device At boot the device will look for the new firmware version and if it sees the value on the Portal changed it will update the firmware accordingly In the Portal is possible to set an automatic FW update by selecting from the drop down menu a x release i e Firmware 6 x In this way any release that will be available within the Firmware version 6 x w...

Page 16: ... indication bar will show up indicating the upload process completion Wait until the process is finished don t disconnect power supply during this operation Once the upload is complete the device will reboot automatically Reload the page or click the home link to go back to the home page ...

Page 17: ... pressed in for 34 seconds after the device is powered Release the button the rescue process starts The device restarts and the LED will blink orange indicating a FW update downgrade process is in progress When the LED will turn green blinking or steady reboot the device Your device now is reset to default to the last Firmware released Reboot Page This page is dedicated to the reboot of the Retail...

Page 18: ...port of QR codes More details are provided in the upcoming chapters The Portal is accessible using a web browser at https manage barix com Portal Login When purchasing the RetailPlayer solution get in touch with Barix Support team or with your local distributor to receive support barix com your RetailPlayer Portal credentials required to login In the Login area enter the credentials The first time...

Page 19: ...ualize the name of the logged user It is possible to assign a user to multiple organizations and give to the same user different permissions to access or not the areas on the Portal If a user is assigned to more than one Organization Continue the reading to learn more about how users and organizations are handled Devices management The Devices button gives access to the device list All the registe...

Page 20: ...r Online the device successfully established a connection with the Portal It s possible to monitor its status and control the playback Offline the device is not connected with the Portal If it was connected at least once in the past the reported information are the last ones reported before disconnecting if it was never connected there is no reported information or status In this state the device ...

Page 21: ...introduced in FW 6 2 make sure to update your players to see this information Volume Device volume indication in visible when overlaying the icon with the mouse Device not connected with the Portal if the device was ever connected the mouse overlay shows the last reported volume NAME This column shows the device s name it is the default sorting used in the table Clicking on the arrow it is possibl...

Page 22: ...ted Give a Name to the device and if needed write a note about it Select the time zone the device is running in Complete the registration Device Settings After the registration the user goes into the Device Settings to finalize the configuration of the device just being added the same section can be used to modify the configuration of an existing device ...

Page 23: ...e playback sequence is random and looped the files must be present in the USB root folder for the device to be able to play them This playback source has priority over anything else configured in the Portal including audio files scheduled main and fallback streams failover tracks but not on Priority URL Organization Assign the device to an organization this field cannot be empty Channel list Assig...

Page 24: ...Indicates which resource is playing among a stream that can be set locally on the Player to play an RTP or HTTP Priority URL stream i e for paging purposes when Play from USB is enabled audio clips scheduled to play Local USB Event Main URL Indicates no resource is playing Fallback URL Failover Track None ACTIVE STREAM Indicates the currently playing stream or track for the track is shown the ID o...

Page 25: ...eed in case the stream that is playing fails The max size is 60s TIME ZONE Indicates the time zone retrieved from the device settings tab LOCAL TIME Indicates the actual device local time as configured in the Settings tab of the device Automation The automation tab is where the user can find The opening hours scheduler Configured at the DEVICE level means it has to be configured for every single d...

Page 26: ...ive Use the mouse to switch between green and gray drag n drop vertically on each day to switch between green on or gray off Use the buttons all or none to switch the playback on or off To apply the settings click on in the top right corner to confirm Weekly Streaming Channel Scheduler This function allows the possibility to trigger the playback of specific streaming channels to play at specific t...

Page 27: ...ings Asset Scheduler The weekly asset scheduler in the device section allows the possibility for store managers to view the schedule activity for the selected device and eventually change the assigned schedule picking it up from the list of Schedules configured for the same organization To see how to create an Asset Schedule and assign it to multiple devices visit this chapter When overlay over th...

Page 28: ... to be used The QR Code can have a name it can be scanned directly on the screen after creation or it can be sent via email to the user that requires access simply click on the email icon to enter the email details It s possible to enable or disable the access from a QR Code link by using the corresponding flag on the left side of the QR Code name The QR Code reports the last access timestamp and ...

Page 29: ... case the main URL is not reachable or down for any reason Once the settings are defined click on SAVE in the upper right corner When configuring channels always remember that RetailPlayer can deal with the following audio algorithms MP3 Decoding MP3 MPEG 1 Audio Layer III or MPEG 2 Audio Layer III MP2 MPEG 1 Audio Layer II or MPEG 2 Audio Layer II AAC Decoding Formats m4a and aac Profiles LC low ...

Page 30: ...Y ONLY TRACKS This flag has been introduced in Portal release 3 2 1 When flagged and SAVE all the RetailPlayer devices that are playing the corresponding Channel List will switch to play Fallback Tracks only It essentially avoid the devices to parse the streams and play only tracks This way it is possible to create playlists of music tracks up to 200 To go back to play streams un flag and SAVE If ...

Page 31: ...cks in the list At this point the Tracks are being downloaded by the RetailPlayer devices if any is set to play this channel list Wait for all the tracks to be downloaded on the players It is possible to monitor the status from the Device tab Status Report PLAYLIST TRACKS In the Channel List area click on PLAY ONLY TRACKS All the RetailPlayer devices configured to play this channel list will play ...

Page 32: ... section to open the Audio Files Manager Audio Files Manager The audio files manager window shows all the audio files uploaded for the organization currently browsed In the below example the ORG is Davide s Office and the files listed are part of this ORG The big button on the top upload files here allows to upload files from the local PC where the Portal is accessed Audio Files format supported m...

Page 33: ...llowed to play the schedule How to schedule audio files Upload your audio files in the Audio Files Manager Access the Audio Files Scheduler and click on the ADD button to add a new schedule If a schedule was already created and has to be modified simply select the desired schedule from the drop down menu Assign the Scheduler a name Choose an Asset from the drop down menu The files uploaded in the ...

Page 34: ...gate to the device and Audio Files from the left side navigation menu From this tab clicking on the button the user can go to the schedule assigned From the drop down menu is possible eventually to select another schedule to be assigned to the device where the user is making modifications It s important that the schedule is always in the same ORG of the device where the schedule must run When a sc...

Page 35: ... and Audio Files Triggers Click on ADD or if a set is already created select it from the drop down menu and click on EDIT Assign a Name to the SET Click on to add a new BUTTON up to 10 buttons can be added to a set Click on CONFIGURE ME to open the editing area of the selected button For each button is possible to assign a name this will also be displayed on the UI of the remote control app and an...

Page 36: ...the streams main fallback and failover tracks but not over the priority URL if configured and the USB Tracks PLAY from USB function active Organizations management This chapter and the following are dedicated to organizations and user management thus the administration side of the Portal RetailPlayer s platform is organized in a way that users are given configurable permissions to control organiza...

Page 37: ...licking on Users The user list table gives an overview of the user s details LOGIN the username used for login in the Portal NAME the user s last name FIRST NAME the user s first name EMAIL the user s email address Click on any row to edit the information of the corresponding user Add new user Click on in the top right bar to add a new user and fill out the corresponding fields in addition create ...

Page 38: ...ilege to see the DEVICE STATUS panel in the device editing section Device Remote Control Gives the user the privilege to see the REMOTE CONTROL panel in the device editing section and allows the user to add remote controls Channel Admin Gives the user the privilege to see the Channel Menu Item which allows managing channels Channel List Admin Gives the user the privilege to see the Channel List Me...

Page 39: ...tically a complete computer system and could run any software there is no way to download and run malware Since the firmware is a closed package that only accepts Barix software SSH or Shell connection is not possible hence the installation of 3rd party software is not possible The only application running on the device is the RetailPlayer software changing this is not possible To catch any virus ...

Page 40: ...vices are covered under the Barix Terms Conditions and our Privacy Policy Please follow the Safety and Precaution Recommendations Barix is a ISO 9001 2015 certified company All rights reserved All information is subject to change without notice All mentioned trademarks belong to their respective owners and are used for reference only ...

Reviews: