background image

8

C. 

Apply fenestrated drape and complete sterile field preparation.

5. 

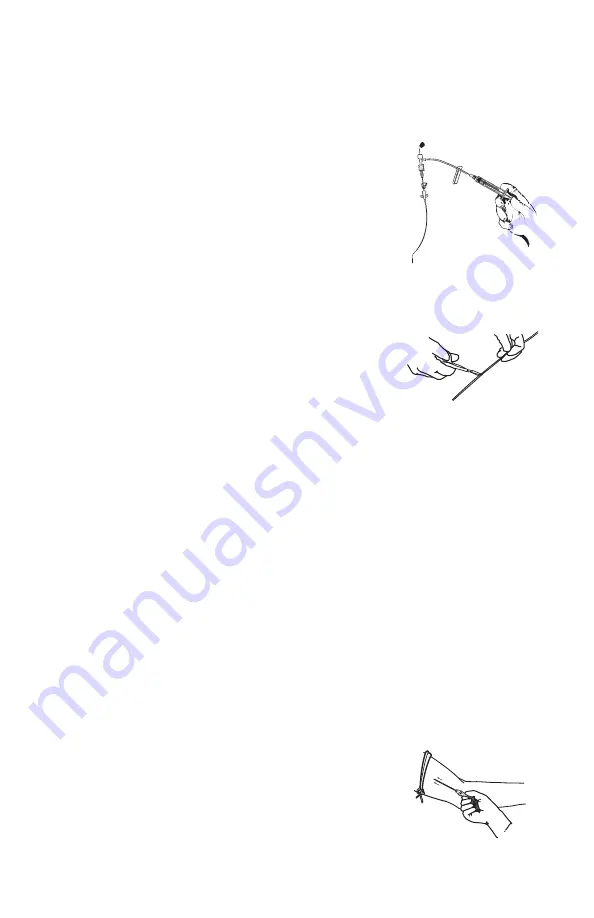
Pre-flush the Catheter

           Caution: 

Do not clamp extension leg when stylet or stiffening wire is in catheter to 

minimize the risk of component or catheter damage.

           Caution:

 Catheter stylet must be wetted prior to stylet 

repositioning or withdrawal.

A. 

Attach a prefilled syringe to the luer attachment on the    

      T-Lock extension set.

B. 

Pre-flush all catheter lumens with sterile saline to wet 


  hydrophilic stylet.

C. 

Remove the syringe after pre-flushing.

6. 

Modification of Catheter Length


WARNING:

 Do not use the catheter if there is any evidence of mechanical damage 

or leaking. Damage to the catheter may lead to rupture, fragmentation, possible 

embolism, and surgical removal.


NOTE:

 Catheters can be cut to length if a different length 

is desired due to patient size and desired point of insertion 

according to hospital protocol. Catheter depth markings 

are in centimeters.

A.  Measure the distance from the zero mark to the desired tip location.

B.  Disconnect the T-Lock from the catheter luer connector.

C.  Withdraw the entire T-lock connector/stylet assembly as one unit.

           Caution: 

Catheter stylet must be wetted prior to stylet repositioning or withdrawal.

D.  Retract the stylet to well behind the point the catheter is to be cut.

           Caution:

 Do not allow accidental device contact with sharp instruments. Mechanical 

damage may occur. Use only smooth edged, atraumatic clamps or forceps.

E.  Using a sterile scalpel or scissors, carefully cut the catheter according to institutional  

  policy, if necessary.

           Caution:

 The stylet or stiffening wire needs to be well behind the point the catheter 

is to be cut. NEVER cut the stylet or stiffening wire.

F.  Inspect cut surface to assure there is no loose material.

G.  Re-advance the T-lock connector/stylet assembly. Assure stylet tip is intact.

H.  Lock the T-Lock connector to the catheter hub.

I.  Gently retract the stylet through the locked T-lock connector until the stylet tip is  


  contained inside the catheter.

           WARNING: 

Ensure that the stylet tip does not extend beyond the trimmed end of 

the catheter. Extension of the stylet tip beyond the catheter end may result in vessel 

damage, stylet damage, difficult removal, stylet tip separation, potential embolism 

and/or risk of patient injury.

7.  Perform Venipuncture

A.  Anesthetize with local anesthesia as required.

B.  Insert the safety introducer needle into the desired vein. 

Summary of Contents for PowerMidline

Page 1: ...1 Instructions For Use BARD...

Page 2: ...or past treatment will prevent proper device stabilization and or access Warnings General Warnings When using alcohol or alcohol containing antiseptics with polyurethane midlines care should be taken...

Page 3: ...dure for a particular patient A suitable trained clinician is responsible for evaluat ing the health status of a patient as it pertains to a power injection procedure Failure to warm contrast media to...

Page 4: ...the dose Do not infuse against resistance To reduce potential for blood backflow into the catheter tip always remove syringes slowly while injecting the last 0 5 mL of sterile saline Do not reinsert n...

Page 5: ...round any part of the catheter s tubing shaft or extension legs If using sutures to secure catheter USE THE SUTURE WINGS and make sure they do not occlude puncture or cut the catheter Do not use sciss...

Page 6: ...Erosion Through the Skin Catheter Embolism Catheter Occlusion Catheter Related Sepsis Exit Site Infection Exit Site Necrosis Extravasations Fibrin Sheath Formation Hematoma Heparin Induced Thrombocyto...

Page 7: ...lease tourniquet D Assess the selected vein to ensure the vessel size is adequate to accommodate the catheter being placed 2 Patient Position Catheter Measurement A Position the arm at a 90 angle B Fo...

Page 8: ...tylet assembly as one unit Caution Catheter stylet must be wetted prior to stylet repositioning or withdrawal D Retract the stylet to well behind the point the catheter is to be cut Caution Do not all...

Page 9: ...nit to prevent the needle from damaging or shearing the guidewire F Advance the small sheath and dilator together as a unit over the guidewire using a slight rotational motion If necessary a small inc...

Page 10: ...Stabilize the catheter position by applying pressure to the vein distal to the introducer sheath B Withdraw the introducer sheath from the vein and away from the site C Split the introducer sheath an...

Page 11: ...er to Instructions For Use on the proper use and removal The StatLock Stabilization Device should be monitored daily and replaced at least every seven days Caution The catheter must be secured in plac...

Page 12: ...be tween hub and wings Chevron anchor tape on top of transparent dressing Tape Strip Securement Procedure Single Lumen 1 Place 1st anchor tape over wings or bifurcation 2 Cover site and 1st anchor tap...

Page 13: ...emperature prior to power injec tion may result in catheter failure Warning Use of lumens not marked Power Injectable for power injection may result in catheter failure G Complete power injection stud...

Page 14: ...LLER THAN 10 mL TO FLUSH AND CONFIRM PATENCY Patency should be assessed with a 10 mL or larger syringe with sterile saline Upon confirmation of patency administration of medication should be given in...

Page 15: ...nd Toxic Reactions Adverse Events During Infusion Therapy Symposium University of California 1993 2 Findlay Steven R et al Hyperosmolar Triggering of Histamine Release from Human Basophils Journal of...

Page 16: ...daccess com Clinical Information 1 800 443 3385 USA Email medical services crbard com STERILIZE Manufacturer Do Not Re Use Non Pyrogenic Reorder Number Lot Number Do Not Re sterilize Length Use By Ste...

Reviews: