background image

6. Configuration Schemes

6.8

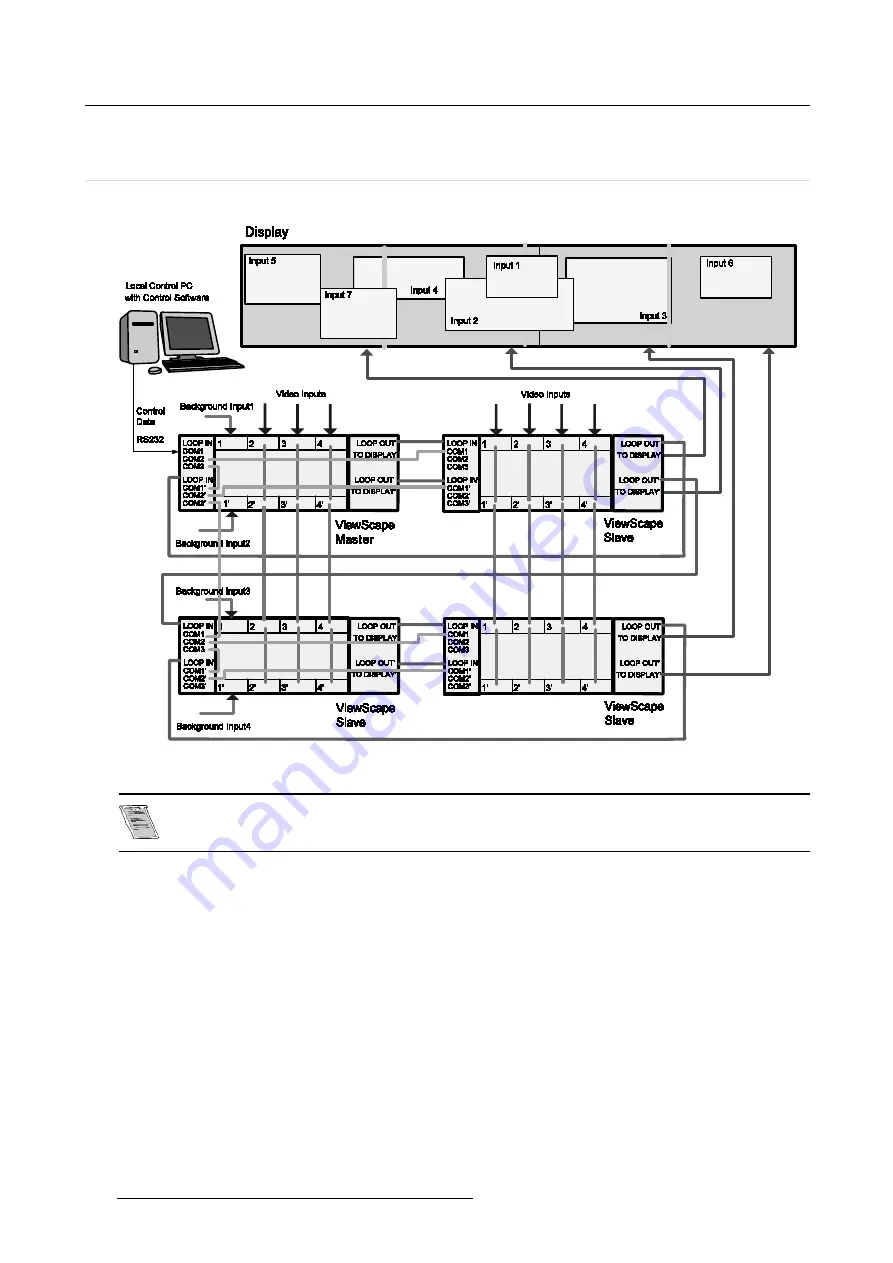
Chained – Stacked configuration with overlapped

background

Scheme

Image 6-8
Chain-stacked configuration with overlapped background

The input types of the upper digitizer must correspond with the inputs on the lower dig-
itizer.

How to set up communication

1. Connect the RS232 communication port of the local control PC with the COM1 RS232 input port of the

master ViewScape Digitizer (upper digitizer).

2. Connect COM2 of upper digitizer of master ViewScape digitizer with COM1 of upper digitizer of next

slave ViewScape digitizer.

3. Connect COM3 of upper digitizer of master ViewScape digitizer with COM1’ of lower digitizer of master

ViewScape digitizer.

4. Connect COM2’ of lower digitizer of master ViewScape digitizer with COM1’ of lower digitizer of next

slave ViewScape digitizer.

5. Connect COM3’ of lower digitizer of master ViewScape digitizer with COM1 of upper digitizer of first

slave ViewScape in the stack.

6. Repeat step 2, step 3 and step 4 for the stack chain of the configuration.

32

R5976474 VIEWSCAPE DIGITIZER 26022003

Summary of Contents for R9851590

Page 1: ...EVENTS VIEWSCAPE DIGITIZER R9851590 OWNERS MANUAL 26022003 R5976474 00 ...

Page 2: ...Barco nv Events Noordlaan 5 B 8520 Kuurne Phone 32 56 36 89 70 Fax 32 56 36 88 24 E mail events barco com Visit us at the web www barco com Printed in Belgium ...

Page 3: ...rantee relating to perfect manufacturing as part of the legally stipulated terms of guarantee On receipt the purchaser must immediately inspect all delivered goods for damage incurred during transport as well as for material and manufacturing faults Barco must be informed immediately in writing of any complaints The period of guarantee begins on the date of transfer of risks in the case of special...

Page 4: ......

Page 5: ...20 5 Cables and accessories for the ViewScape Digitizer 21 5 1Cables and accessories 21 6 Configuration Schemes 23 6 1Stand alone configurations without background 23 6 2Stand alone configurations with overlapped background 23 6 3Stand alone configurations with hard edged background 24 6 4Chained configuration without background 26 6 5Chained configuration with overlapped background 27 6 6Chained ...

Page 6: ...Table of contents 2 R5976474 VIEWSCAPE DIGITIZER 26022003 ...

Page 7: ...en replacement of the defective parts must be undertaken immediately Protect the power data cords from being walked on or pinched particularly at plugs convenience re ceptacles and the point where they exit from the apparatus Replace damaged power data cords immediately Only use attachments accessories specified by the manufacturer Disconnect the power to this apparatus during lightning storms or ...

Page 8: ...UST be earthed In order to protect against risk of electric shock the installation should be properly grounded Defeat ing the purpose of the grounding type plug will expose you to the risk of electric shock This apparatus must be grounded earthed via the supplied 3 conductor AC power cord If the supplied power cord is not the correct variant consult your dealer Power system It is recommended to us...

Page 9: ...he wall outlet does not exceed 15 amperes Cabinet openings Never push objects of any kind into this product through cabinet slots as they may touch dangerous high voltage points or short out parts that could result in a risk of fire or electrical shock Never spill liquid of any kind on the product Should any liquid or solid object fall into the cabinet unplug the set and have it checked by qualifi...

Page 10: ...1 Safety 6 R5976474 VIEWSCAPE DIGITIZER 26022003 ...

Page 11: ...m With analog and digital outputs which allow for the control of displays as well as built in control software the ViewScape gives you control over everything from basic set up to configuration and advanced feature control The ViewScape Digitizer is a generic device This means that a number of combinations can be made Devices can be chained in order to generate more windows on the output 8 windows...

Page 12: ...utput resolution Z order control Instant modification of Z order control for each output window Window Positioning Intuitive positioning interface Soft edge Soft edge overlap and soft edge blending Connectors RS 232 RJ 11 Ethernet RJ 45 Effects Anamorphic imaging Chroma keying per input Alpha keying per input Z order control Windowing View ports Ruggedness IP 10 Dimensions ViewScape 486 x 482 x 10...

Page 13: ...2 Introduction 2 4 Dimensions of the ViewScape Digitizer Dimensions Image 2 2 Dimensions ViewScape R5976474 VIEWSCAPE DIGITIZER 26022003 9 ...

Page 14: ...2 Introduction Image 2 3 Dimensions ViewScape font side 10 R5976474 VIEWSCAPE DIGITIZER 26022003 ...

Page 15: ...it and lead to the possibility of overheating The ViewScape Digitizer should operate from an AC power source The ViewScape Digitizer is equipped with Power Supply Autoranging from 85 to 264 volt 50 60 Hertz When installed in a rack the mounting should be such that no hazardous condition is achieved due to uneven mechanical loading When the mains switch located on the back of the ViewScape Digitize...

Page 16: ...pper digitizer E2 COM1 RS232 input lower digitizer F1 COM2 RS232 chaining input upper digitizer F2 COM2 RS232 chaining input lower digitizer G1Loop in upper digitizer G2Loop in lower digitizer H1COM3 RS232 stacking output upper digitizer H2COM3 RS232 stacking output lower digitizer I1 TCP IP Ethernet LAN connector upper digitizer I2 TCP IP Ethernet LAN connector lower digitizer 12 R5976474 VIEWSCA...

Page 17: ...RS232 output port for communication links to other digitizers in stack configuration I1 I2 TCP IP Ethernet LAN connector For future use 3 3 Removing and inserting a ViewScape Digitizer input module There is no need to switch off the ViewScape Digitizer to remove or insert an input mod ule The input modules are hot swappable How to remove an input module from the ViewScape Digitizer 1 Push in the r...

Page 18: ...3 Physical Installation of the ViewScape Digitizer Maximum two HDSDI input modules may be inserted in one ViewScape Digitizer 14 R5976474 VIEWSCAPE DIGITIZER 26022003 ...

Page 19: ...urce DVI data in 162 MHz pixel clock Resolution from VGA to UXGA 60 Hz DVI compliant DVI loop through Amber LED upper LED on the front side will be lit indicating module start up When placed in an input slot the green LED lower LED on the front side will be lit indicating that the system acknowledges the module Image 4 1 Image 4 2 Order info Article No Description R9850960 ViewScape Digitizer DVI ...

Page 20: ...film either continuous or intermittent film detection When placed in an input slot the green LED lower LED on the front side will be lit indicating that the system acknowledges the module Image 4 3 Image 4 4 Order info Article No Description R9850970 ViewScape Digitizer SDI input module 4 3 HDSDI input module Maximum two HDSDI input modules may be inserted in one ViewScape Digitizer 16 R5976474 VI...

Page 21: ...TE 274M o 1920x1080 29 97 1 1 SMPTE 274M o 1920x1080 25 1 1 SMPTE 274M o 1920x1080 24 1 1 SMPTE 274M o 1920x1080 23 98 1 1 SMPTE 274M Interlaced o 1920x1035 60 2 1 SMPTE 260M o 1920x1035 59 94 2 1 SMPTE 260M o 1920x1080 60 2 1 SMPTE 274M o 1920x1080 59 94 2 1 SMPTE 274M o 1920x1080 50 2 1 SMPTE 274M o 1920 1080 50 2 1 1250 SMPTE 295M o 1920x1080 24 Segmented SMPTE 274M o 1920x1080 23 98 Segmented ...

Page 22: ...m acknowledges the module Image 4 7 Image 4 8 Order info Article No Description R9850920 ViewScape Digitizer CVBS S VID input module 4 5 YUV RG s B input module Technical info Component Video BNC R Y 0 7Vpp 3dB 75 Ohm termination Ys 1Vpp 3dB 0 7V Luma 0 3V Sync 75 Ohm termination B Y 0 7Vpp 3dB 75 Ohm termination RG s B BNC R 0 7Vpp 3dB 75 Ohm termination G s 1Vpp 3dB 0 7Vpp G 0 3Vpp Sync 75 Ohm t...

Page 23: ...XGA and UXGA version available Amber LED upper LED on the front side will be lit indicating recognition of film either continuous or intermittent film detection When placed in an input slot the green LED lower LED on the front side will be lit indicating that the system acknowledges the module Image 4 11 Image 4 12 Order info Article No Description R9850950 ViewScape Digitizer RGB analog SXGA inpu...

Page 24: ...4 7 Dummy input module Technical info Dimensions 103 x 181 x 41 W x D x H Image 4 13 Image 4 14 Order info Article No Description R9850930 ViewScape Digitizer dummy input module 20 R5976474 VIEWSCAPE DIGITIZER 26022003 ...

Page 25: ...3 Z3498421 RJ12 SUBD adapter image 5 4 R9827560 Data cable with SUBD connectors for RS232 connection between local control PC and COM1 RS232 input port of the master Digitizer image 5 5 Z3499209 One meter data cable with MDR connectors Used to make a connection between the LOOP OUT connector of the previous Digitizer and the LOOP IN connector of the next Digitizer image 5 6 R9851210 Five meter dat...

Page 26: ...5 Cables and accessories for the ViewScape Digitizer Image 5 4 Image 5 5 Image 5 6 Image 5 7 Image 5 8 22 R5976474 VIEWSCAPE DIGITIZER 26022003 ...

Page 27: ... upper digitizer to the LOOP IN of the lower digitizer 4 Connect the OUTPUT from the upper digitizer with the projector input of the first screen 5 Connect the OUTPUT from the lower digitizer with the projector input of the second screen 6 Provide the available video sources to the upper digitizer input modules 7 Loop all input through from the upper digitizer to the lower digitizer 8 Configure th...

Page 28: ... input of the first screen 5 Connect the OUTPUT from the lower digitizer with the projector input of the second screen 6 Provide the available video sources to the upper digitizer input modules 7 Connect the first background source to an input of the upper digitizer 8 Connect the second background source to the equivalent input of the lower digitizer 9 Loop all input through from the upper digitiz...

Page 29: ...tizer with the projector input of the first screen 5 Connect the OUTPUT from the lower digitizer with the projector input of the second screen 6 Provide the available video sources to the upper digitizer input modules 7 Connect the first background source to an input of the upper digitizer 8 Connect the second background source to the equivalent input of the lower digitizer 9 Connect this input fr...

Page 30: ... of upper digitizer of master ViewScape digitizer with COM1 of lower digitizer of master ViewScape digitizer 4 Connect COM2 of lower digitizer of master ViewScape digitizer with COM1 of lower digitizer of next slave ViewScape digitizer How to set up the looping 1 Connect LOOP OUT of upper digitizer of master ViewScape digitizer with LOOP IN of upper digitizer of next slave ViewScape digitizer 2 Co...

Page 31: ...ut of the second screen 3 Provide the available video sources to the upper digitizer input modules of the master and the slave ViewScape digitizer 4 Loop all input with a video source connected too through from the upper digitizer to the lower digitizer 6 5 Chained configuration with overlapped background Scheme Image 6 5 Chained configuration with overlapped background The input types of the uppe...

Page 32: ...e ViewScape digitizer with the LOOP IN of the lower digitizer of the master ViewScape digitizer 3 Connect LOOP OUT of the lower digitizer of the master ViewScape digitizer with the LOOP IN of the lower digitizer of the next slave ViewScape digitizer How to set up the source and screen connection 1 Connect the OUTPUT from the upper digitizer of the last slave ViewScape digitizer with the projector ...

Page 33: ...ext slave ViewScape digitizer How to set up the looping 1 Connect LOOP OUT of upper digitizer of master ViewScape digitizer with LOOP IN of upper digitizer of next slave ViewScape digitizer 2 Connect LOOP OUT of upper digitizer of last slave ViewScape digitizer with the LOOP IN of the lower digitizer of the master ViewScape digitizer 3 Connect LOOP OUT of the lower digitizer of the master ViewScap...

Page 34: ...ed configuration without background Scheme Image 6 7 The input types of the upper digitizer must correspond with the inputs on the lower dig itizer How to set up communication 1 Connect the RS232 communication port of the local control PC with the COM1 RS232 input port of the master ViewScape Digitizer upper digitizer 2 Connect COM2 of upper digitizer of master ViewScape digitizer with COM1 of upp...

Page 35: ...tizer in the stack 5 Repeat step 1 step 2 and step 3 for the stack chain of the configuration How to set up the source and screen connection 1 Connect the OUTPUT from the upper digitizer of the last slave ViewScape digitizer in the first chain with the projector input of the first screen 2 Connect the OUTPUT from the lower digitizer of the last slave ViewScape digitizer in the first chain with the...

Page 36: ... 2 Connect COM2 of upper digitizer of master ViewScape digitizer with COM1 of upper digitizer of next slave ViewScape digitizer 3 Connect COM3 of upper digitizer of master ViewScape digitizer with COM1 of lower digitizer of master ViewScape digitizer 4 Connect COM2 of lower digitizer of master ViewScape digitizer with COM1 of lower digitizer of next slave ViewScape digitizer 5 Connect COM3 of lowe...

Page 37: ... in the first chain with the projector input of the second screen 3 Connect the OUTPUT from the upper digitizer of the last slave ViewScape digitizer in the second chain with the projector input of the third screen 4 Connect the OUTPUT from the lower digitizer of the last slave ViewScape digitizer in the second chain with the projector input of the fourth screen 5 Provide the available video sourc...

Page 38: ...of the local control PC with the COM1 RS232 input port of the master ViewScape Digitizer upper digitizer 2 Connect COM2 of upper digitizer of master ViewScape digitizer with COM1 of upper digitizer of next slave ViewScape digitizer 3 Connect COM3 of upper digitizer of master ViewScape digitizer with COM1 of lower digitizer of master ViewScape digitizer 4 Connect COM2 of lower digitizer of master V...

Page 39: ... upper digitizer of the last slave ViewScape digitizer in the second chain with the projector input of the third screen 4 Connect the OUTPUT from the lower digitizer of the last slave ViewScape digitizer in the second chain with the projector input of the fourth screen 5 Provide the available video sources to the upper digitizer input modules of the master and the slave ViewScape digitizer 6 Loop ...

Page 40: ...6 Configuration Schemes 36 R5976474 VIEWSCAPE DIGITIZER 26022003 ...

Page 41: ...R5976476 for more information about the ViewScape Toolset 7 2 Version Control Manager VCM General introduction The Version Control Manager R9850044 is a stand alone program to update the software and firmware of ViewScape Digitizer The software runs from CD ROM and acts like a wizard So no installation is required The software runs on a Windows platform Refer to the manual R5976407 for more inform...

Page 42: ...7 Control Software 38 R5976474 VIEWSCAPE DIGITIZER 26022003 ...

Page 43: ...ine or abrasive cleaners since these will damage the cabinet How to clean the cabinet 1 Unplug the ViewScape Digitizer from the wall outlet before cleaning 2 Clean the cabinet with a damp cloth Stubborn stains may be removed with a cloth lightly dampened with mild detergent solution To keep the cabinet looking brand new periodically clean it with a soft dry cloth R5976474 VIEWSCAPE DIGITIZER 26022...

Page 44: ...8 Maintenance of the ViewScape digitizer 40 R5976474 VIEWSCAPE DIGITIZER 26022003 ...

Page 45: ...und 24 no background 23 overlapped background 23 Connections 11 ViewScape 11 Control Software 37 I Input module 13 15 16 18 20 CVBS S VID 18 Dummy 20 DVI 15 HDSDI 16 Insert 13 Remove 13 RGB analog 19 SDI 16 YUV RG s B 18 Introduction 7 ViewScape 7 M Maintenance 39 O Order info 7 ViewScape 7 S Safety 3 4 Important Instructions 3 Warnings 4 Software 37 VCM 37 ViewScape Toolset 37 V ViewScape 7 9 11 ...

Page 46: ...Index 42 R5976474 VIEWSCAPE DIGITIZER 26022003 ...

Page 47: ...ordlaan 5 B 8520 Kuurne Phone 32 56 36 89 70 Fax 32 56 36 88 24 E mail antoon dejaegher barco com Web www barco com From Date Please correct the following points in this documentation R5976474 00 page wrong correct R5976474 VIEWSCAPE DIGITIZER 26022003 ...

Reviews: